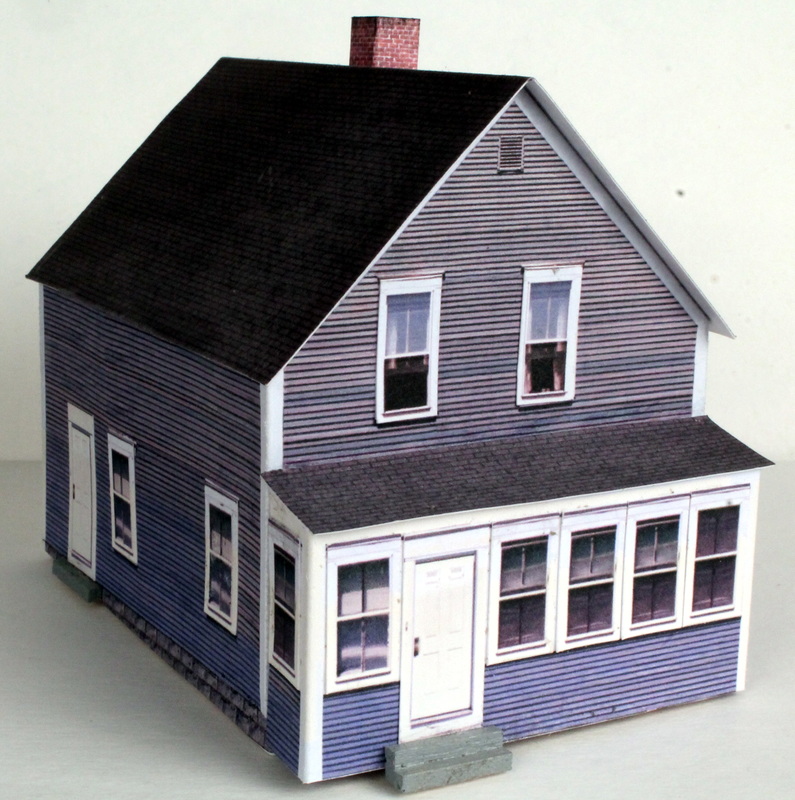
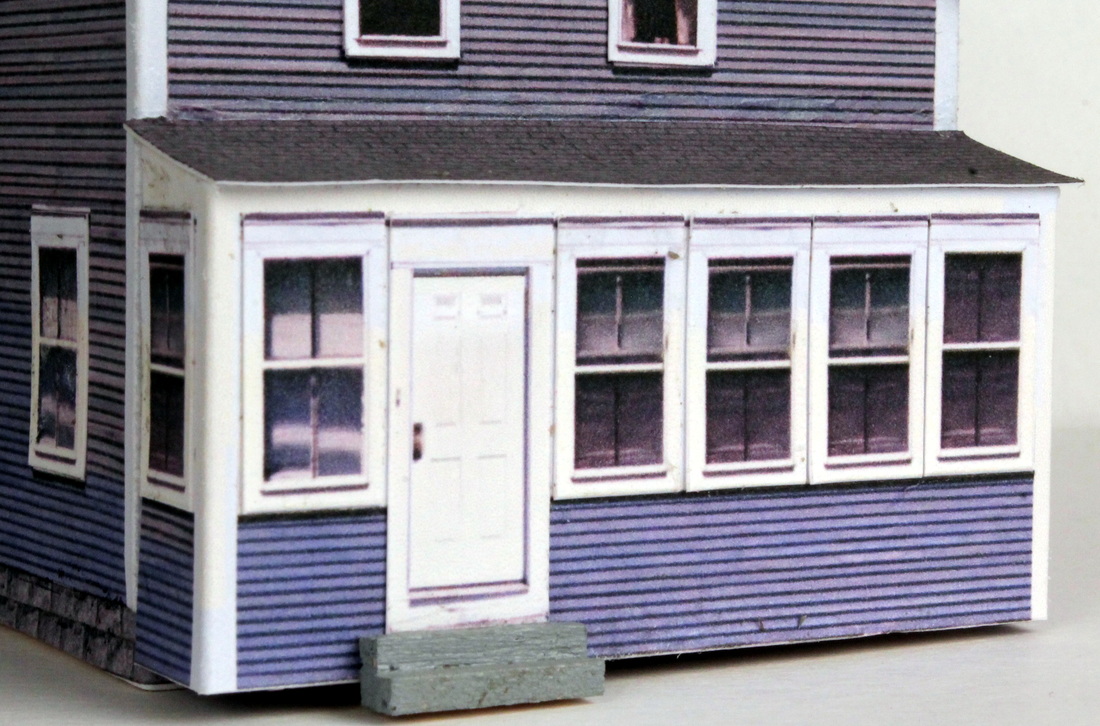
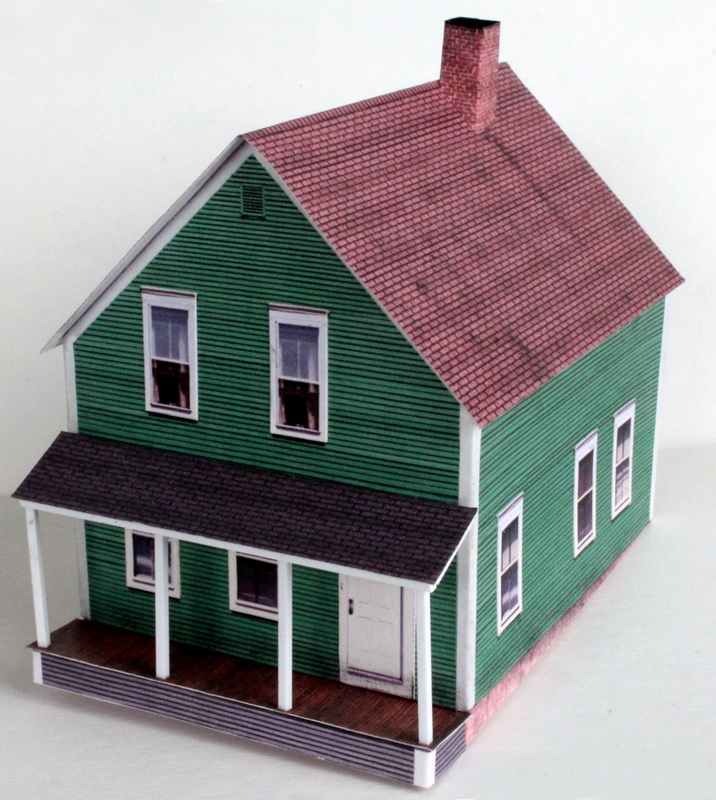
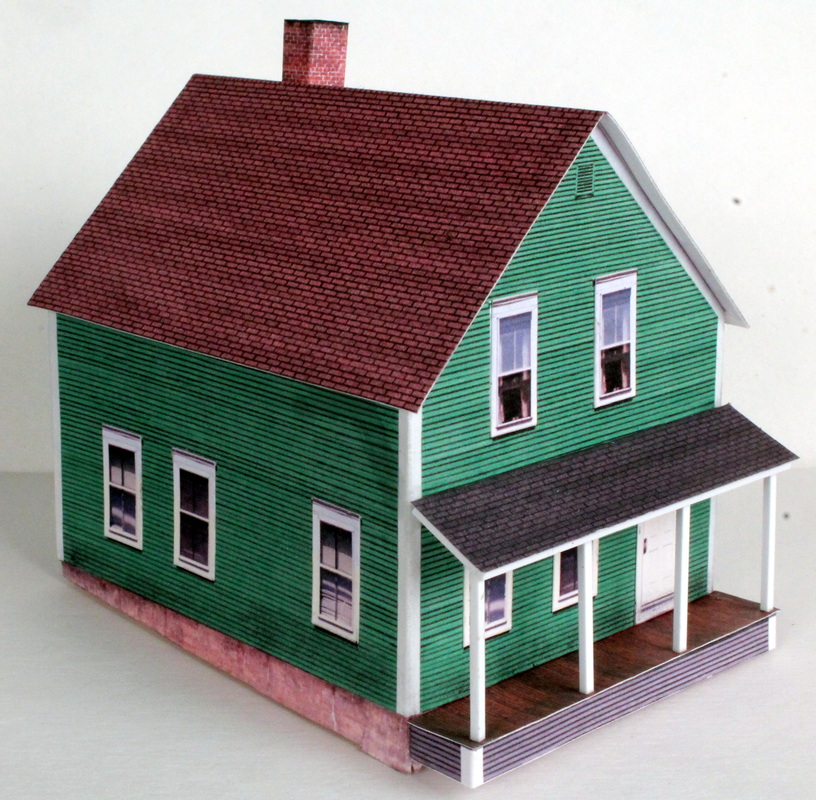
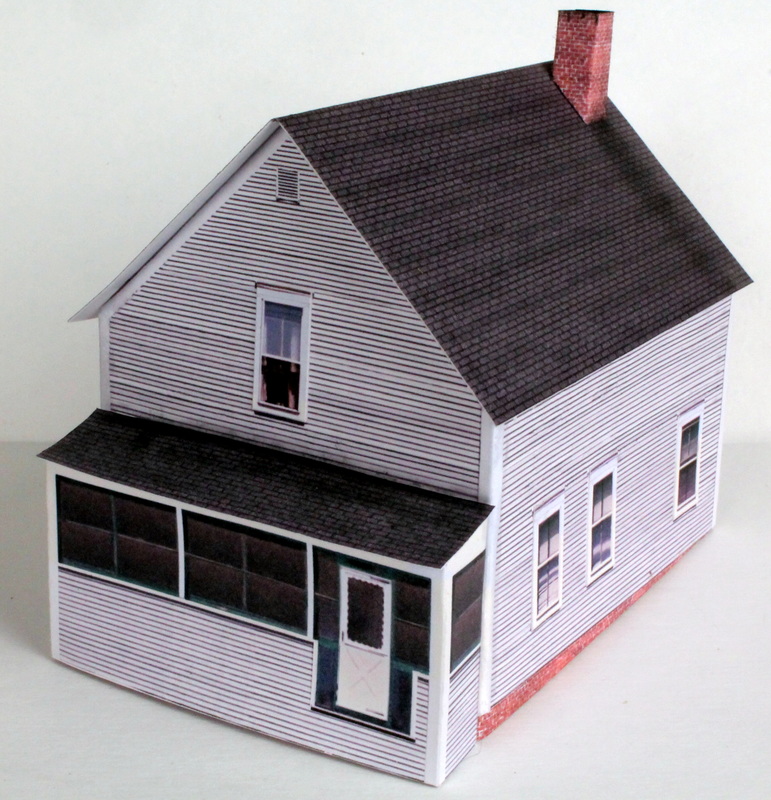
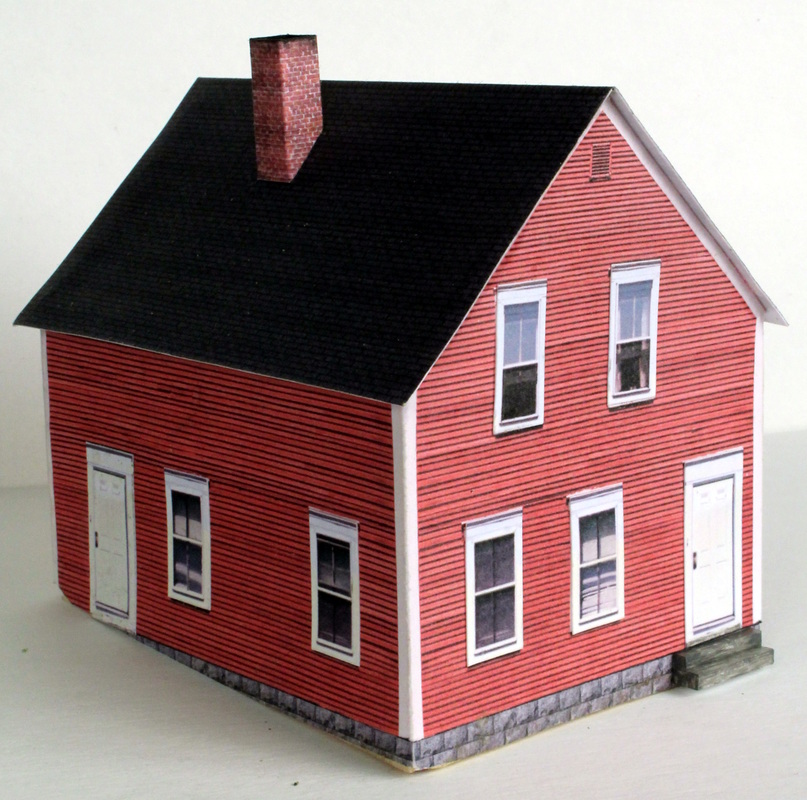
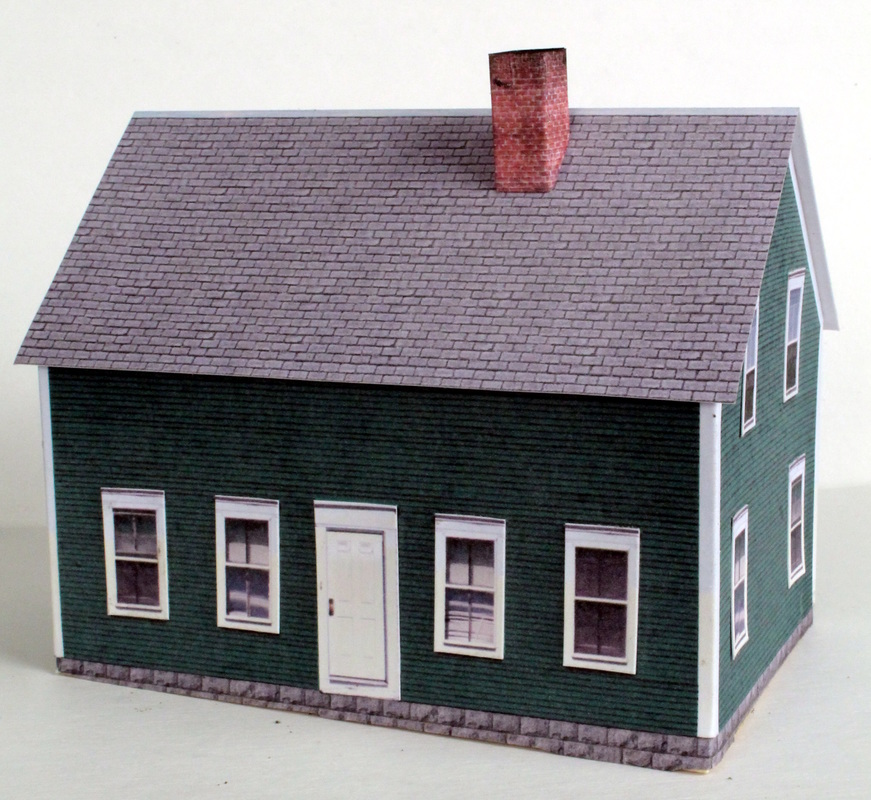
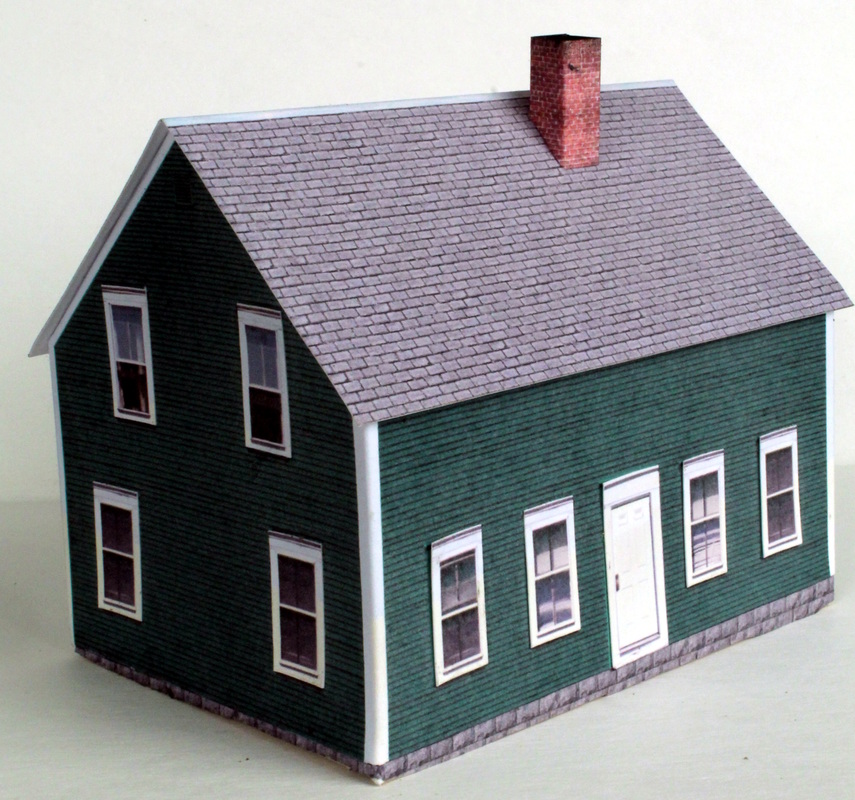
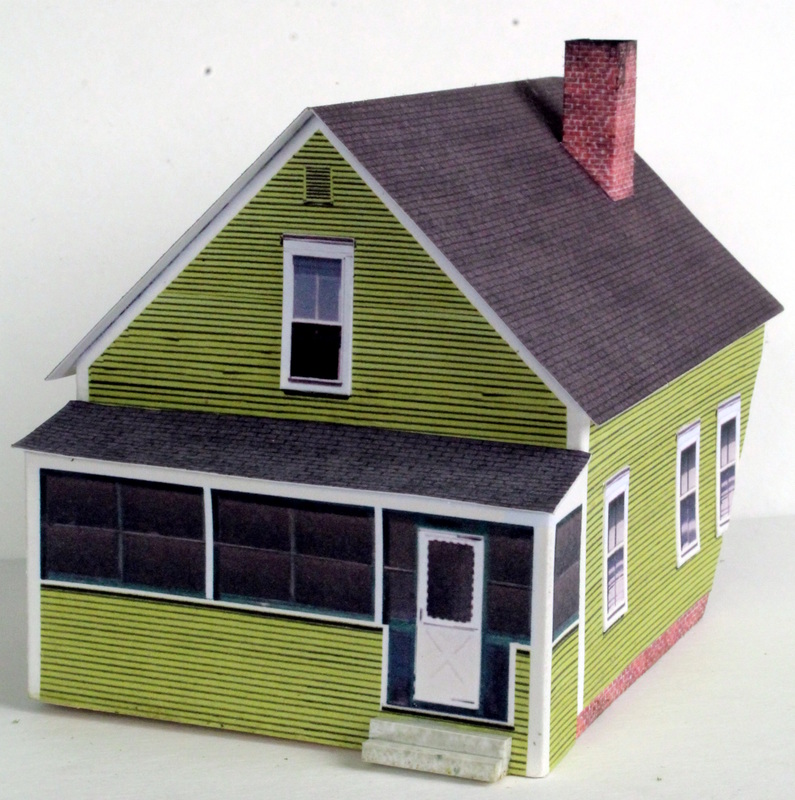
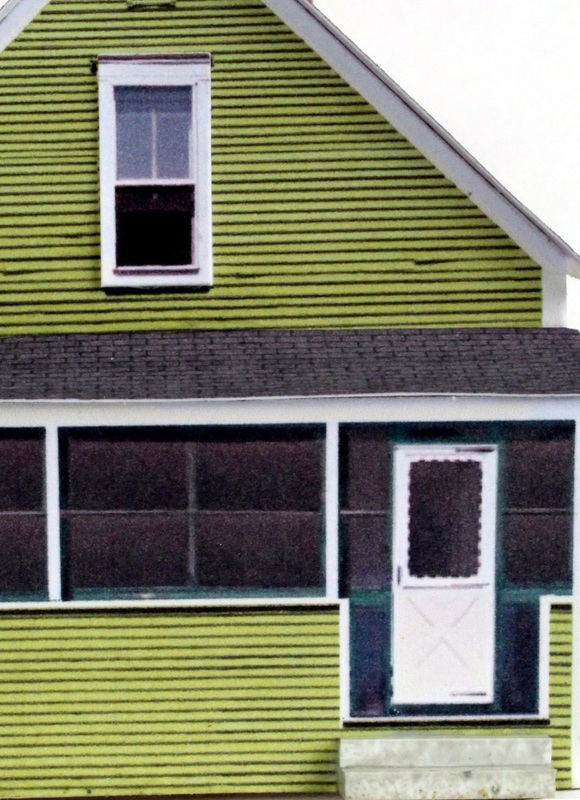
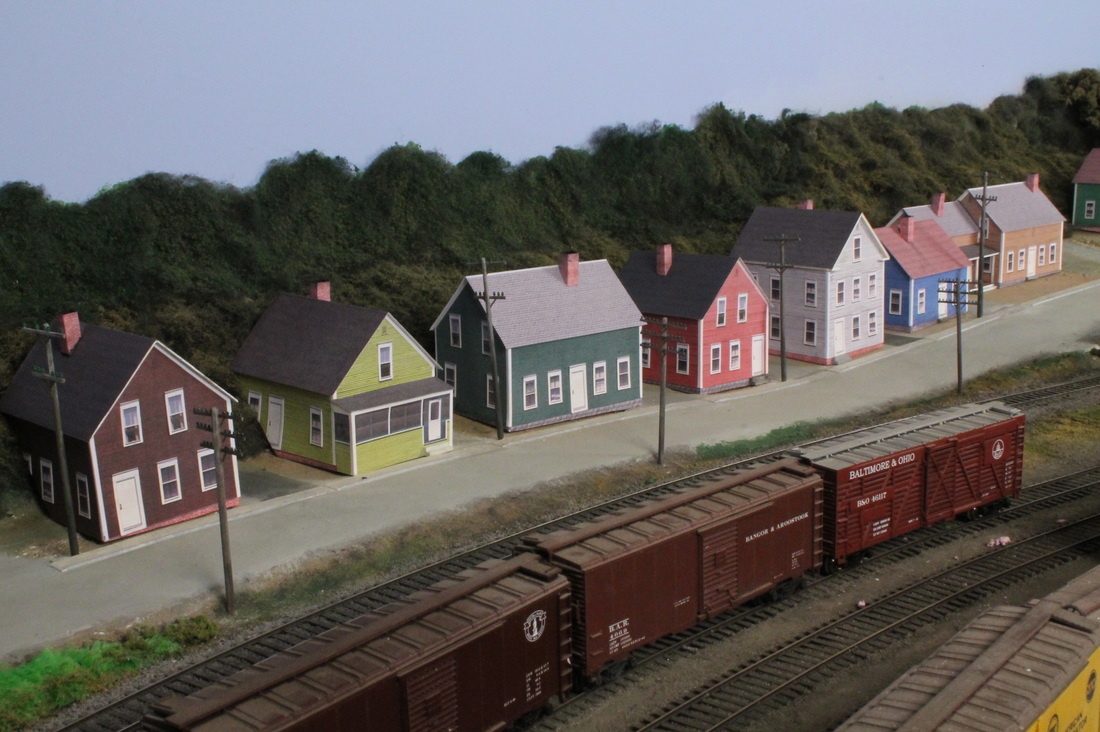
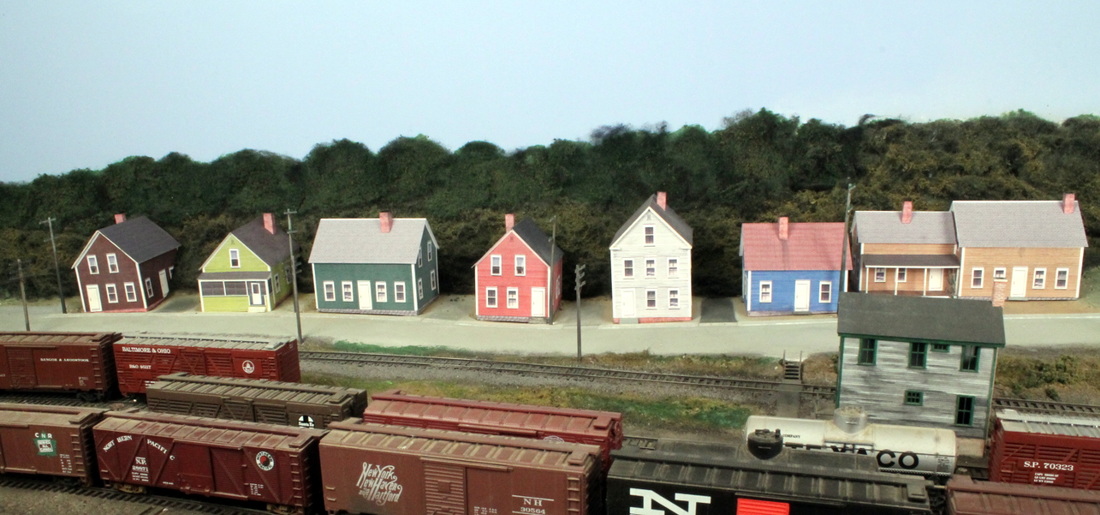
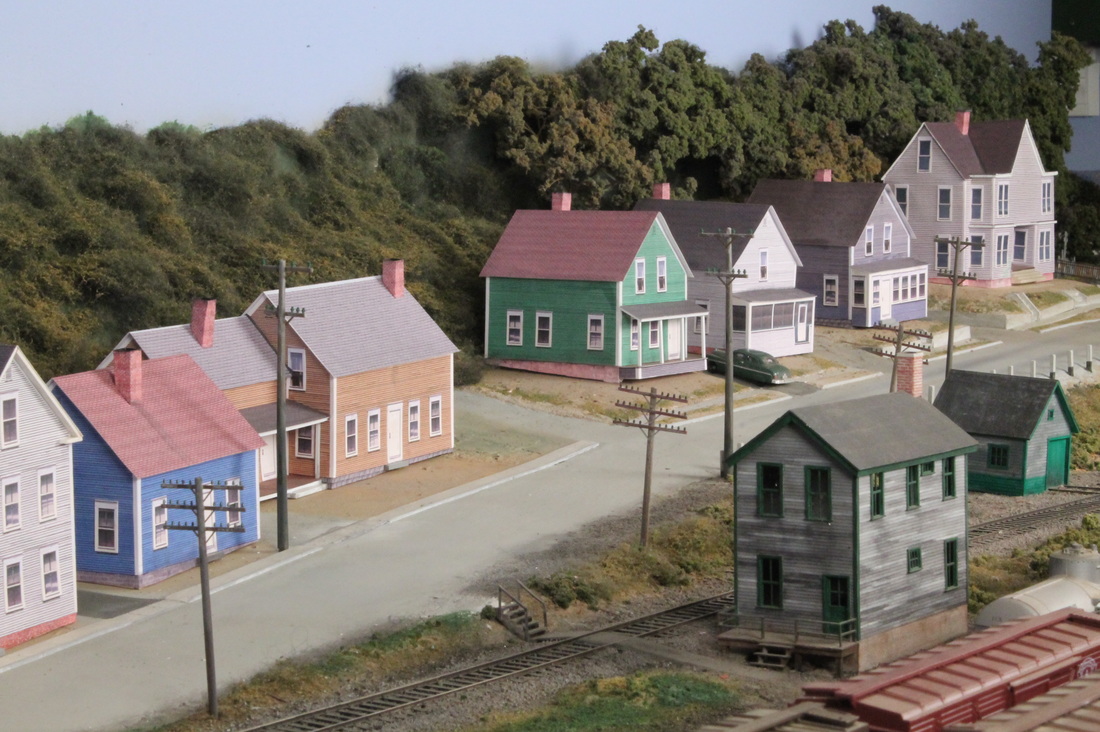
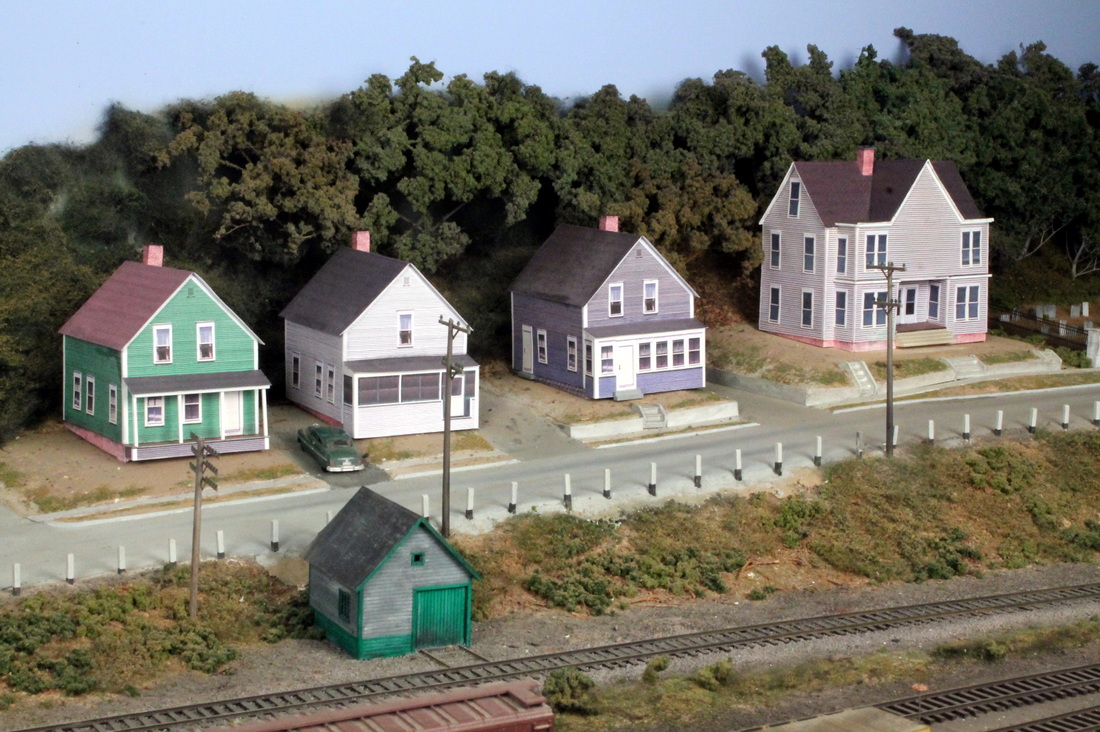
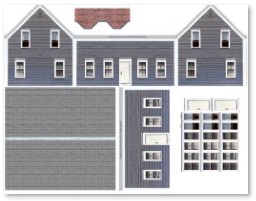
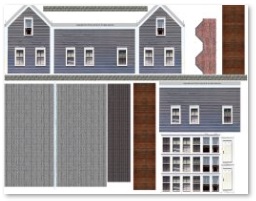
Photo Gallery


Downloads
|
|
|
| ||||
|
|
|
| ||||
|
|
|
| ||||
|
|
| ||||||
|
|
|
| ||||
|
|
|
| ||||
|
|
|
| ||||

|
|
|
| ||||

|
|
|
| ||||
Instructions
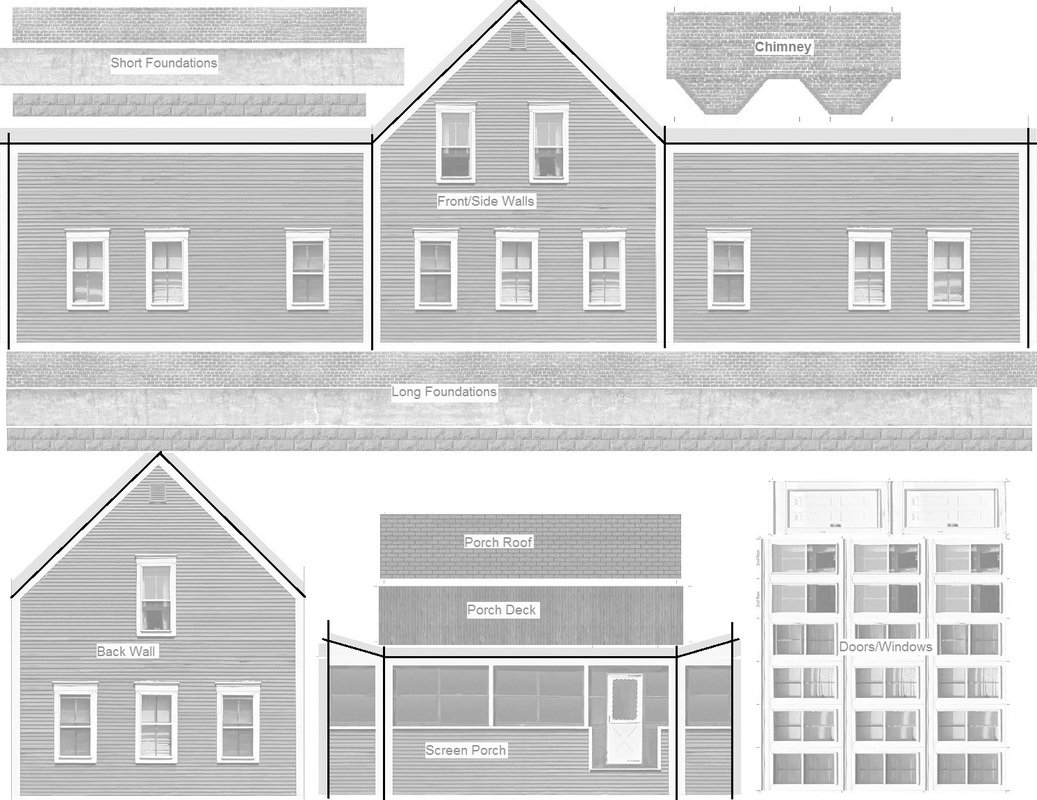
Introduction
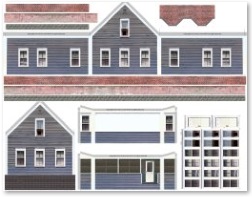
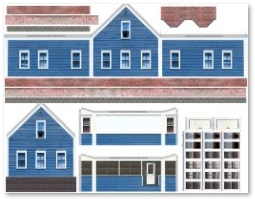
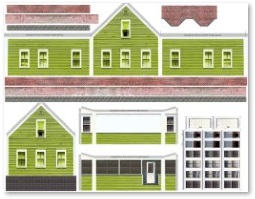
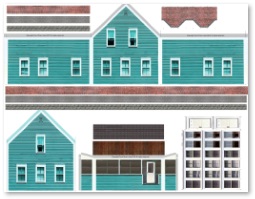
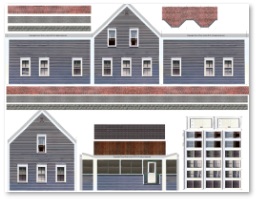
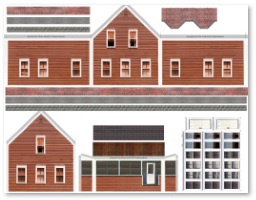
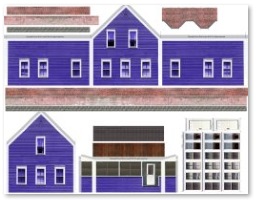
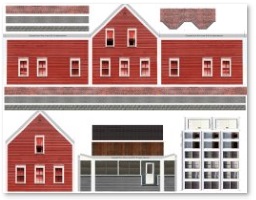
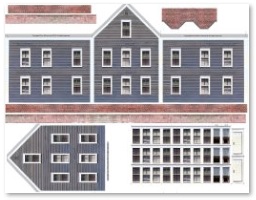
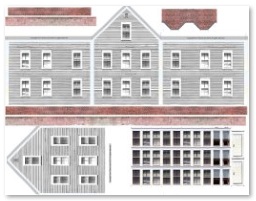
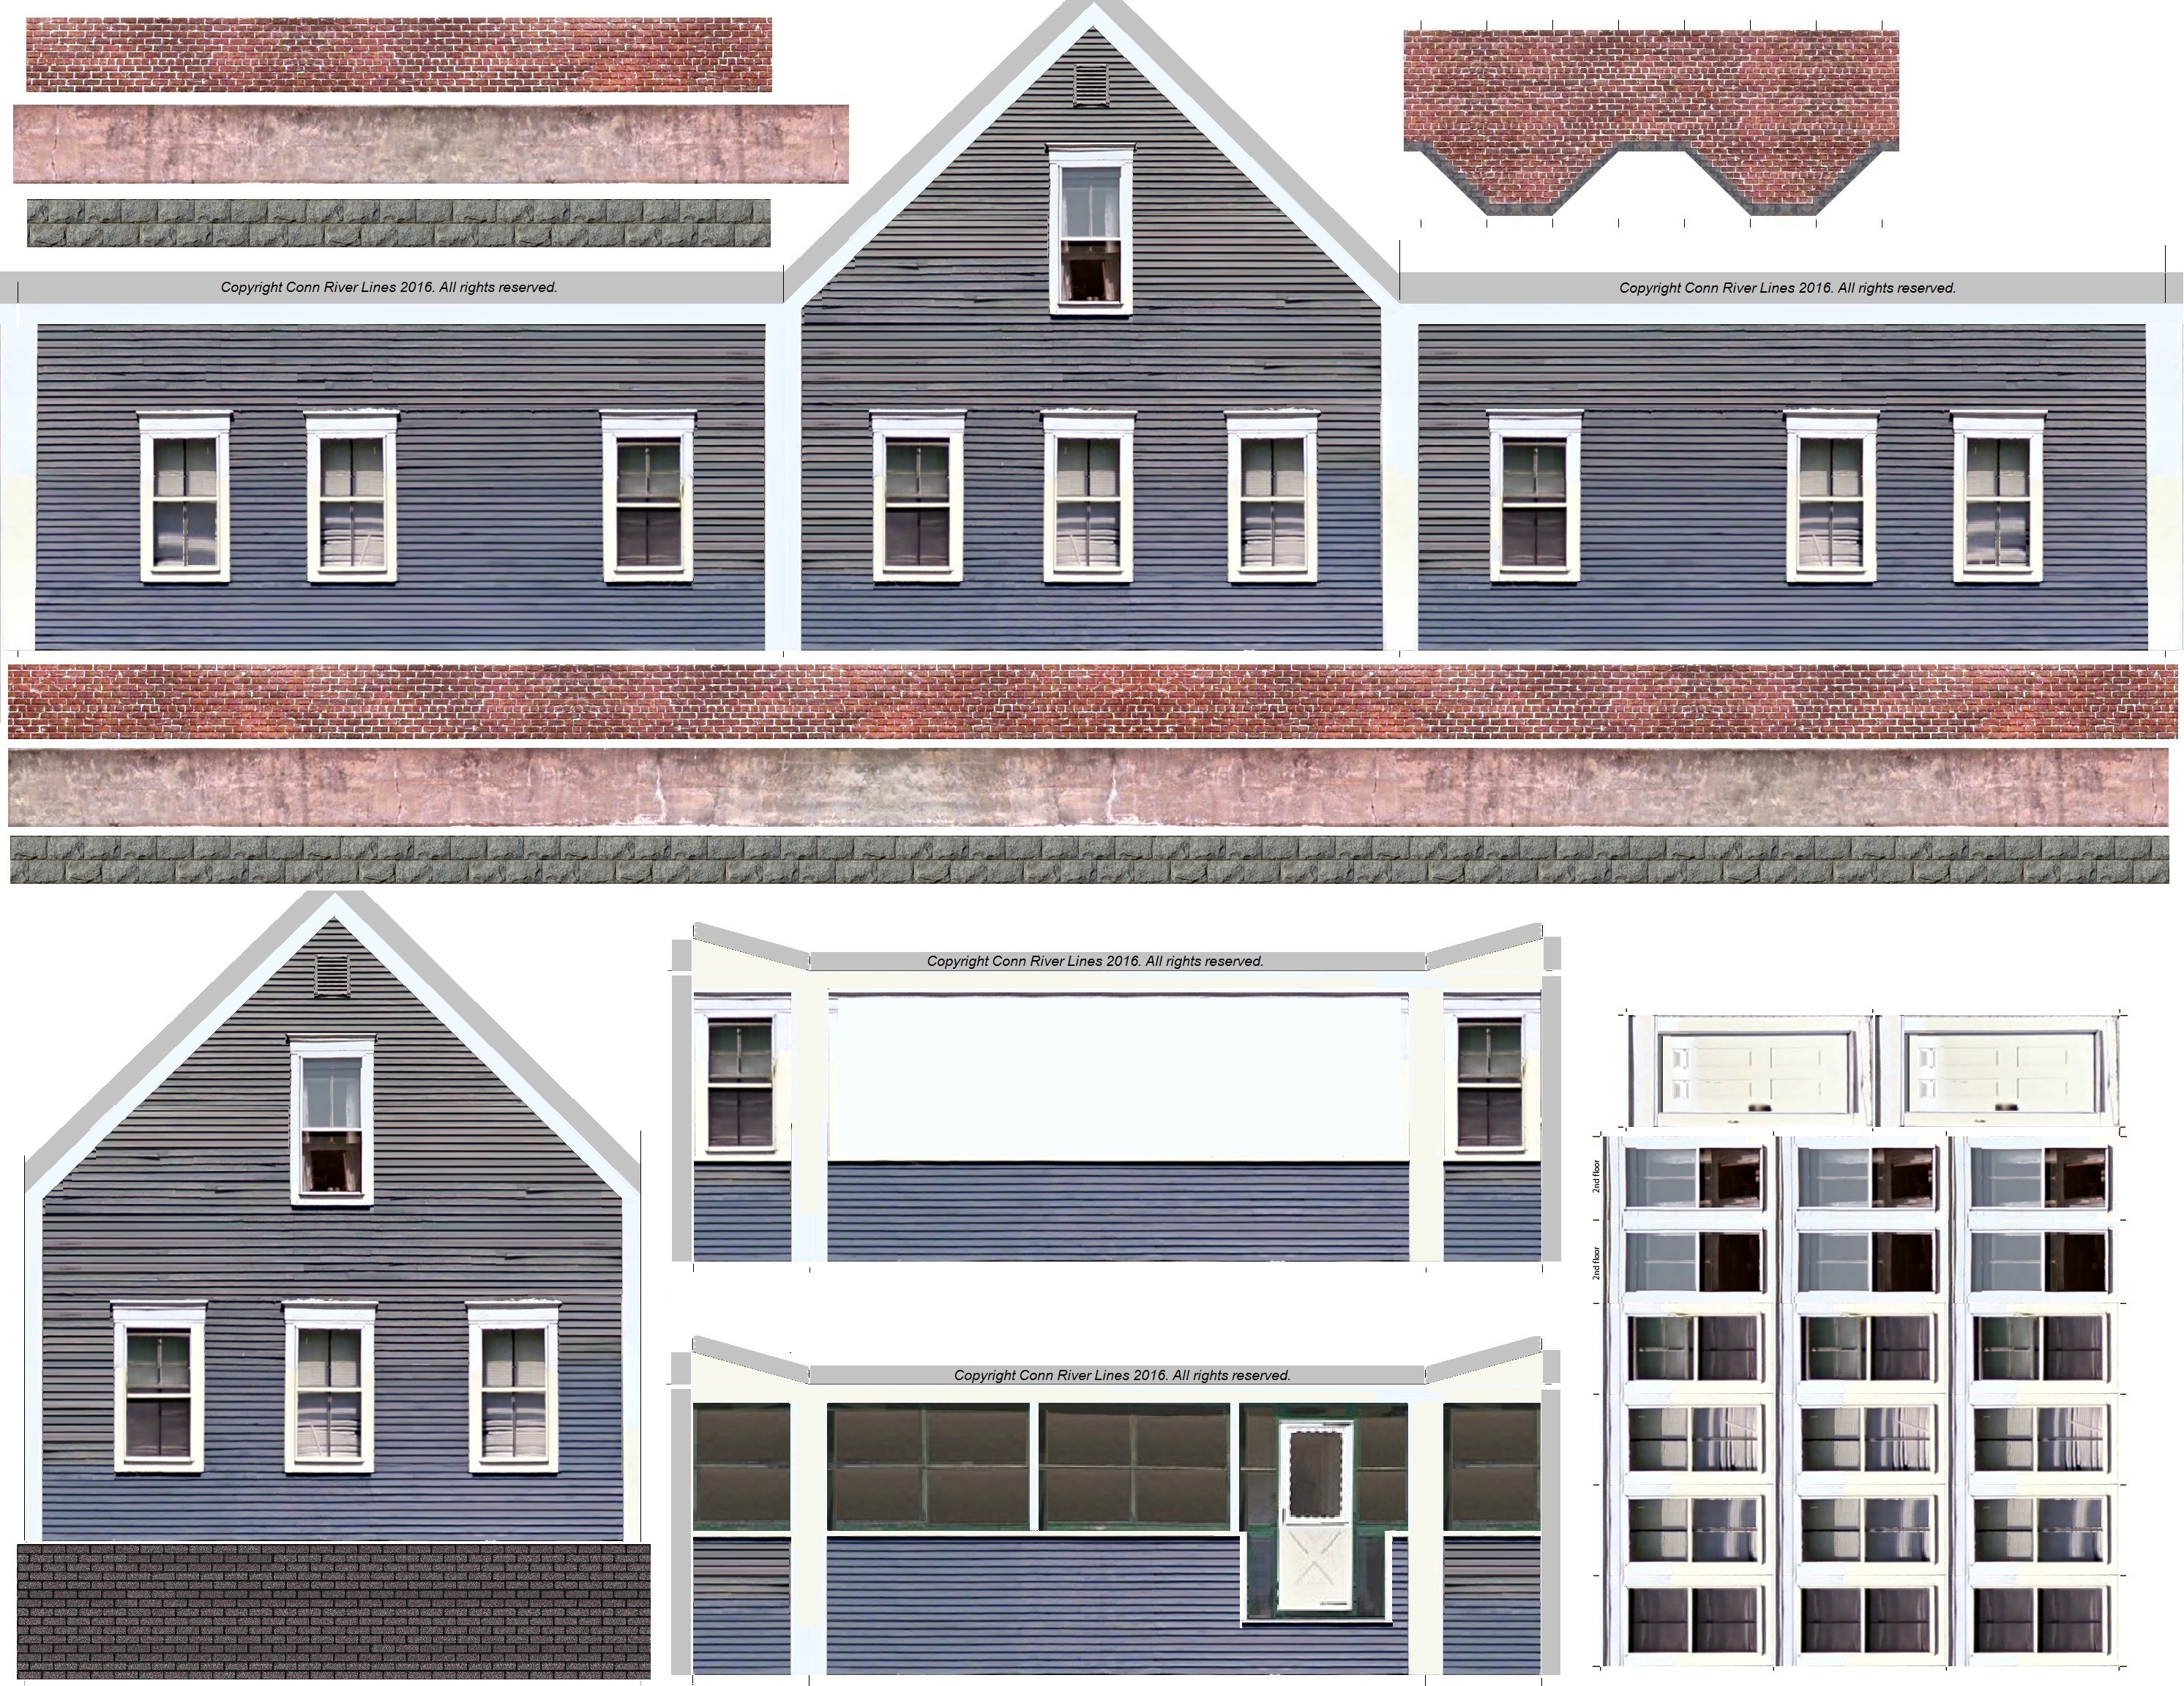
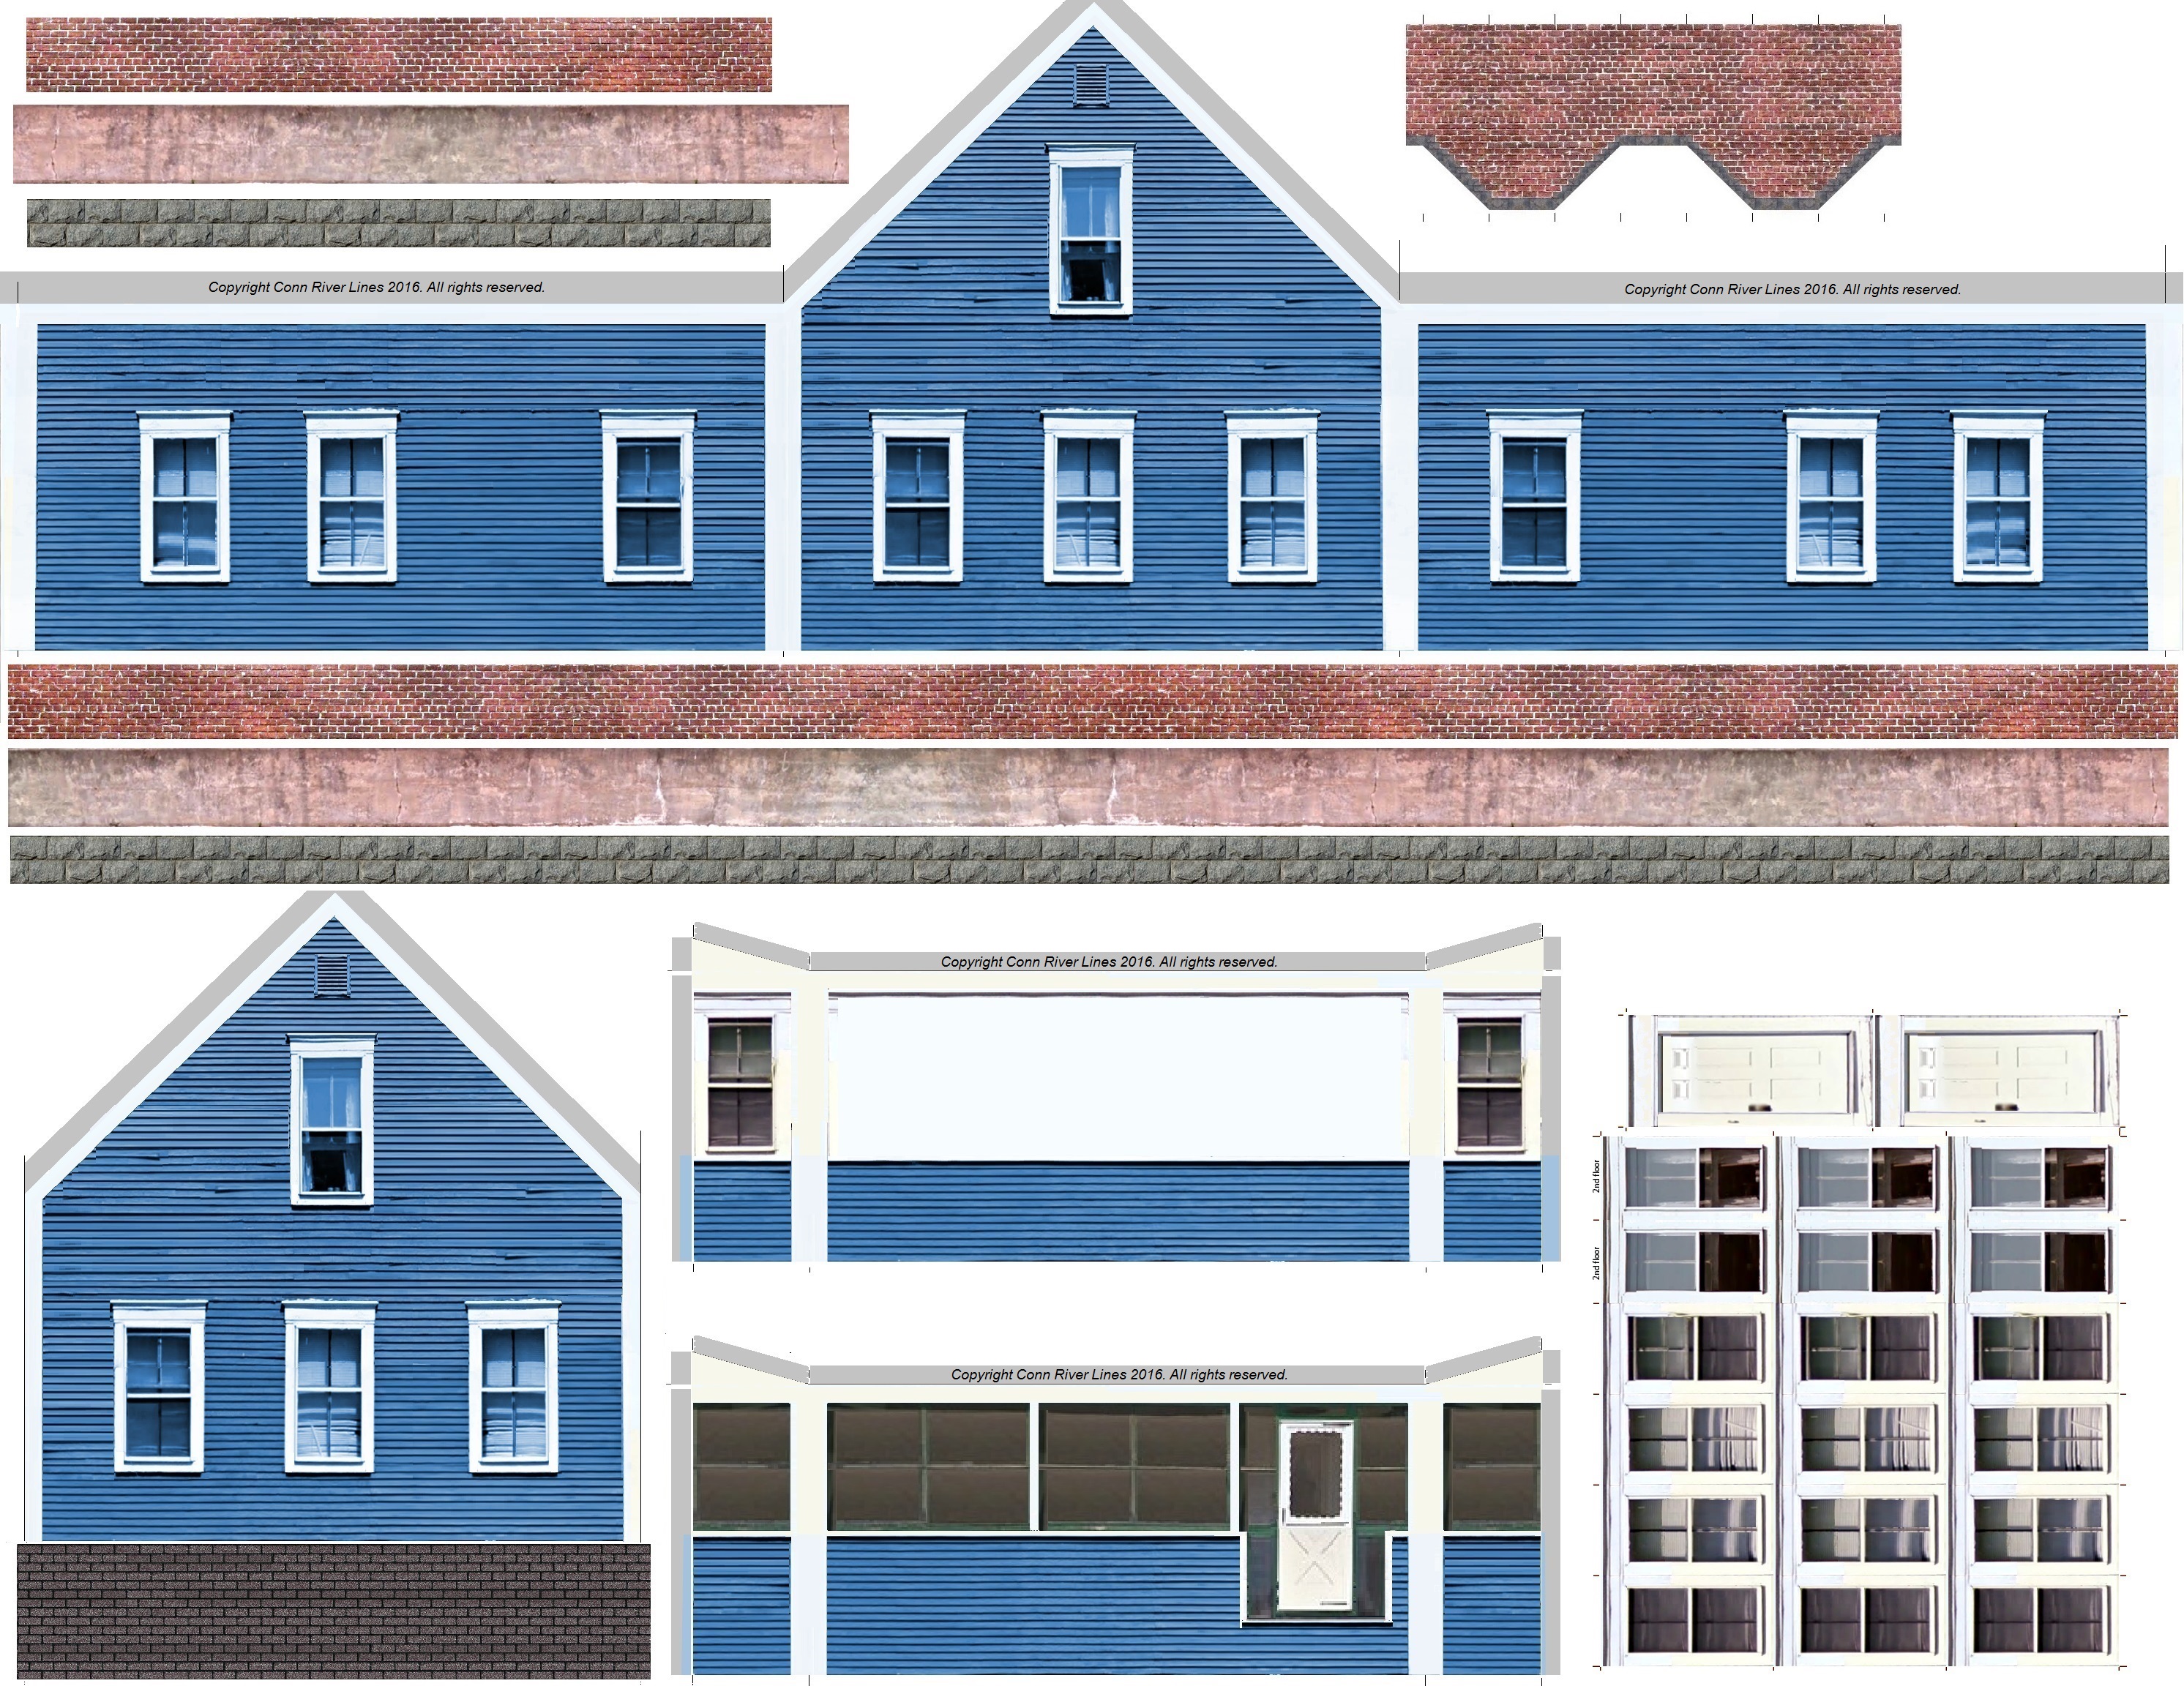
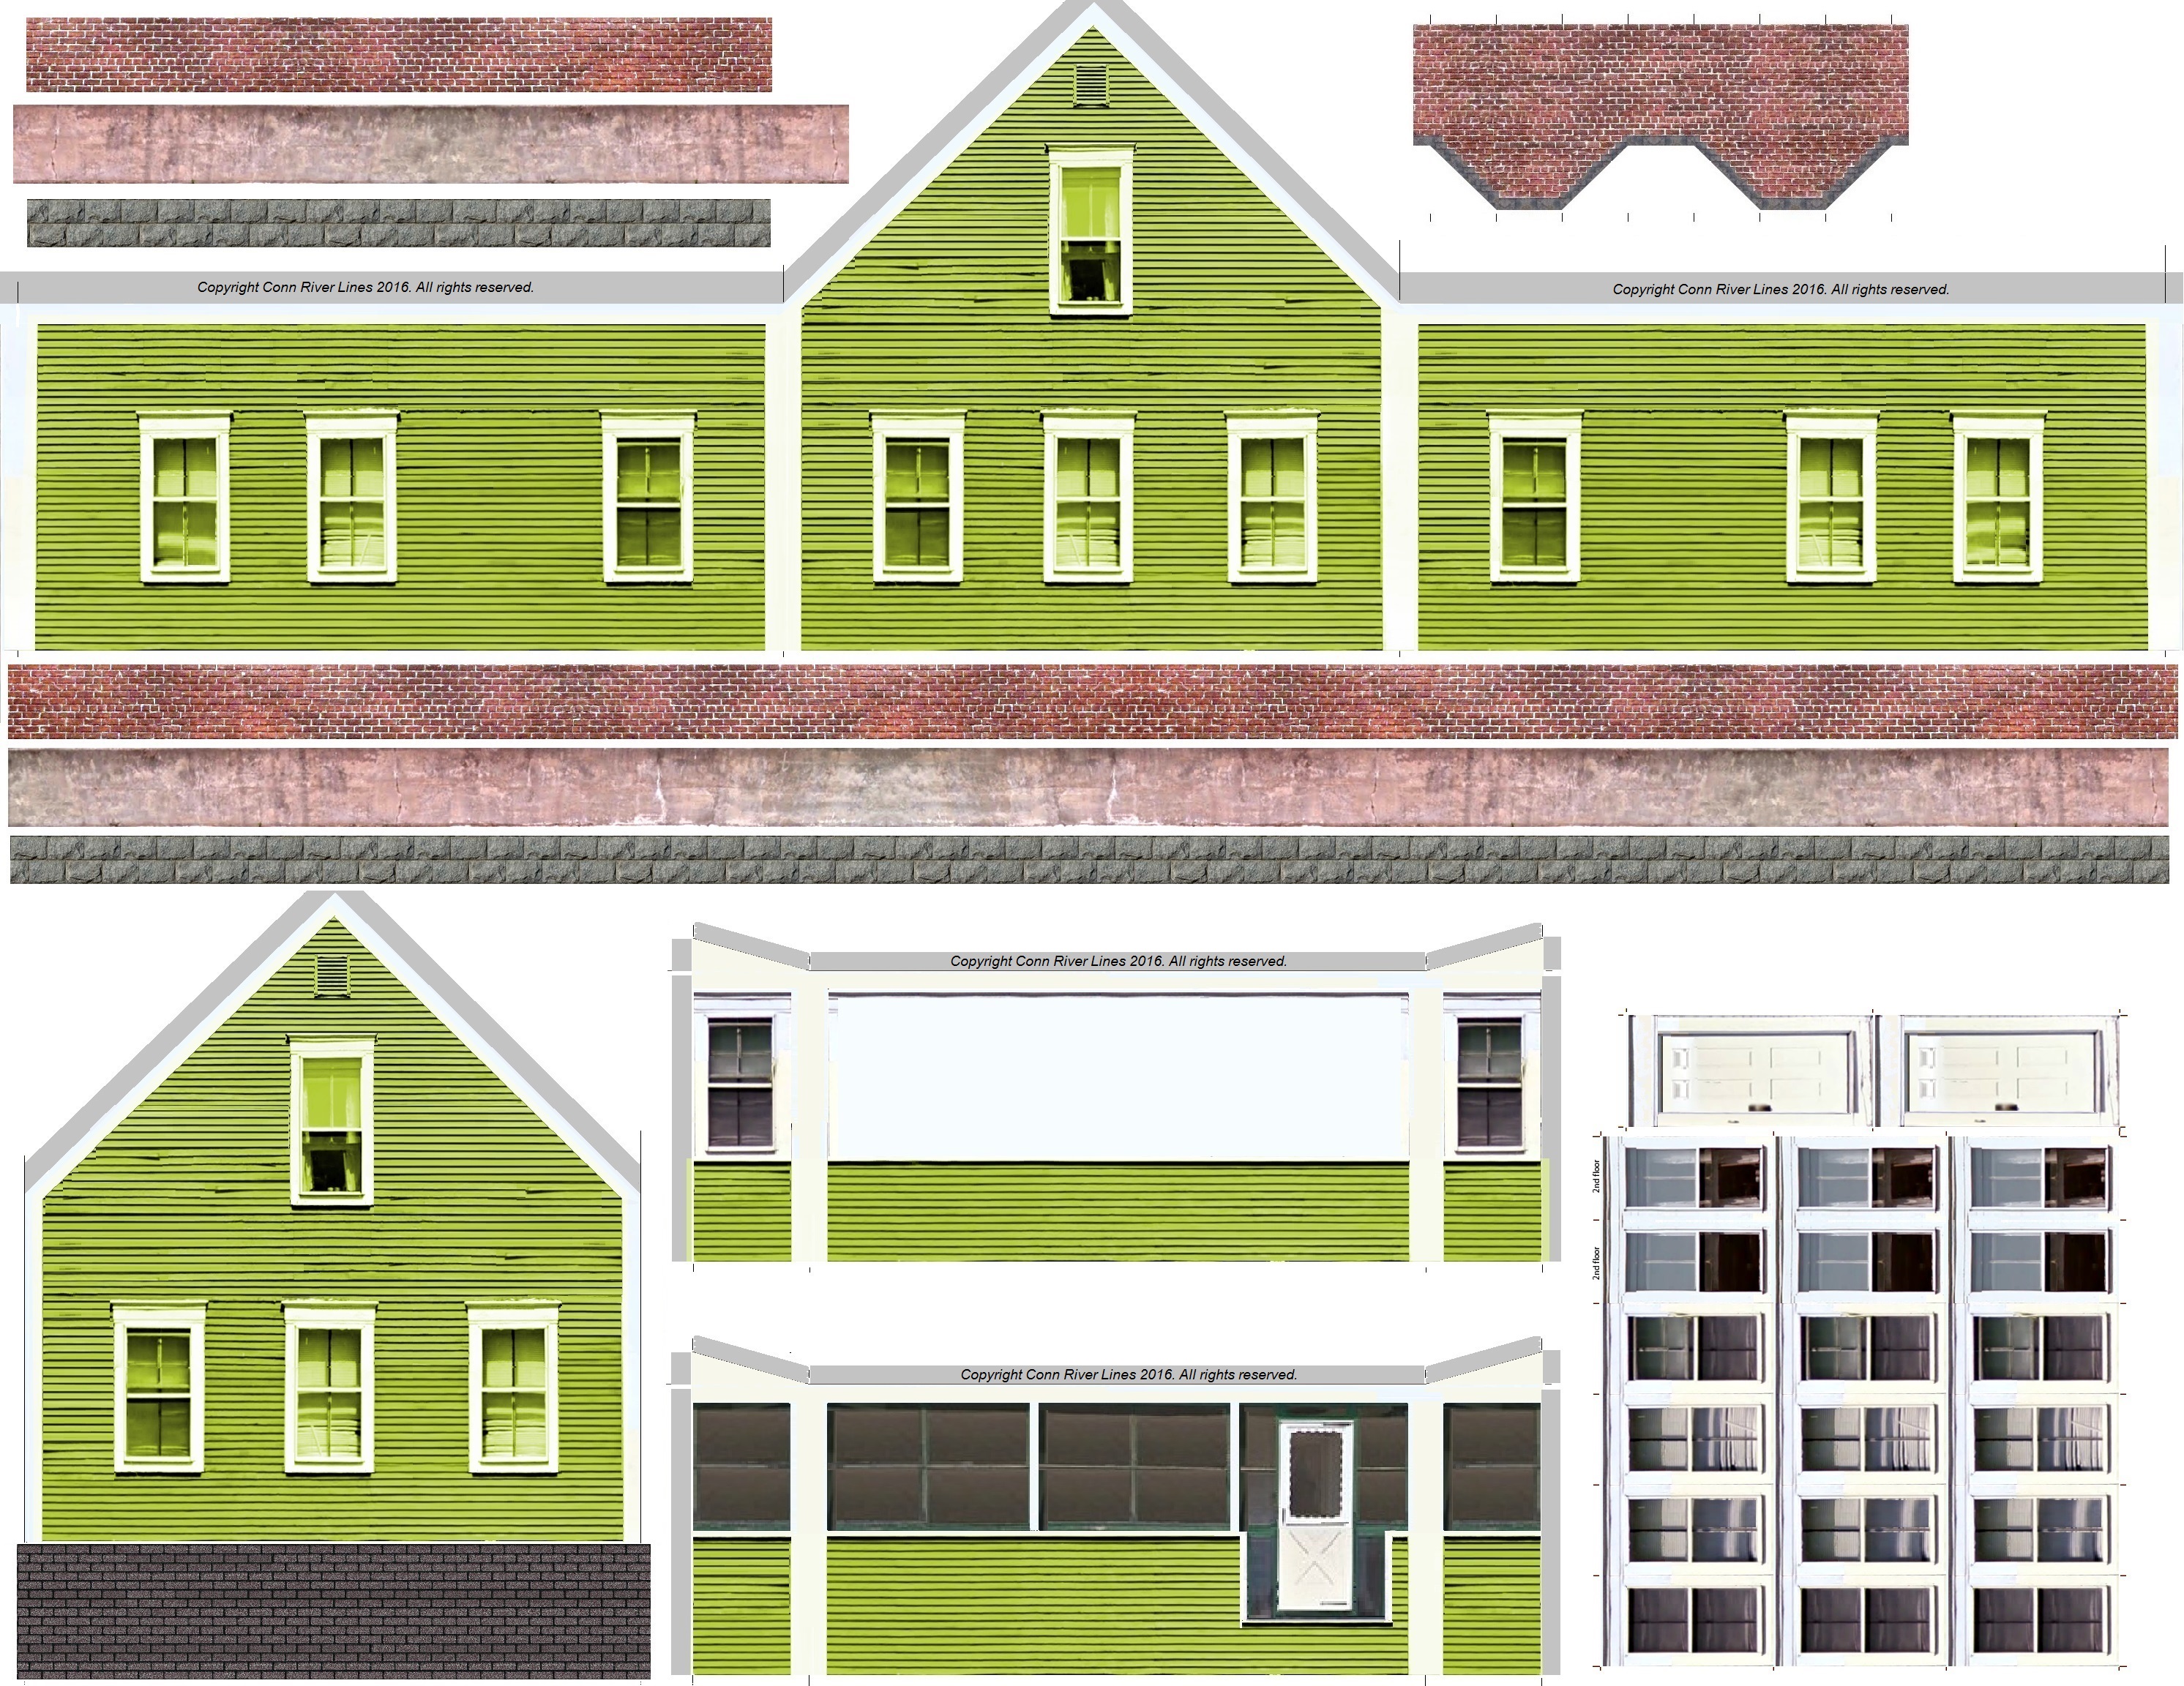
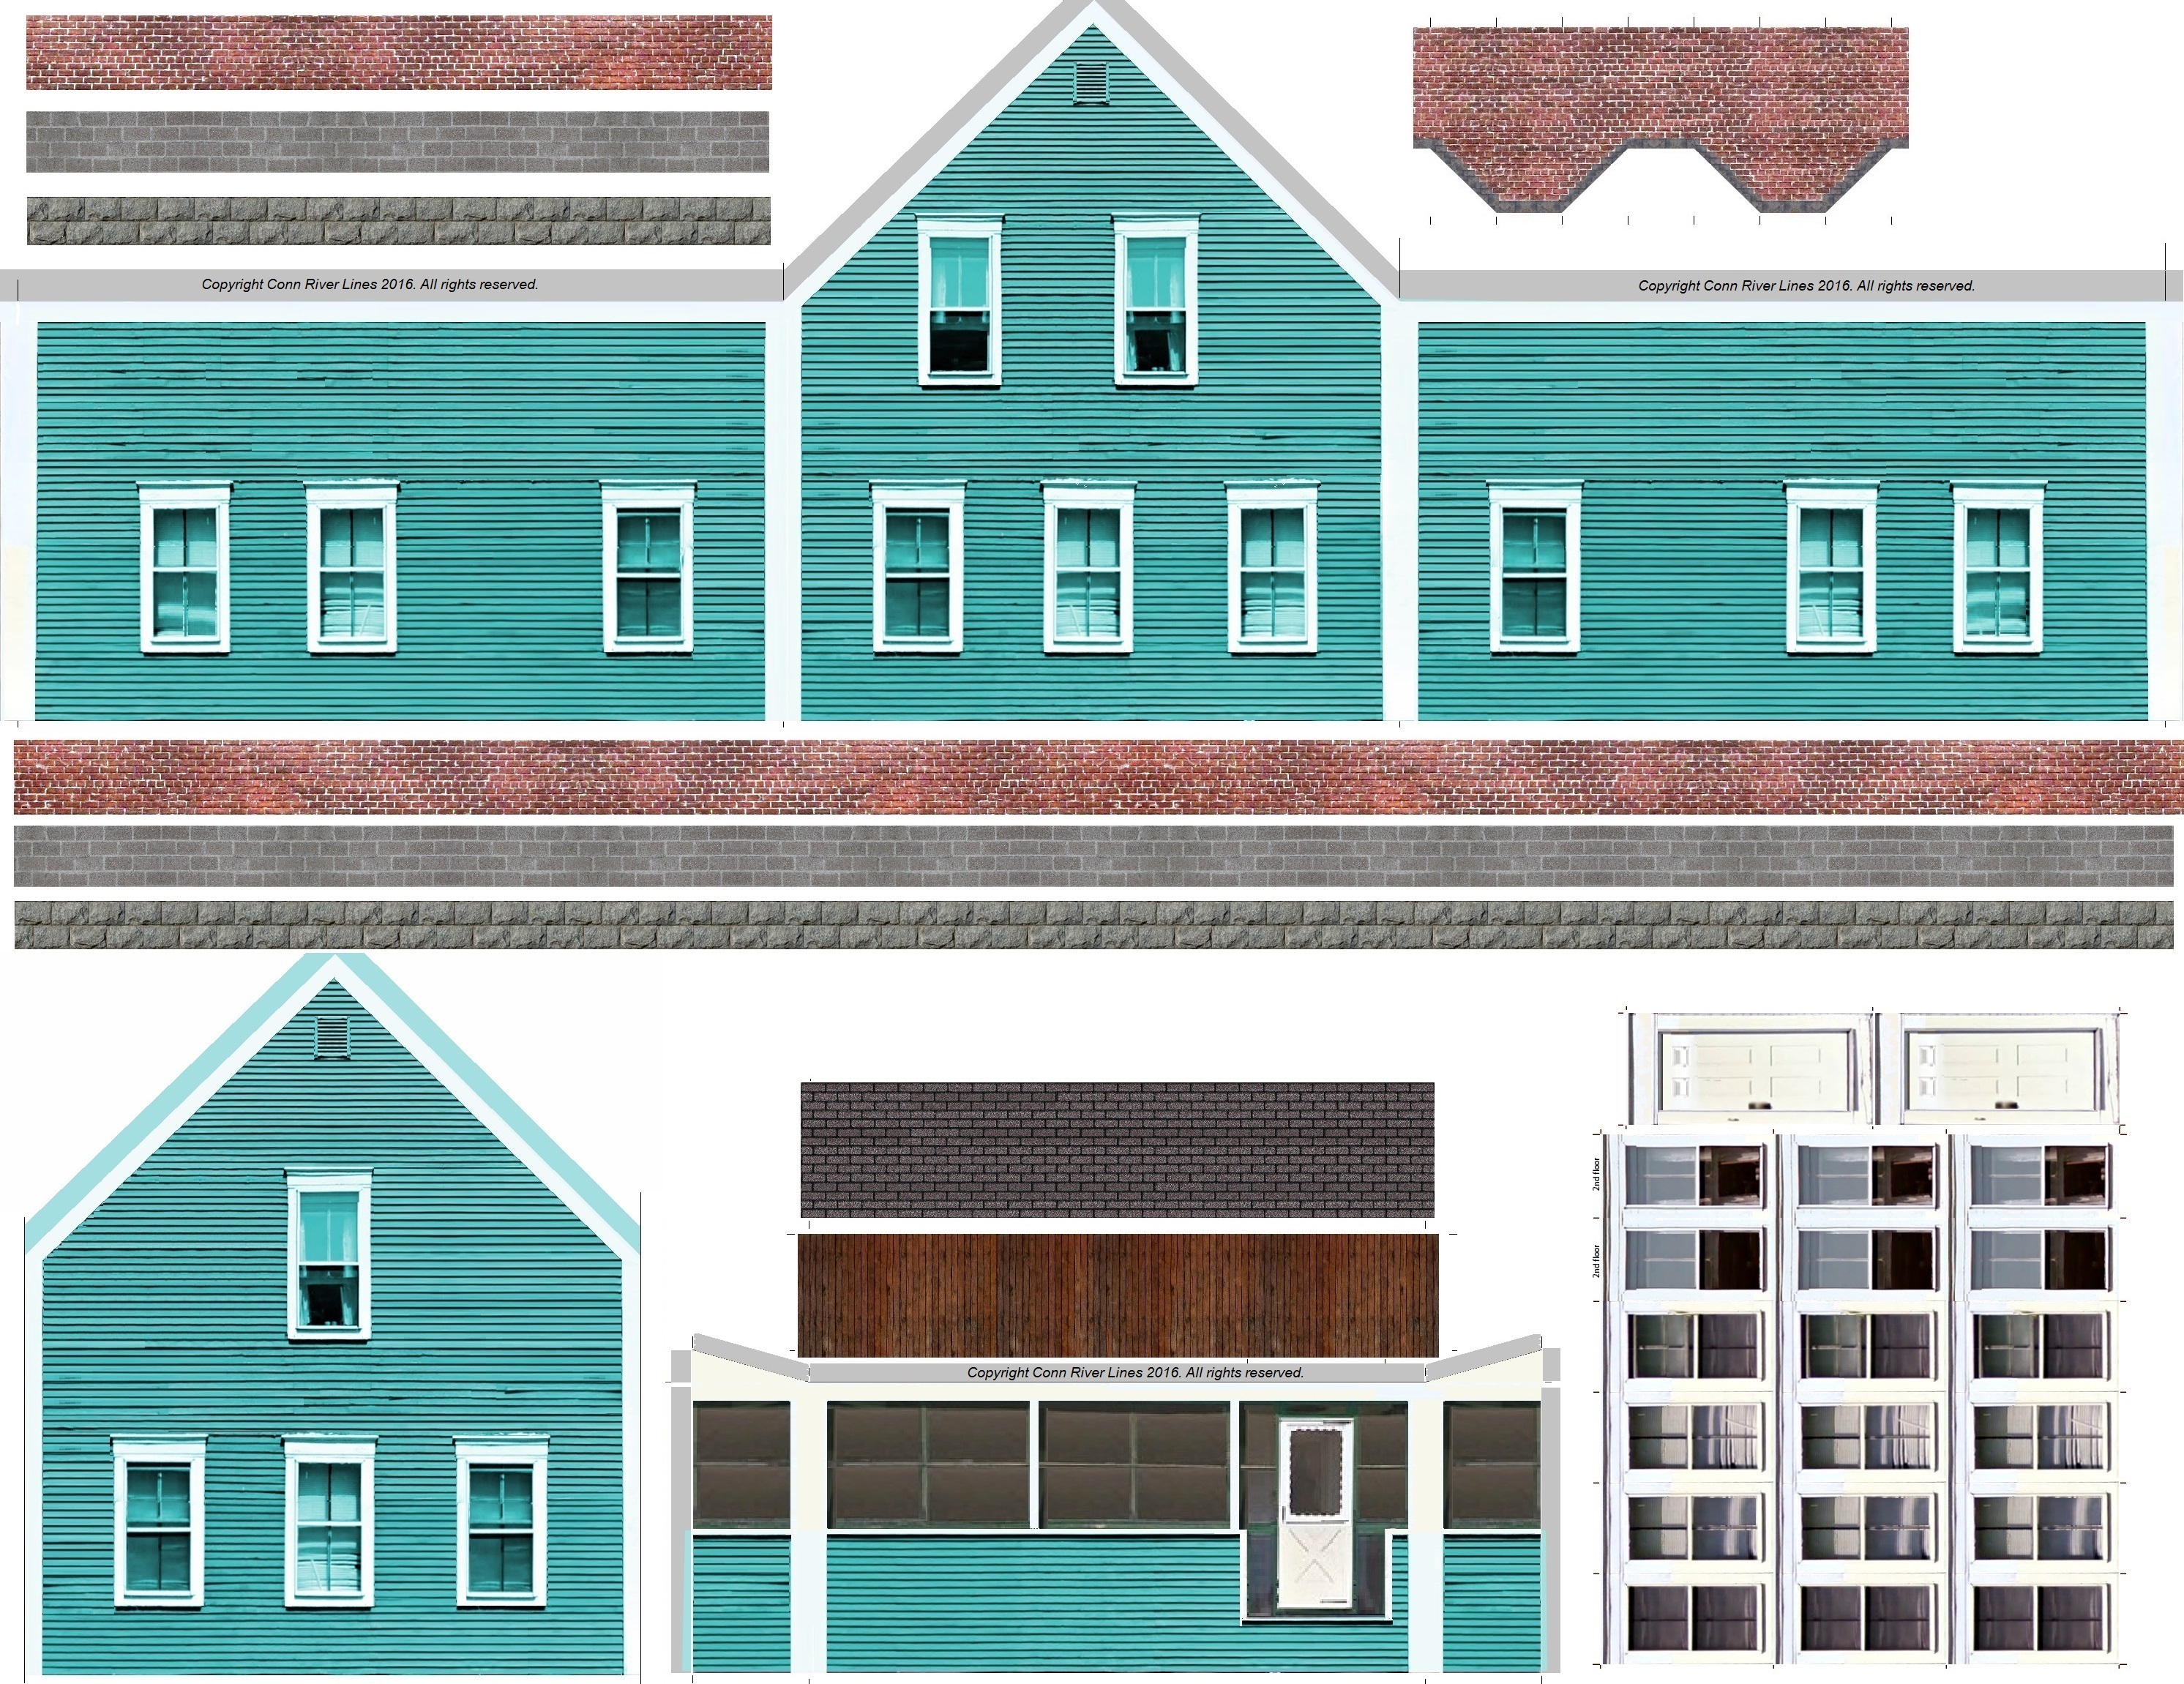
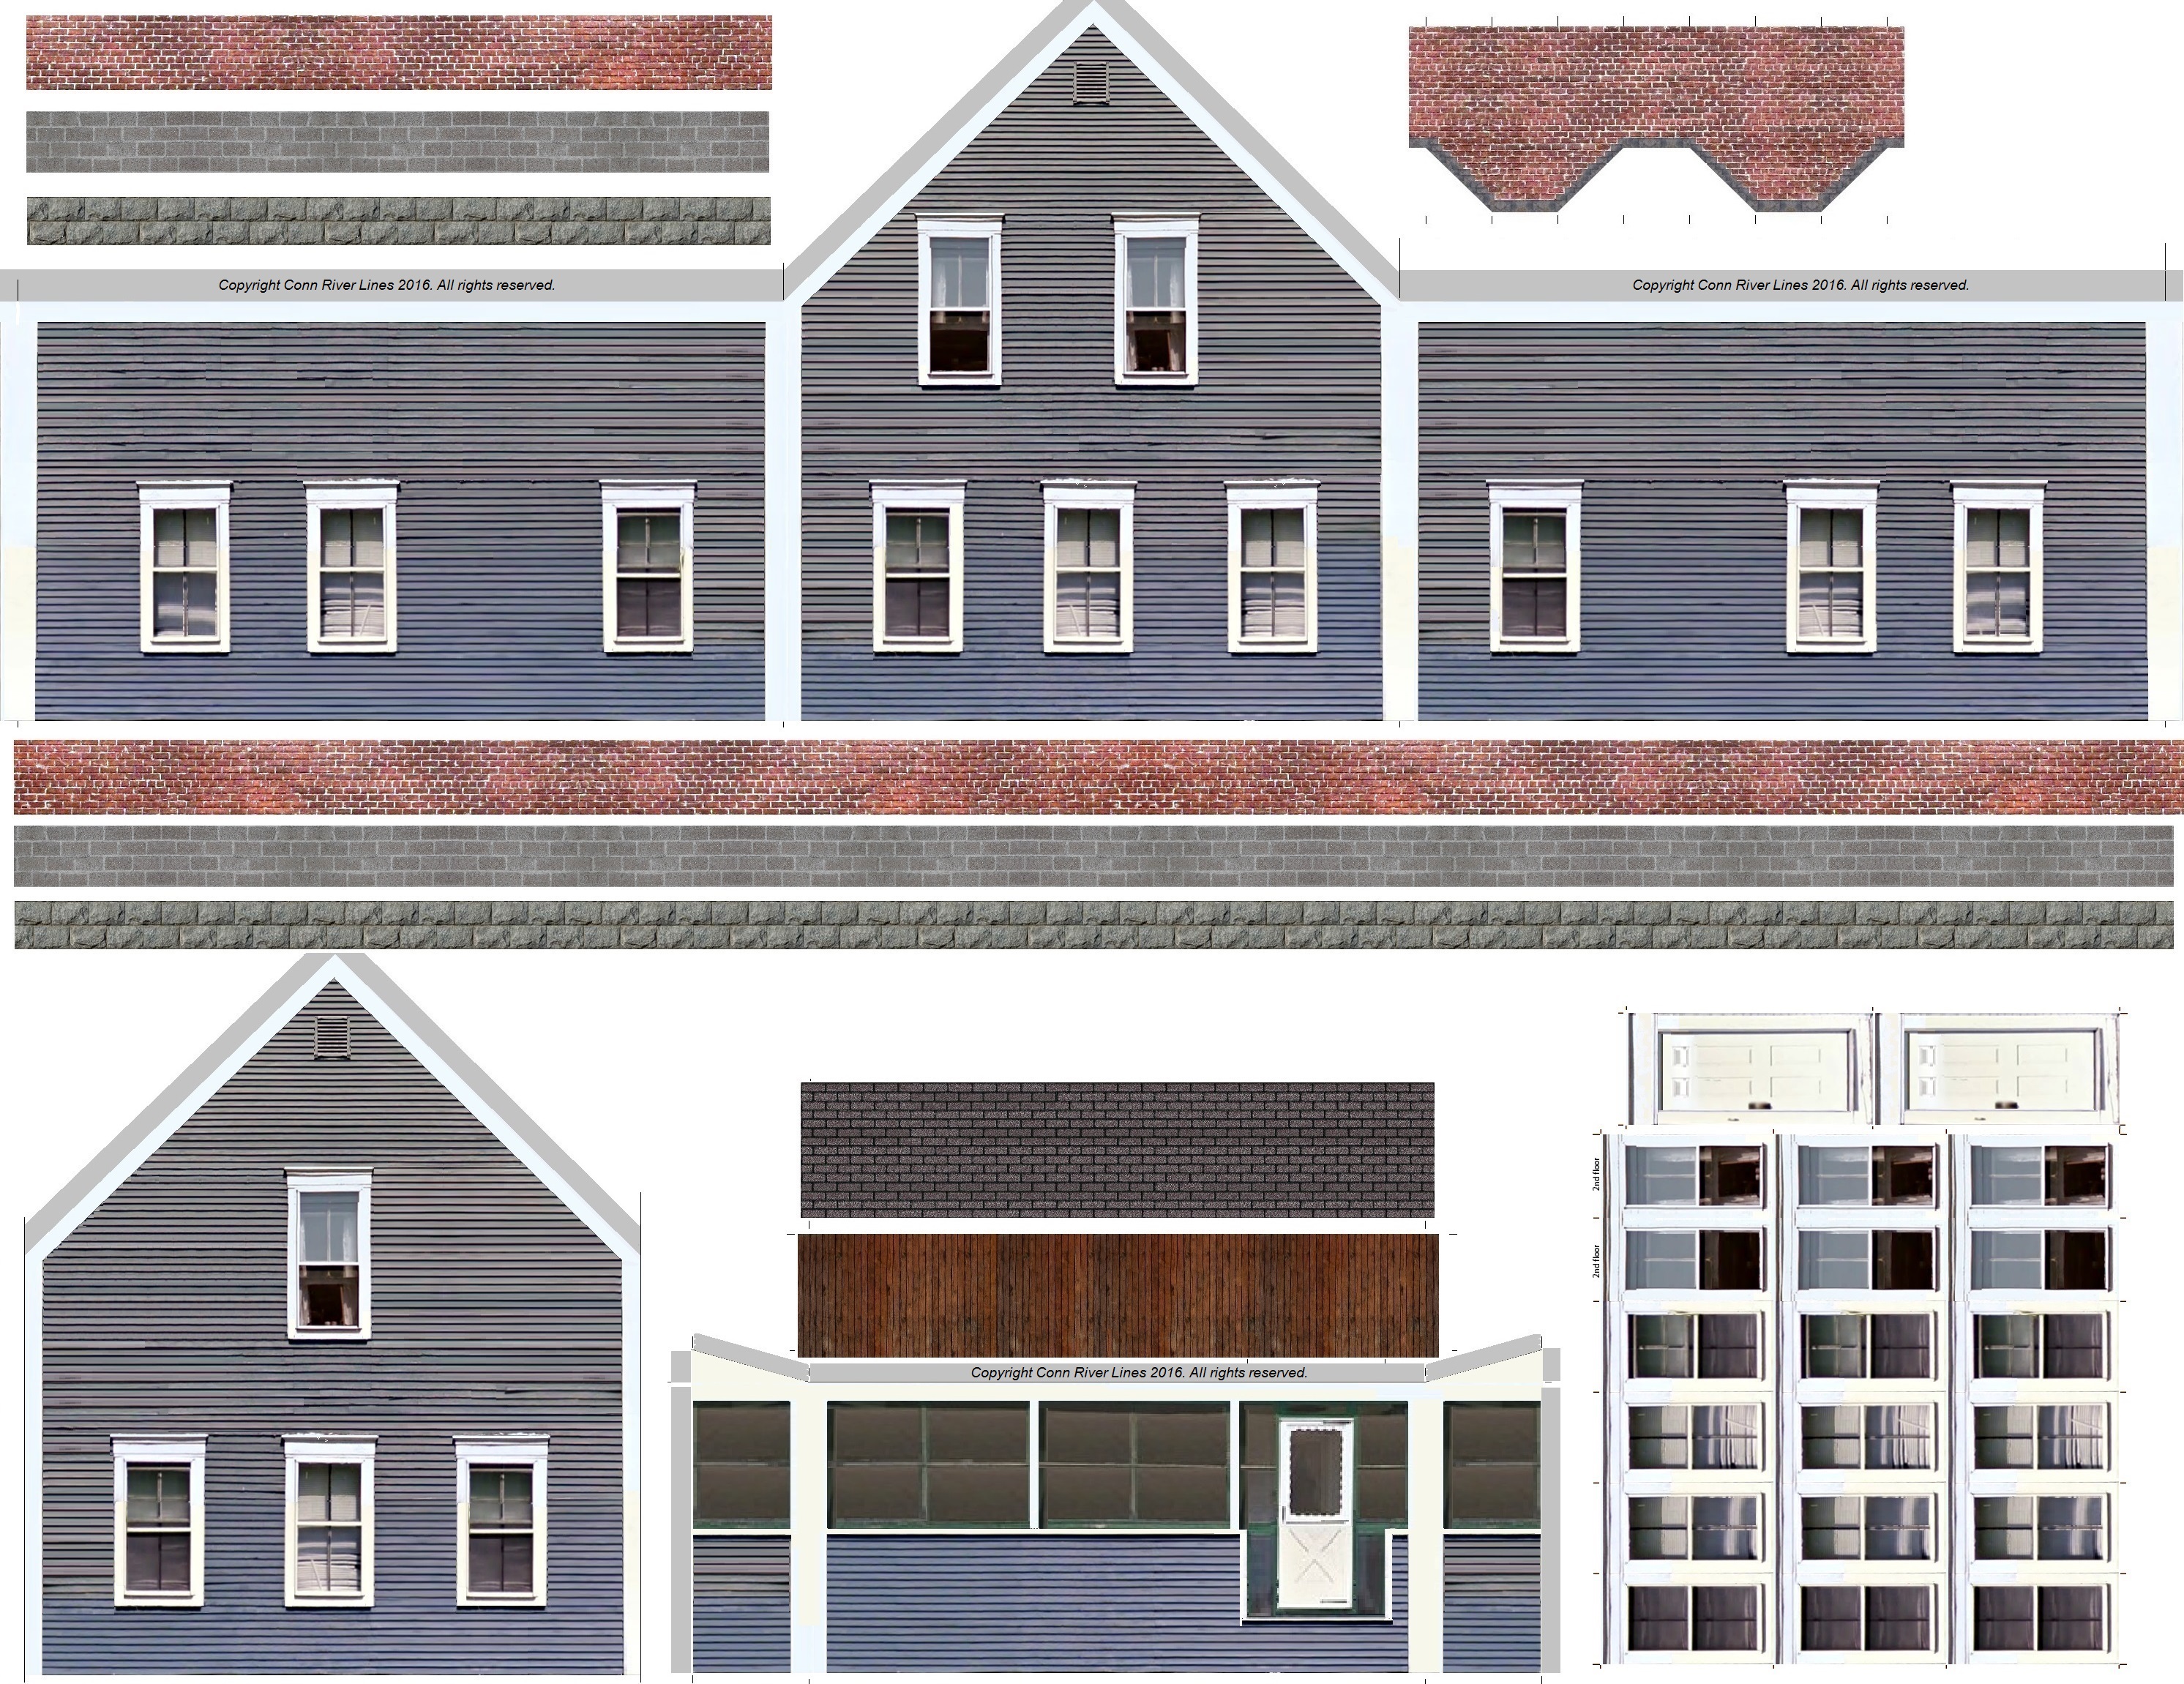
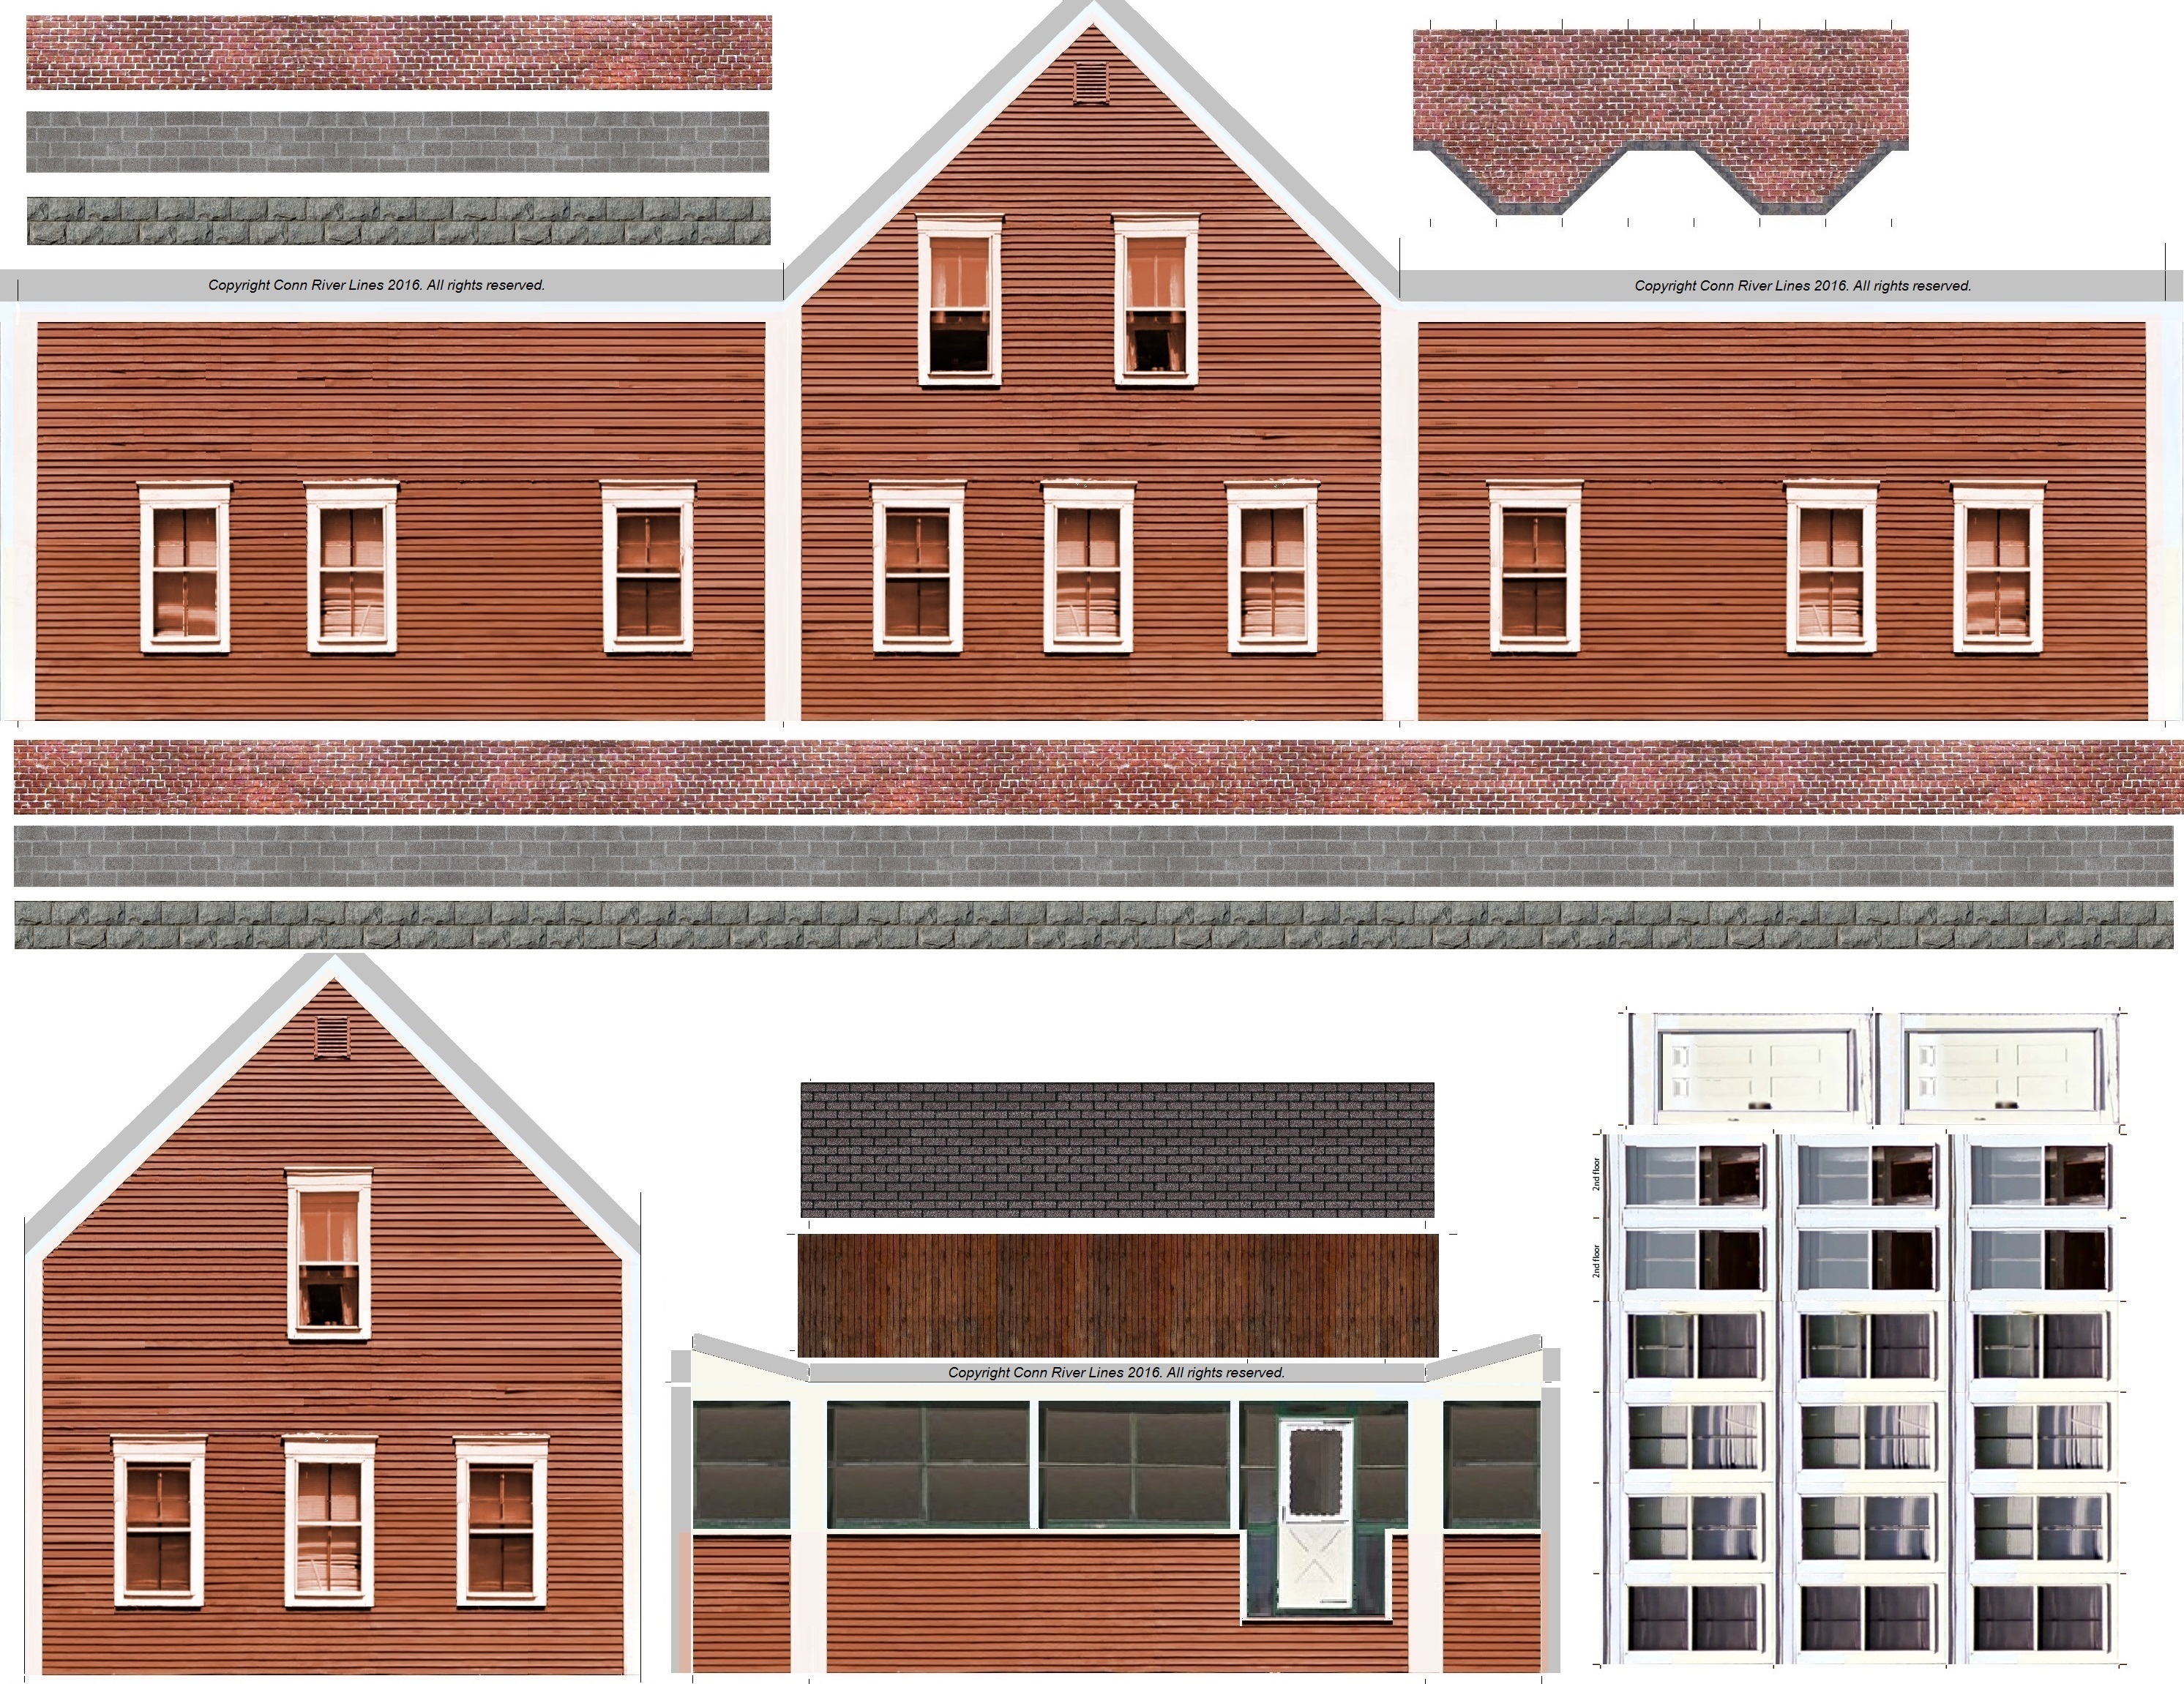
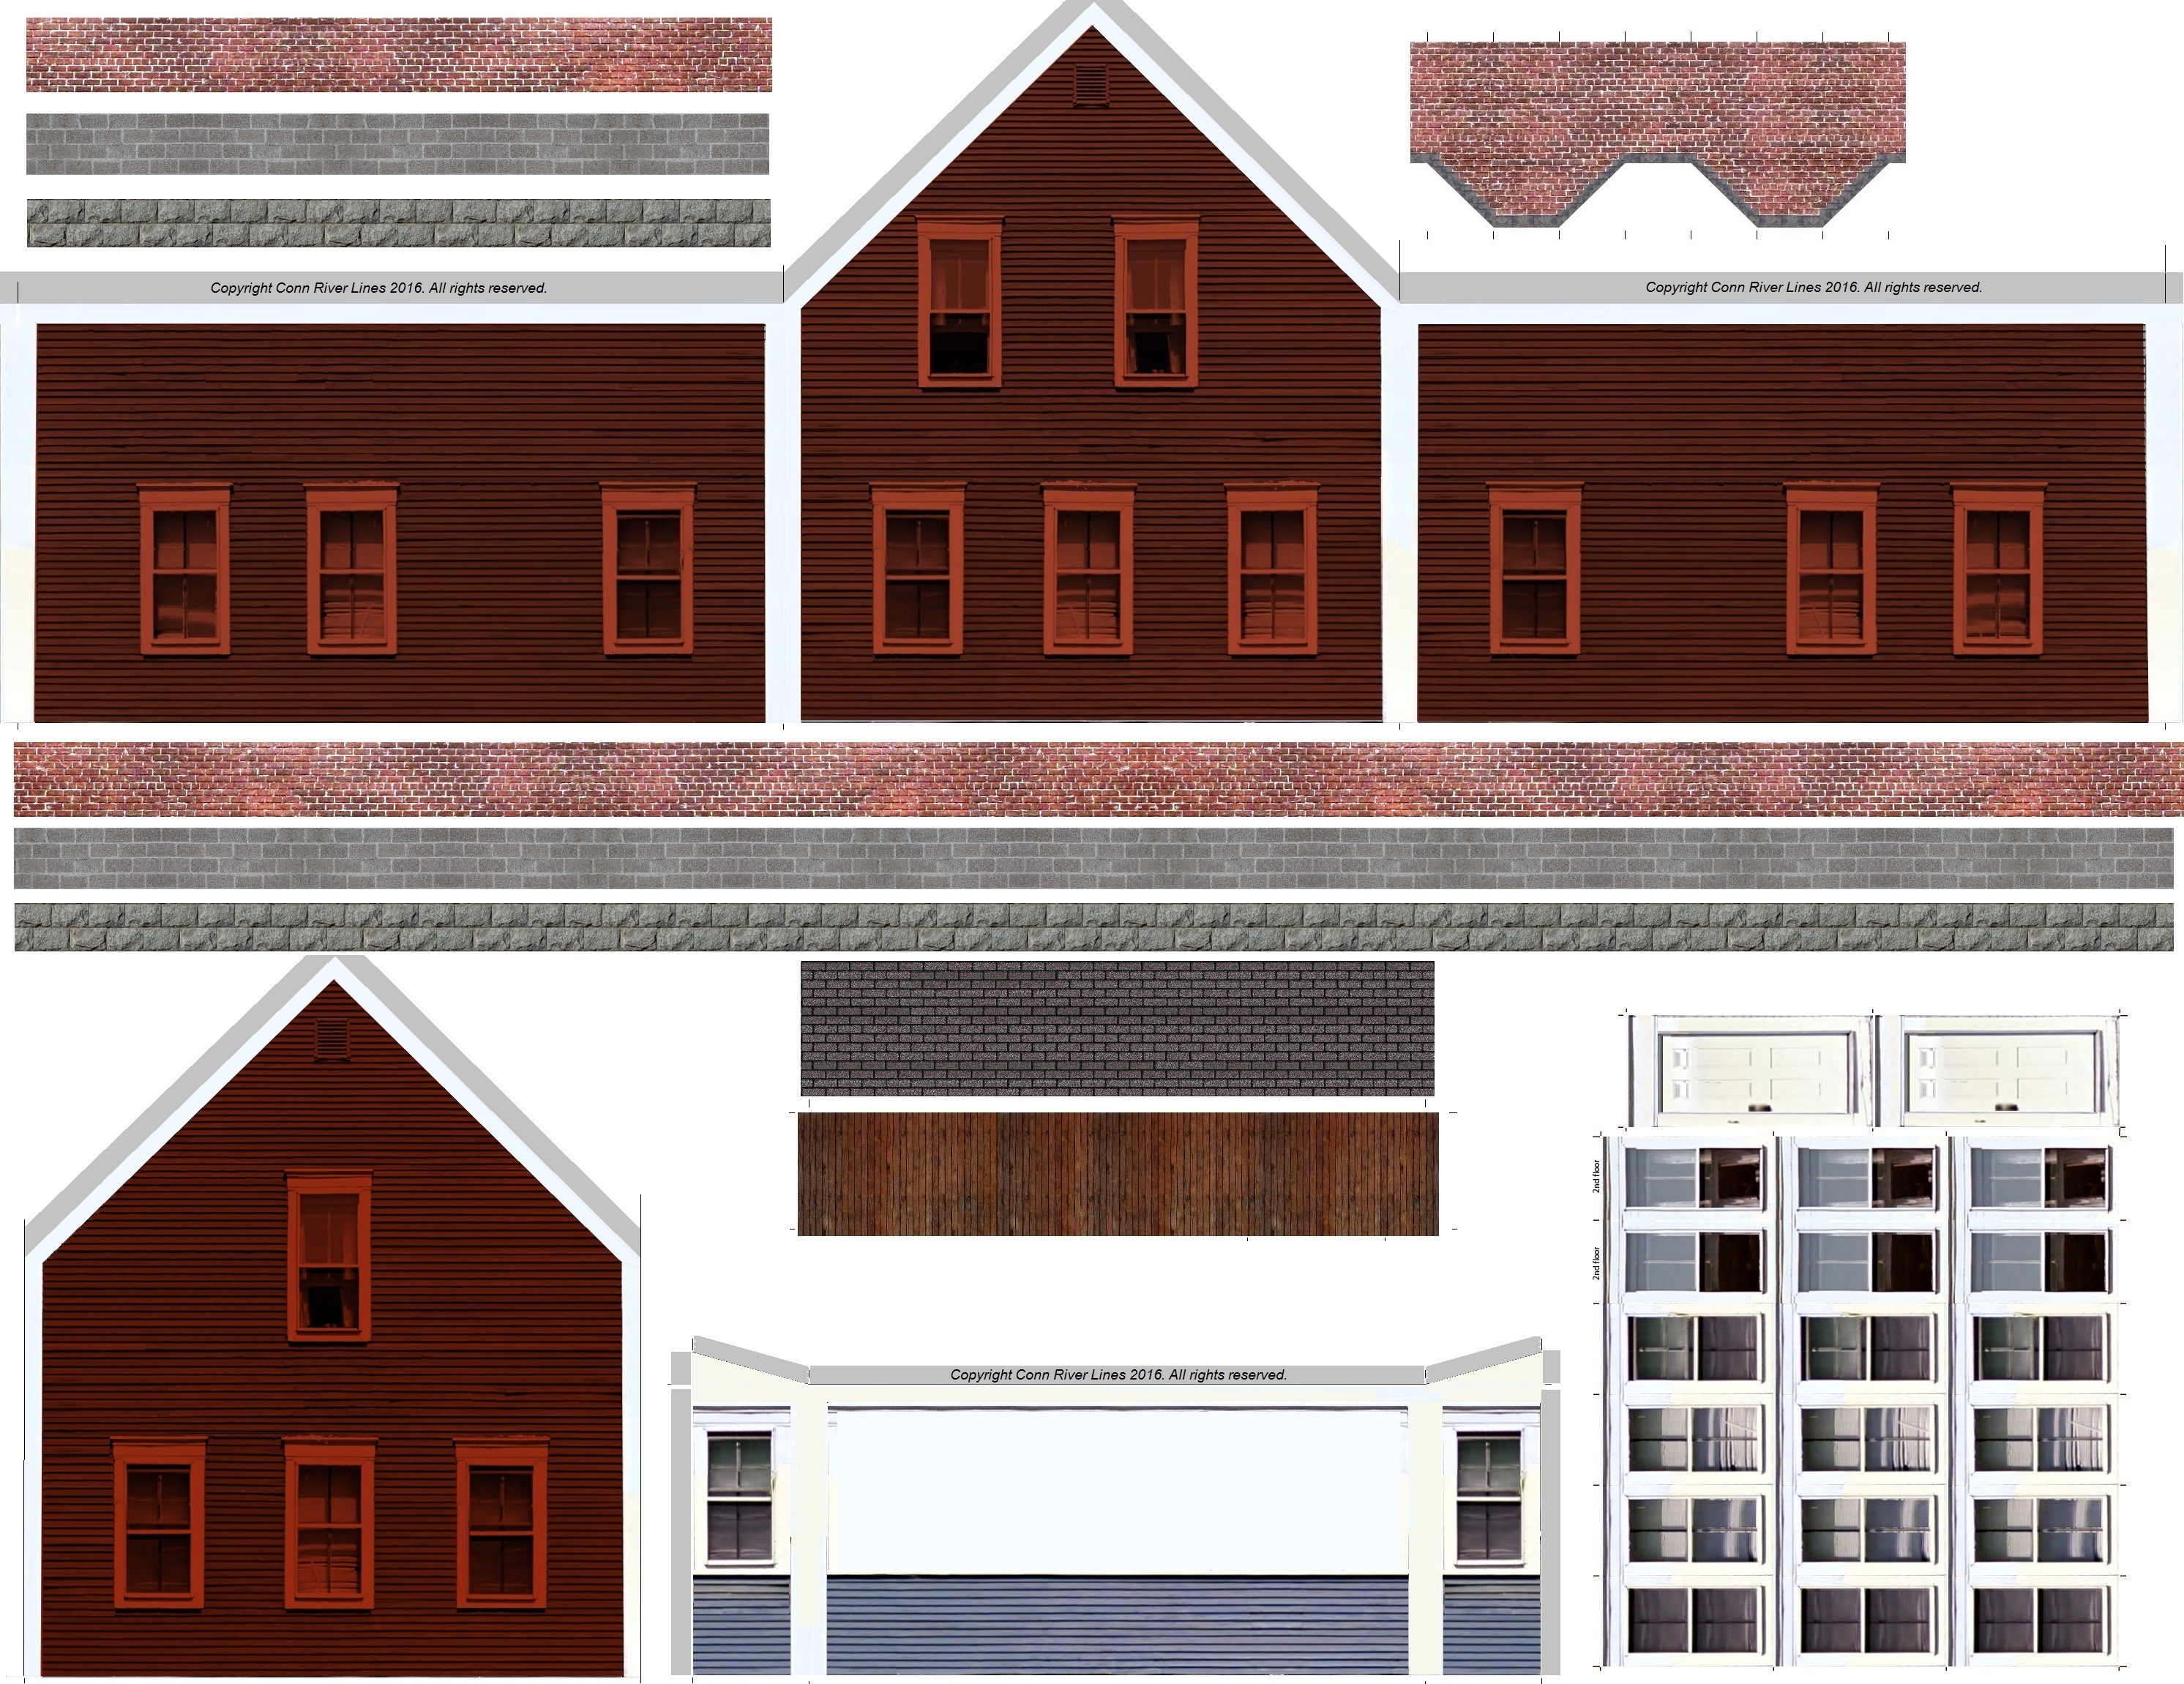
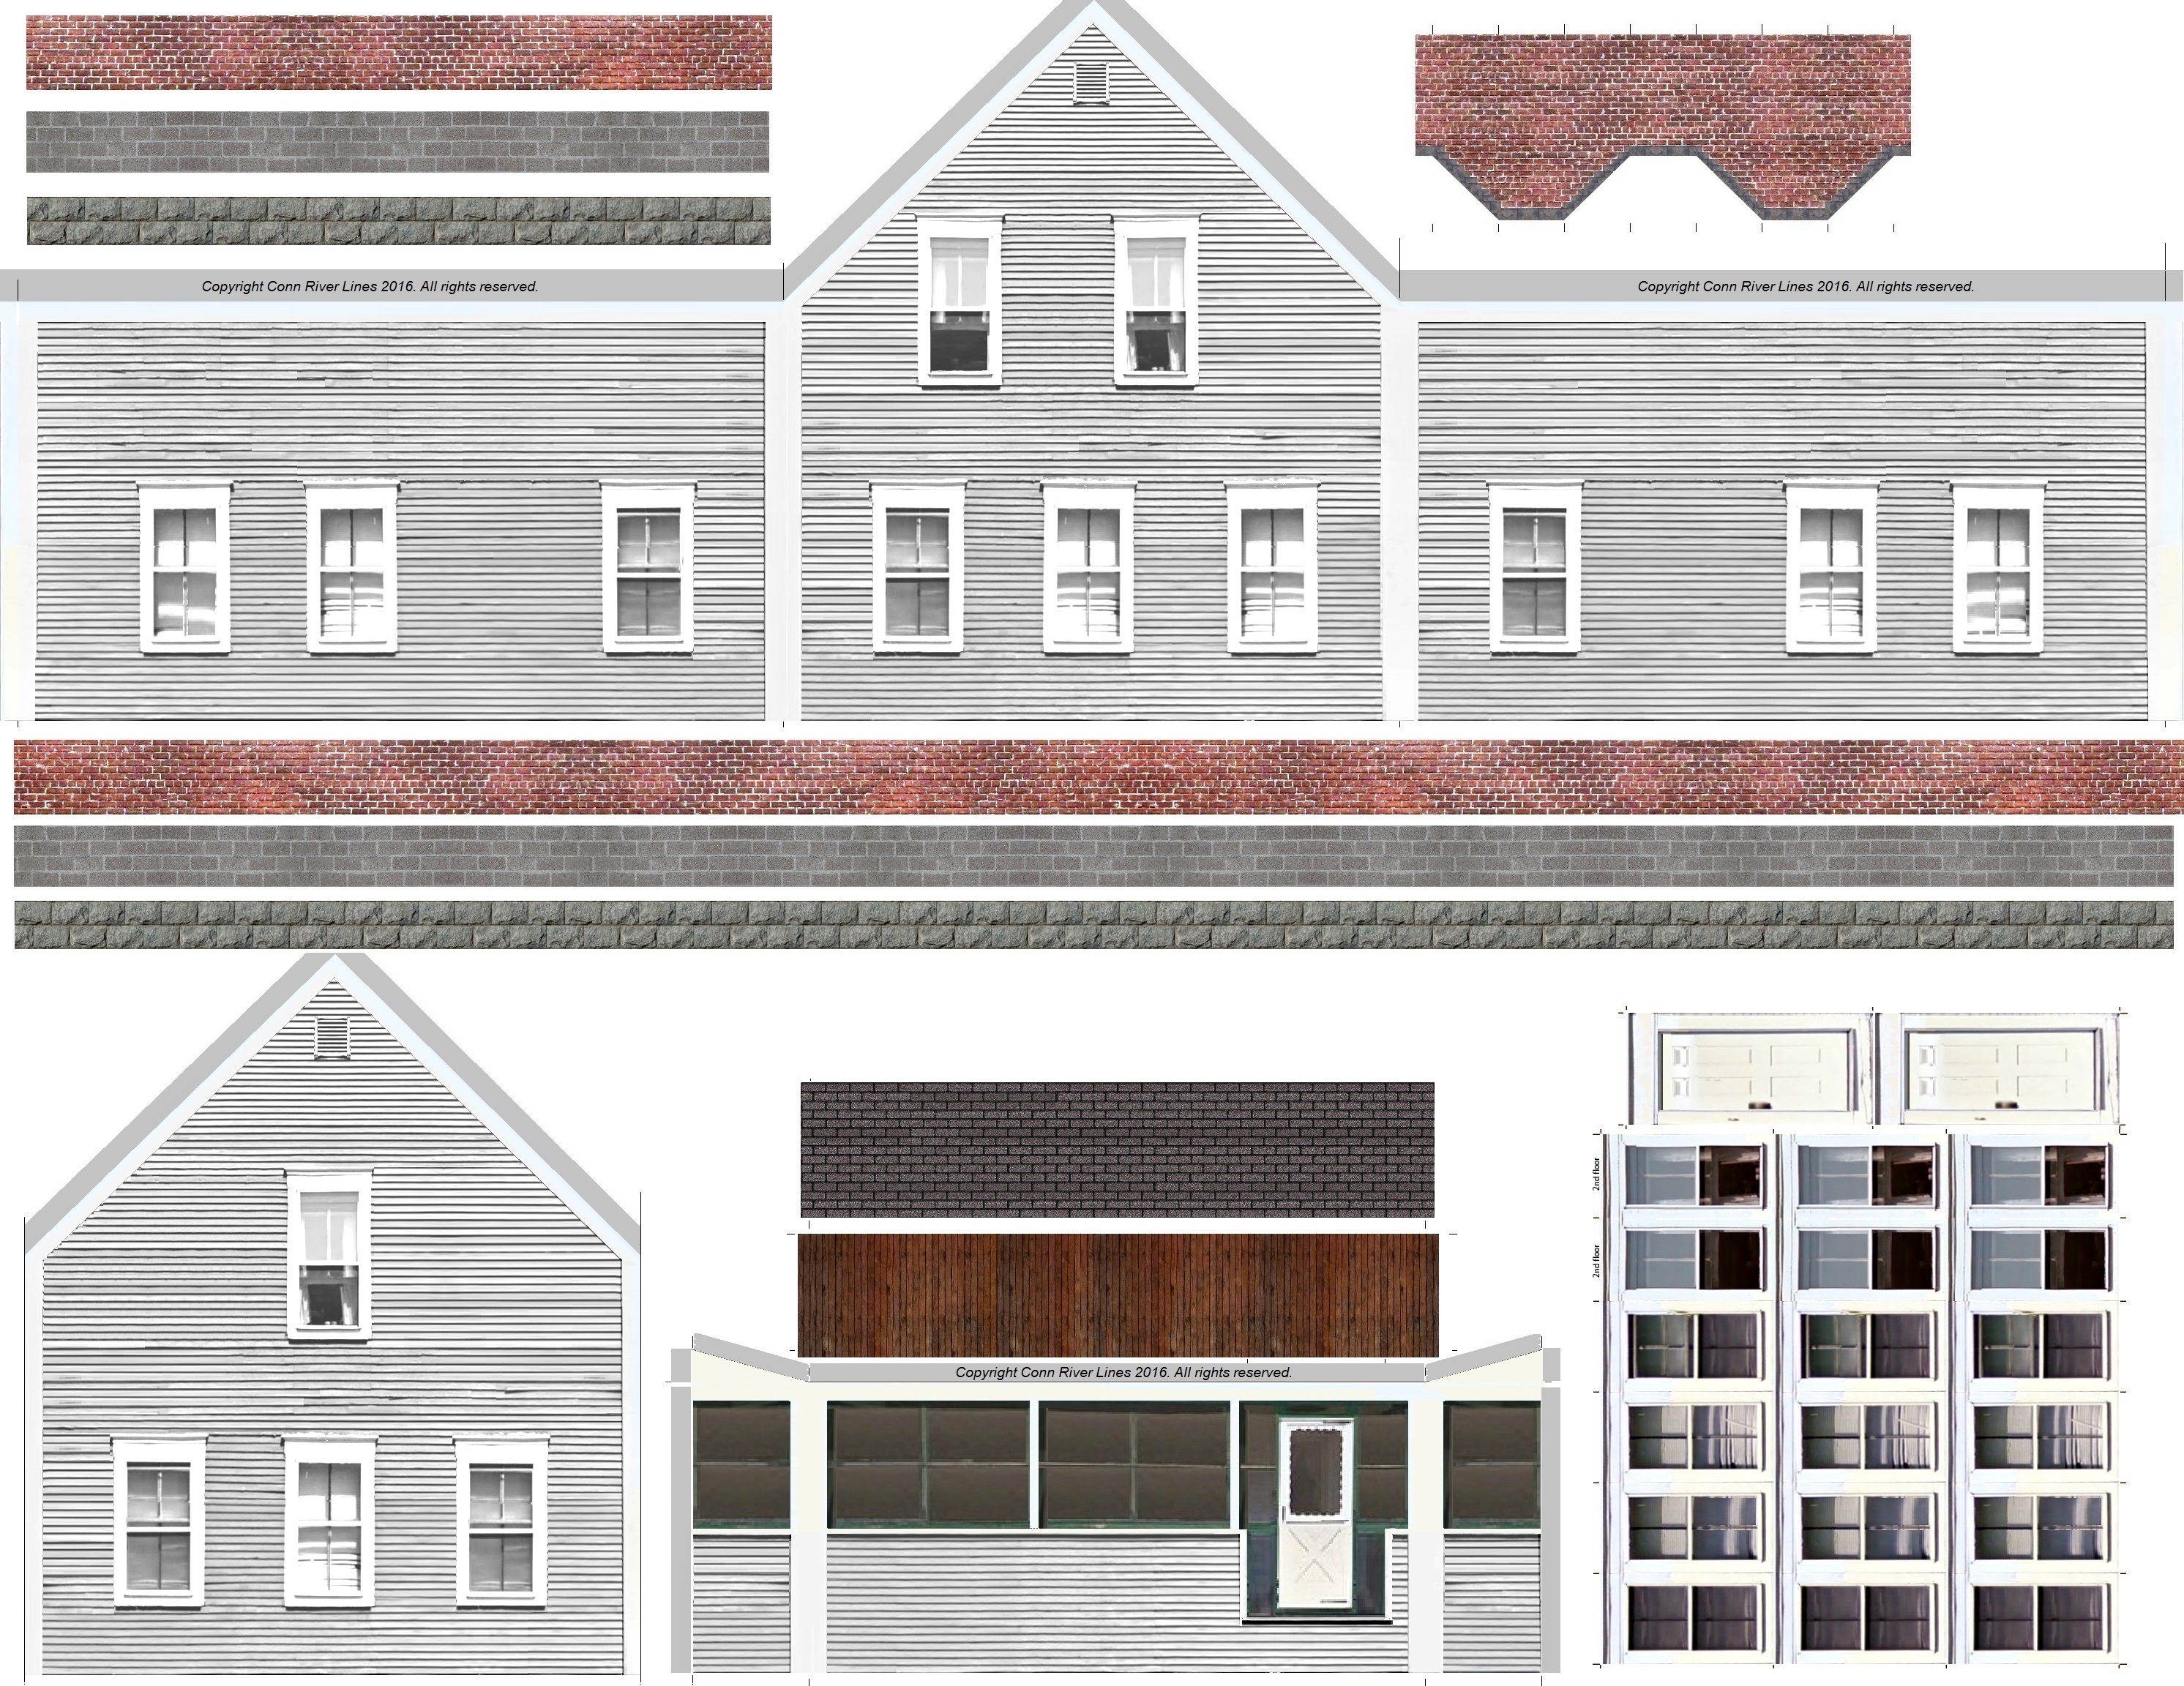
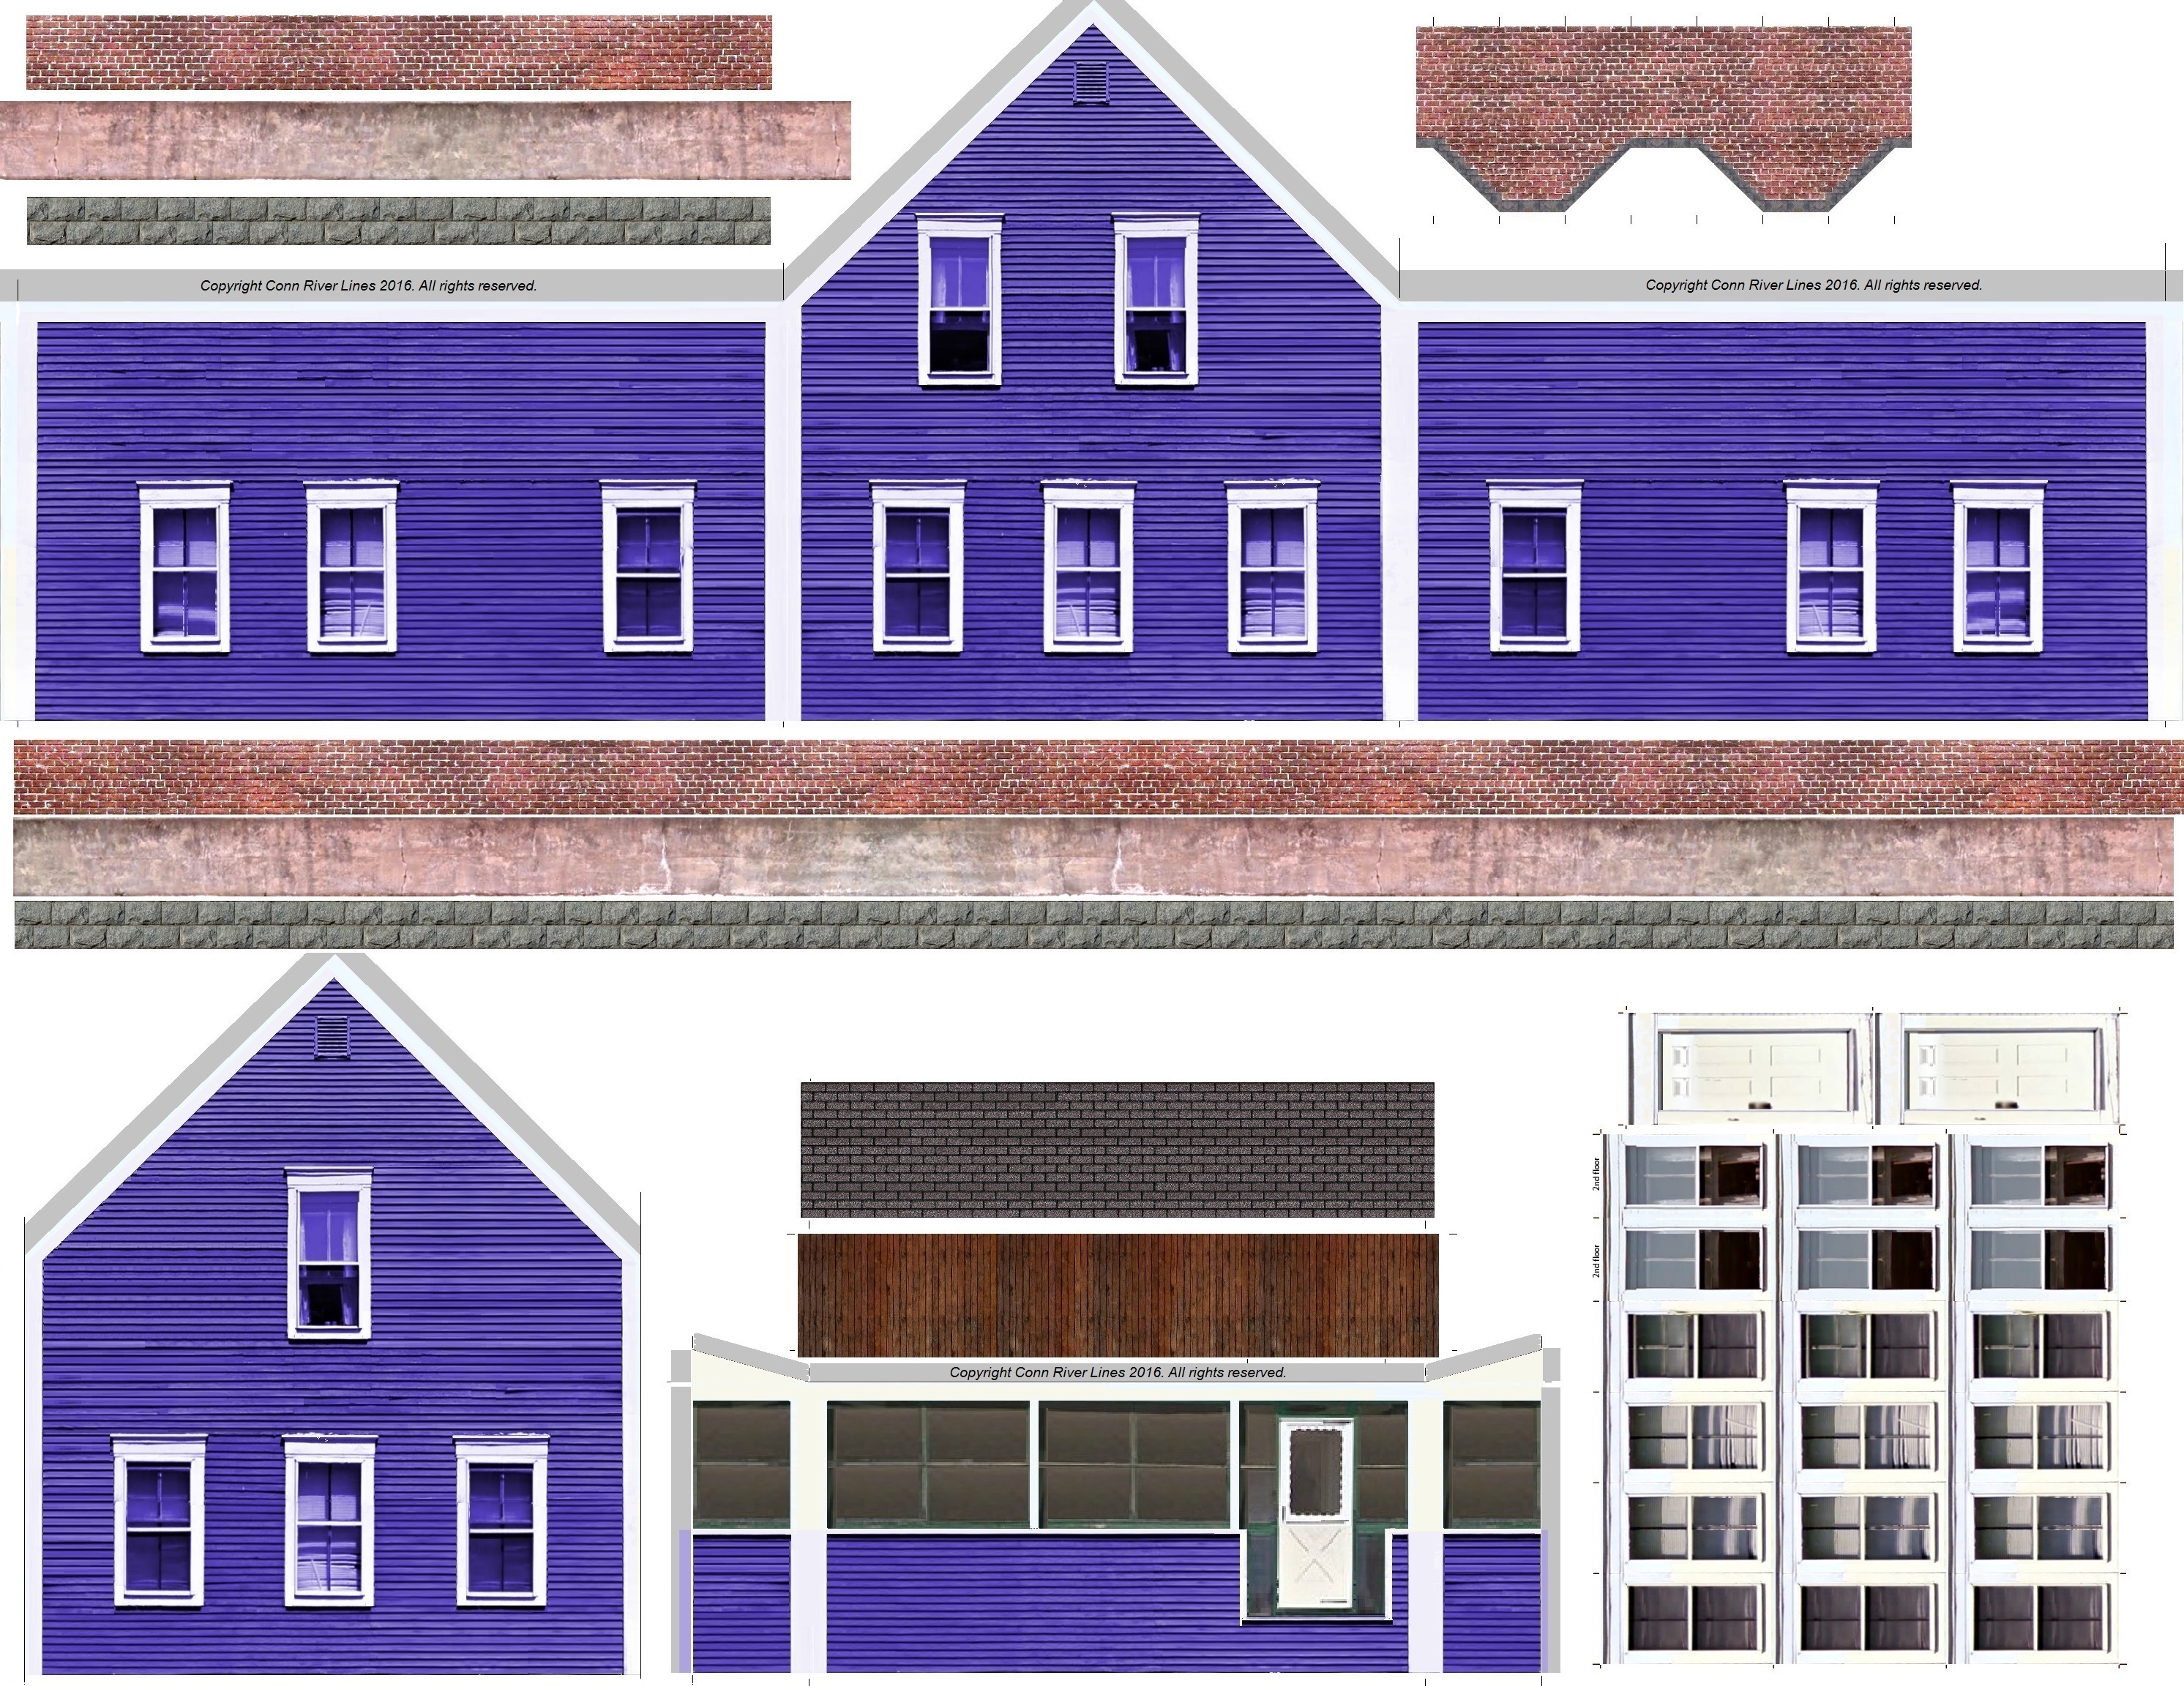
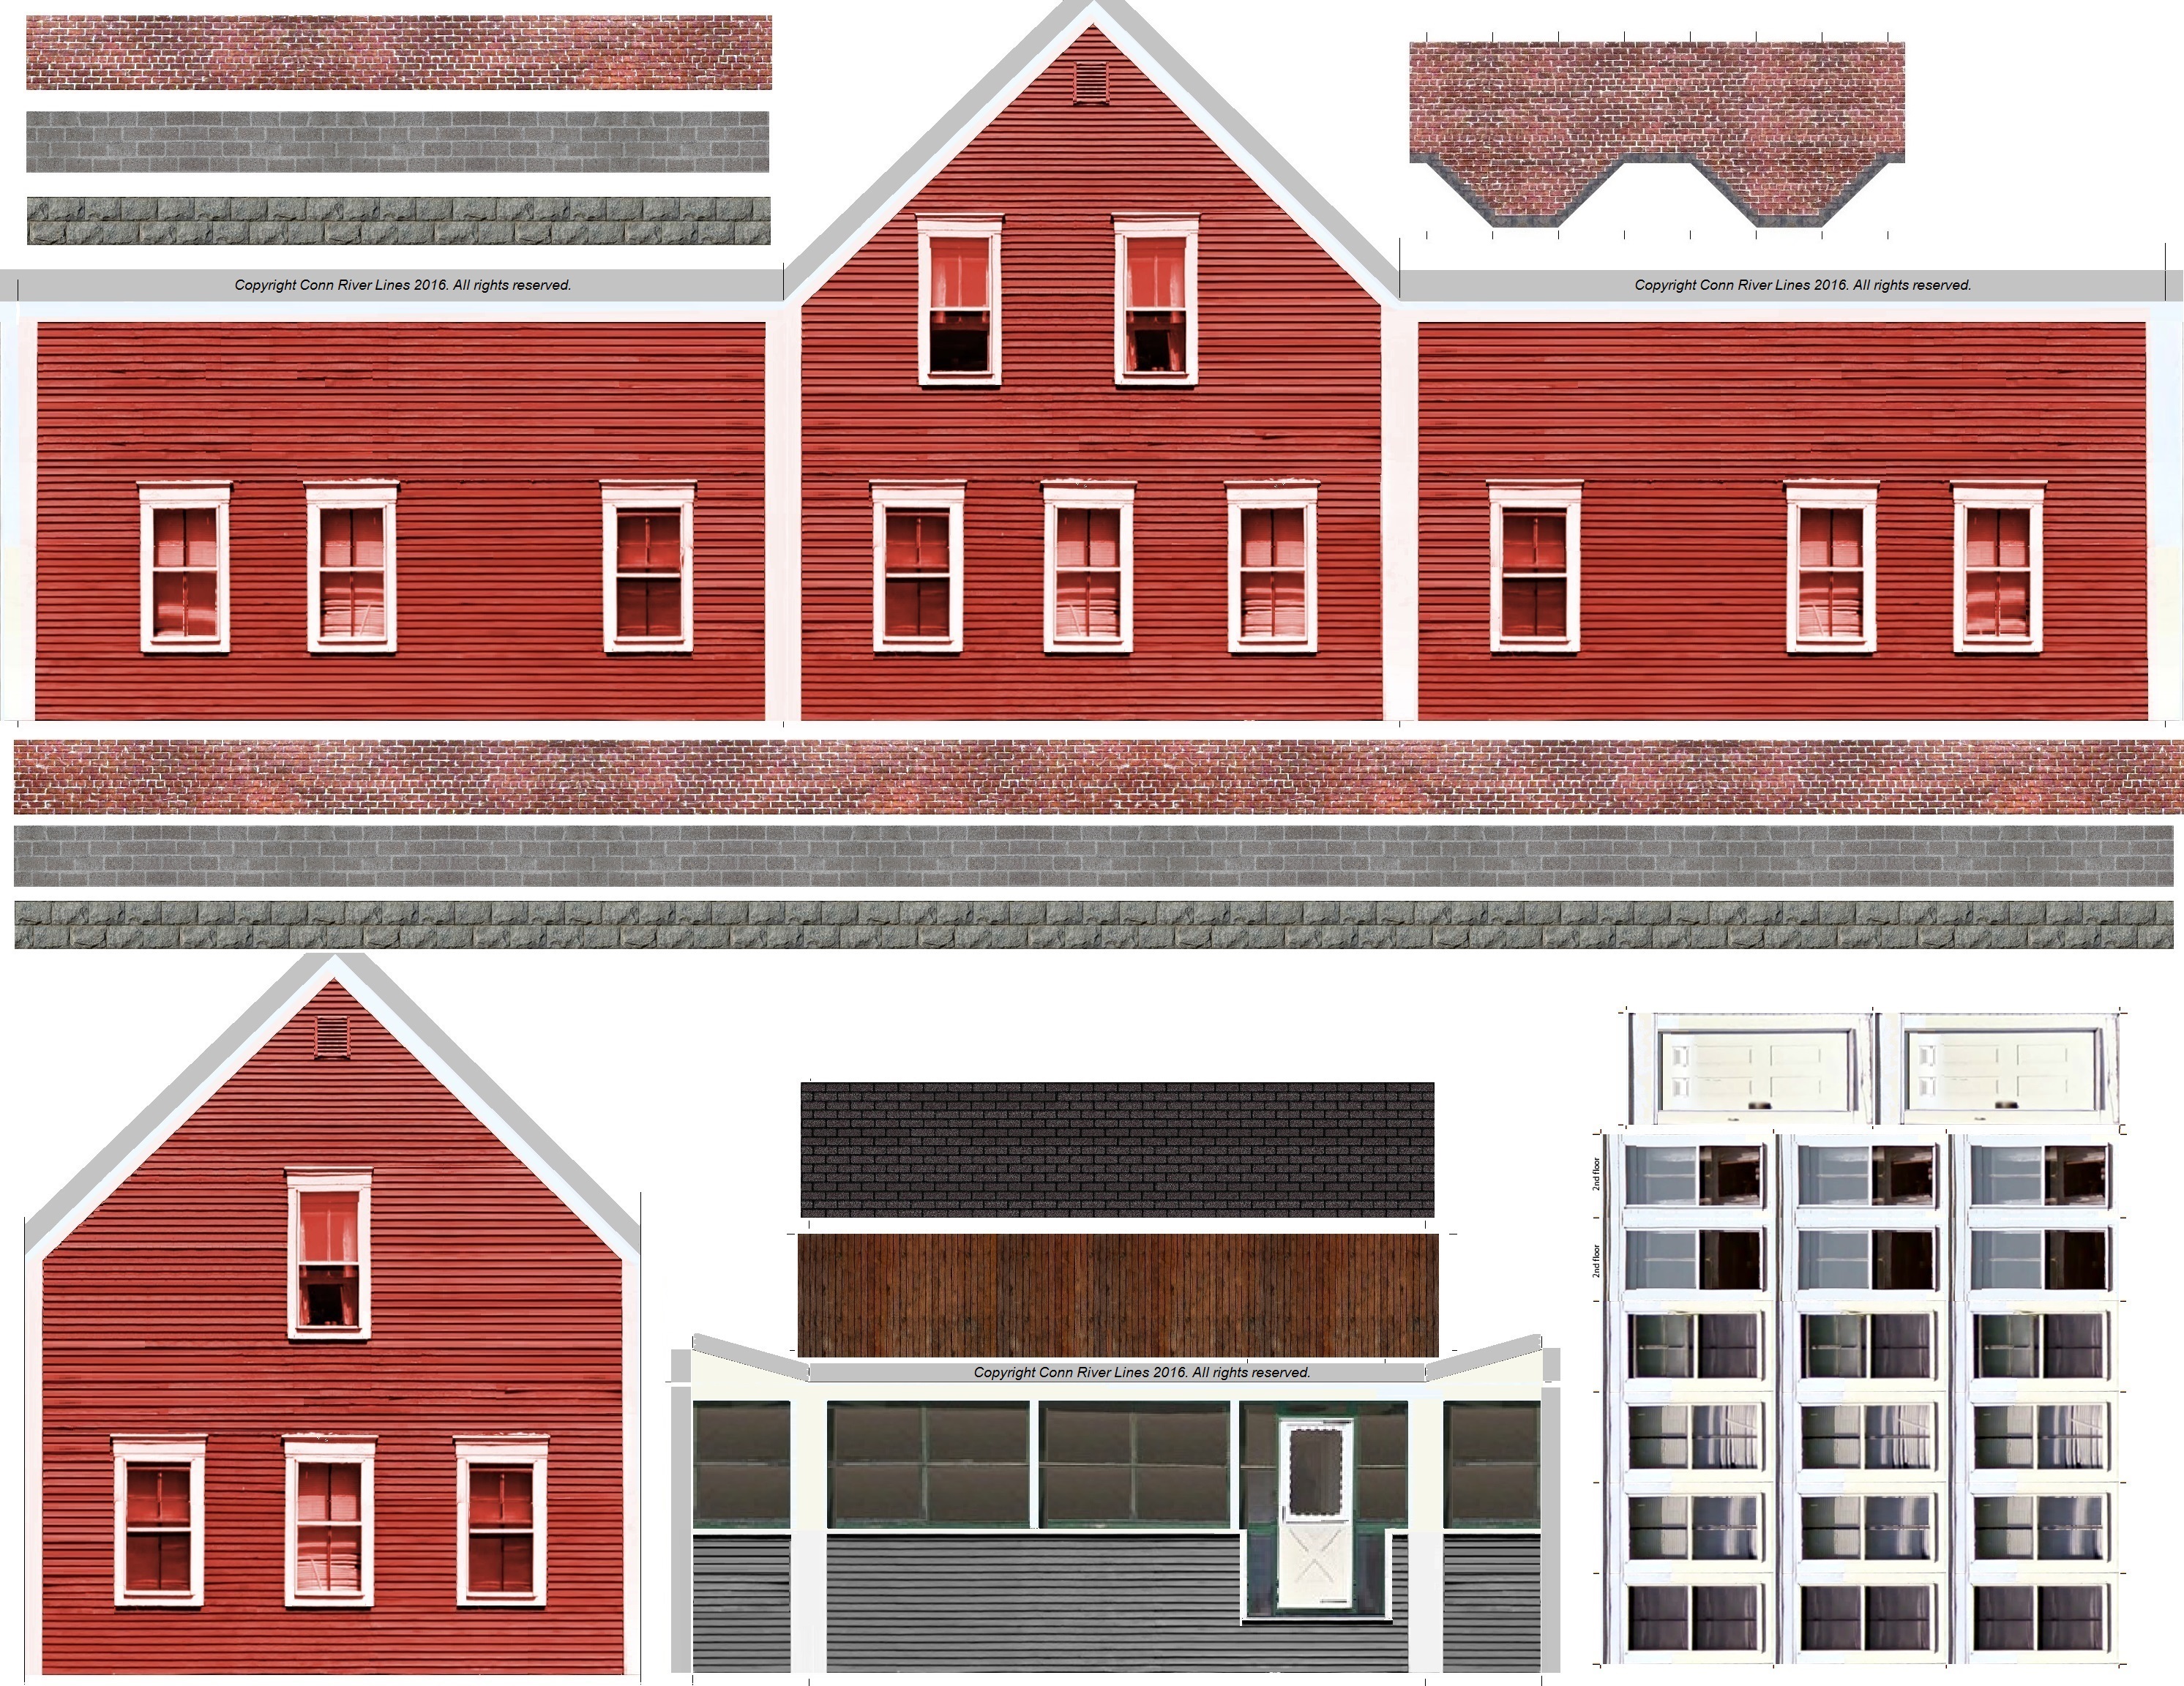
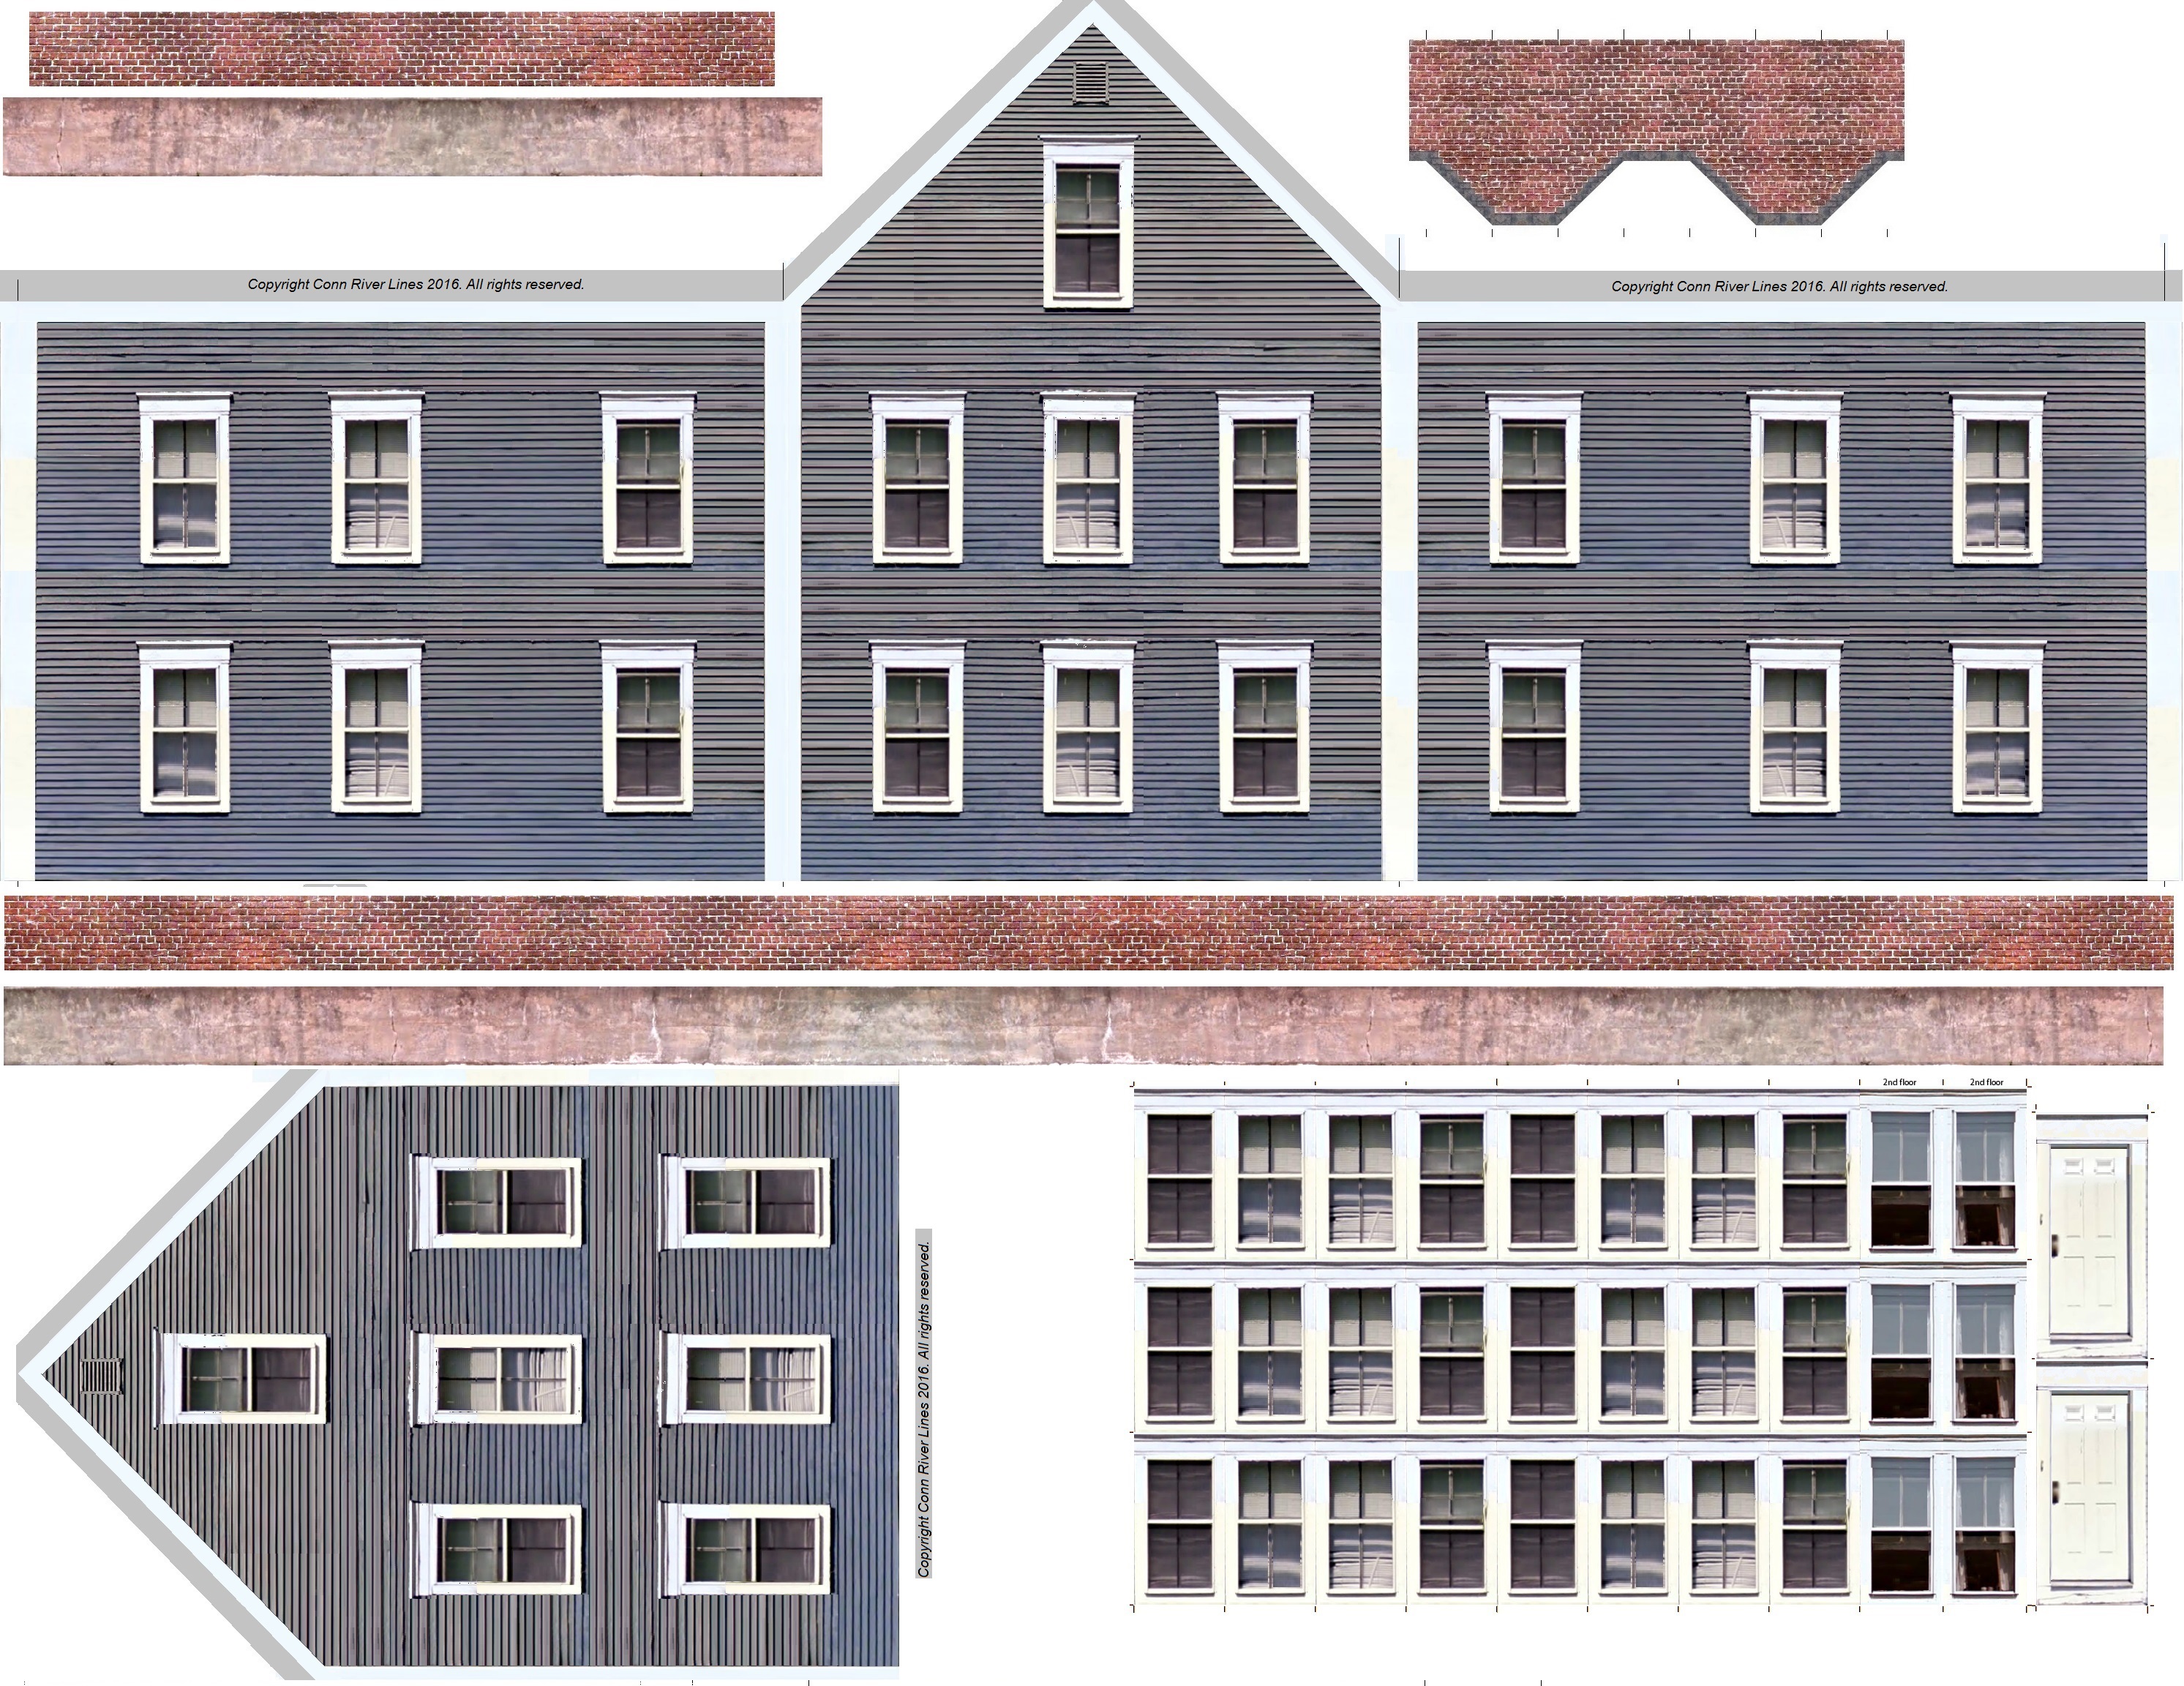
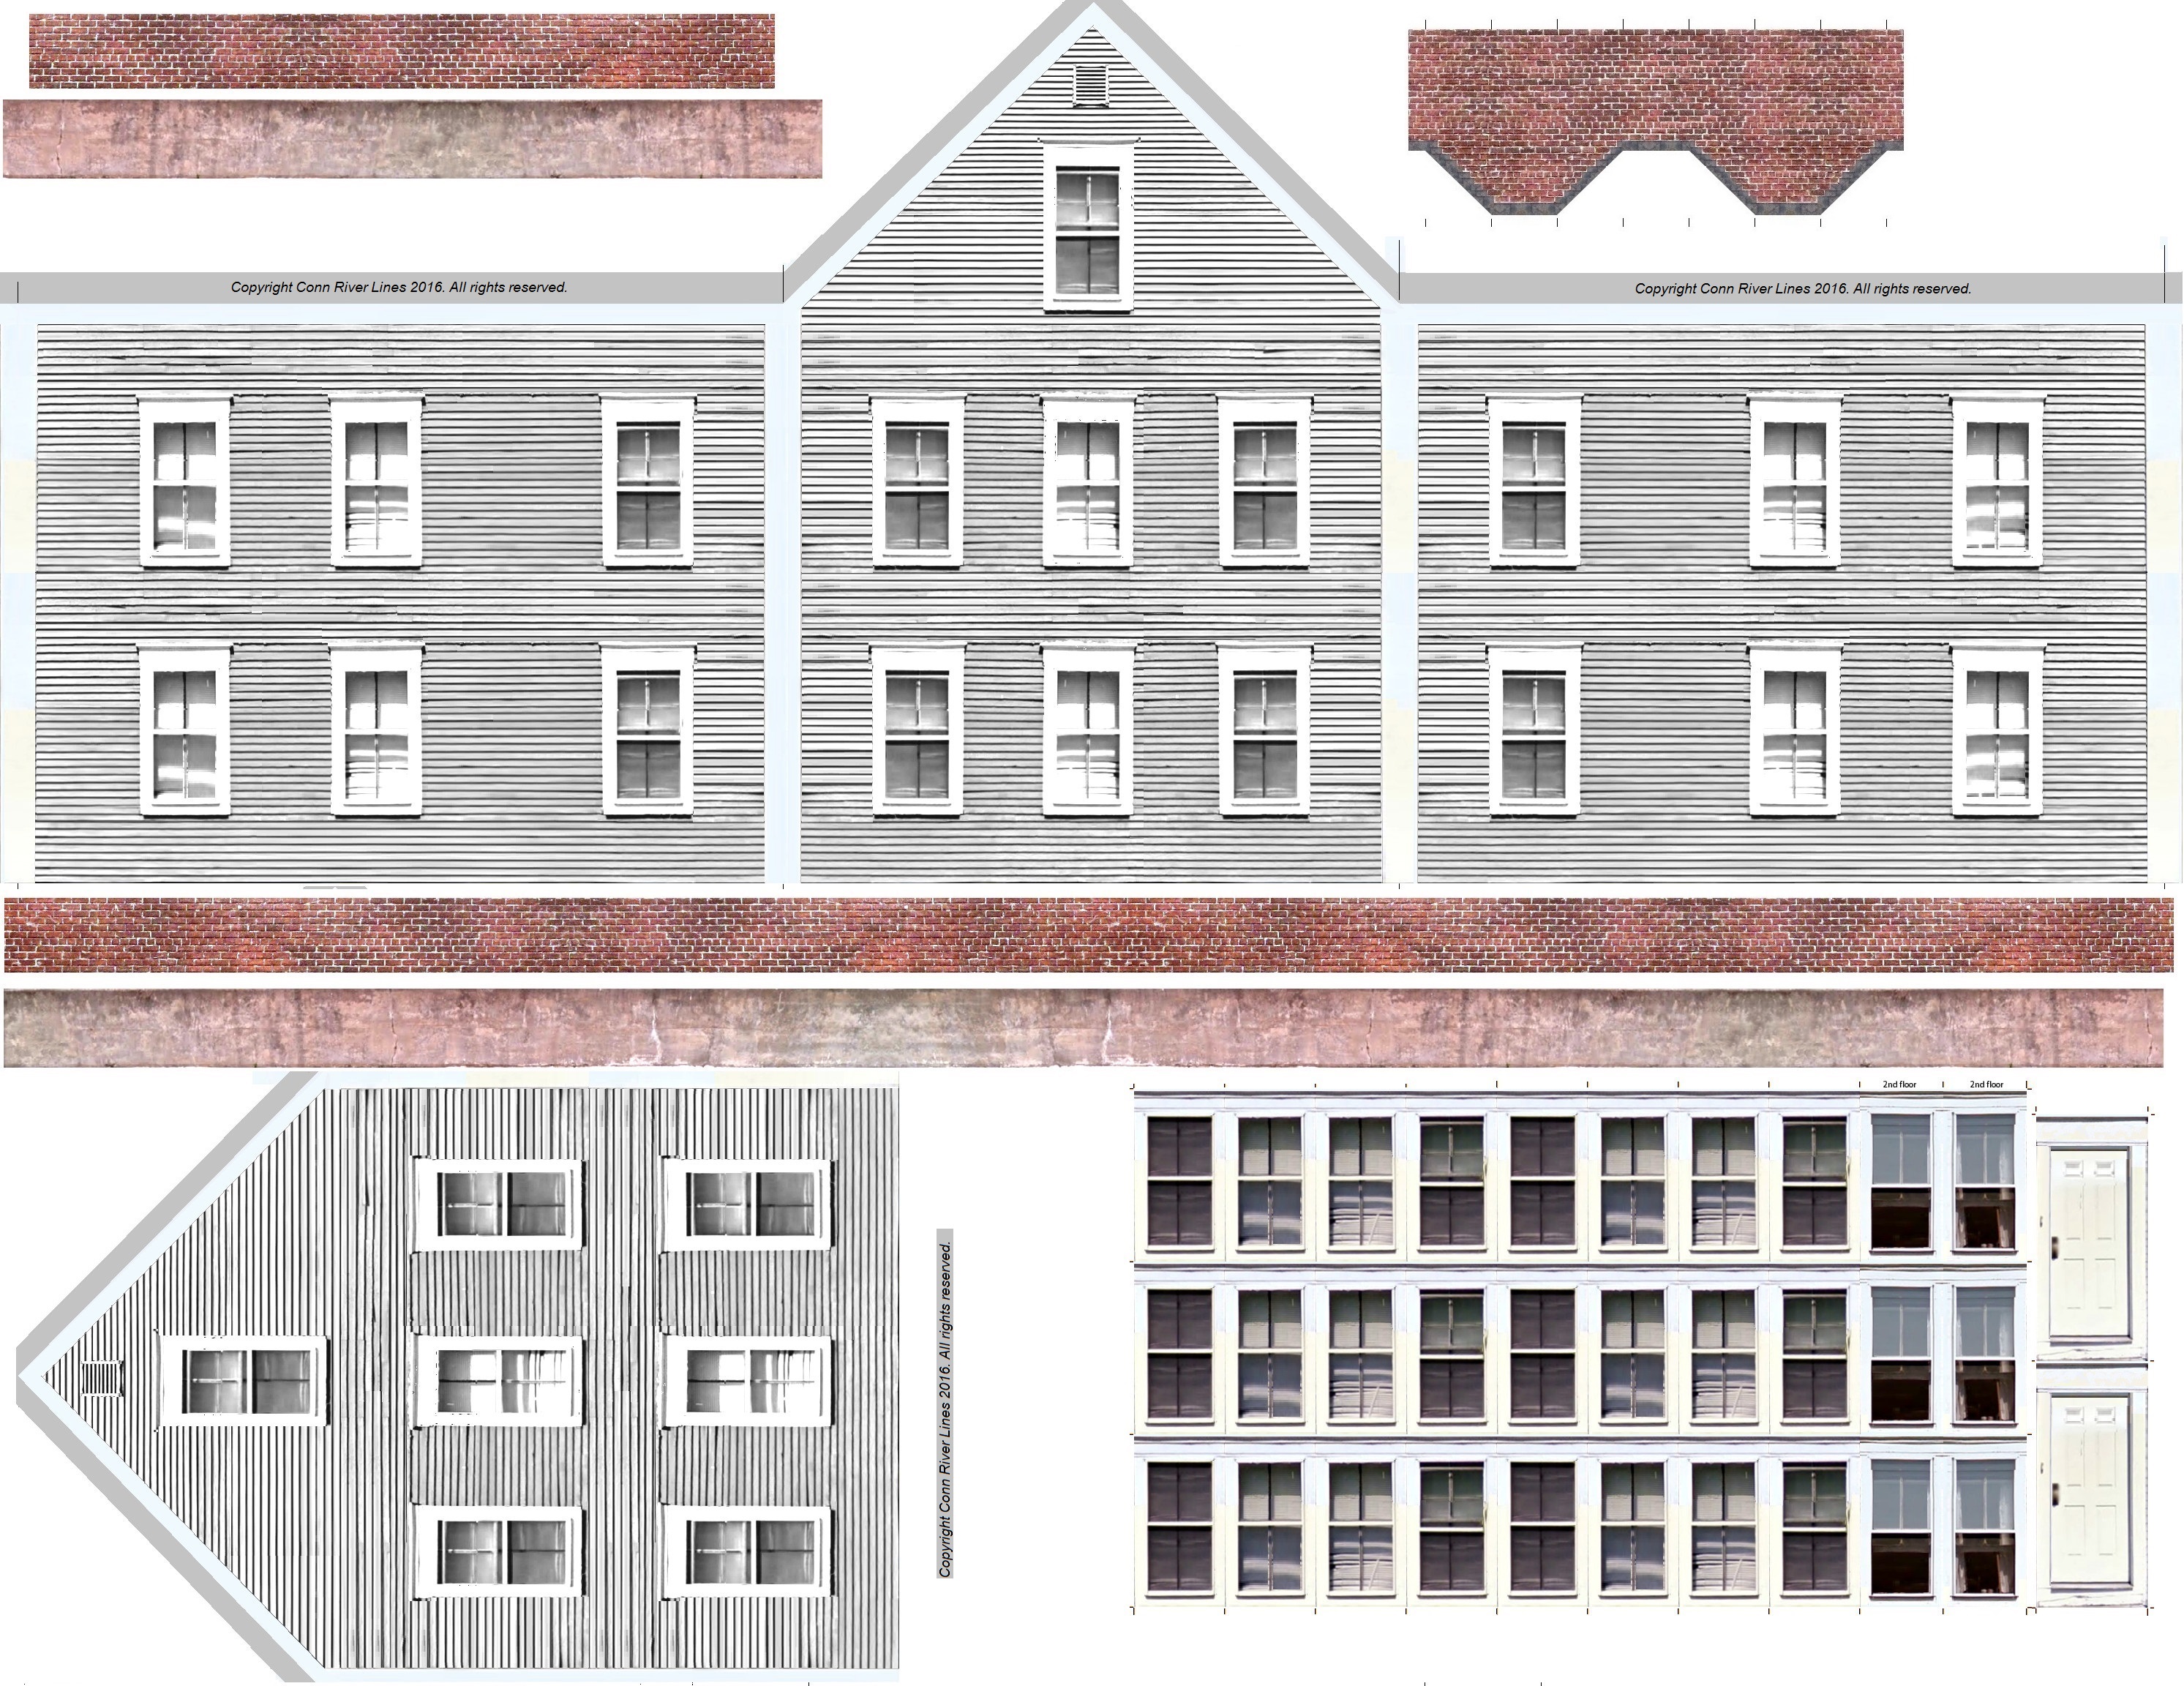
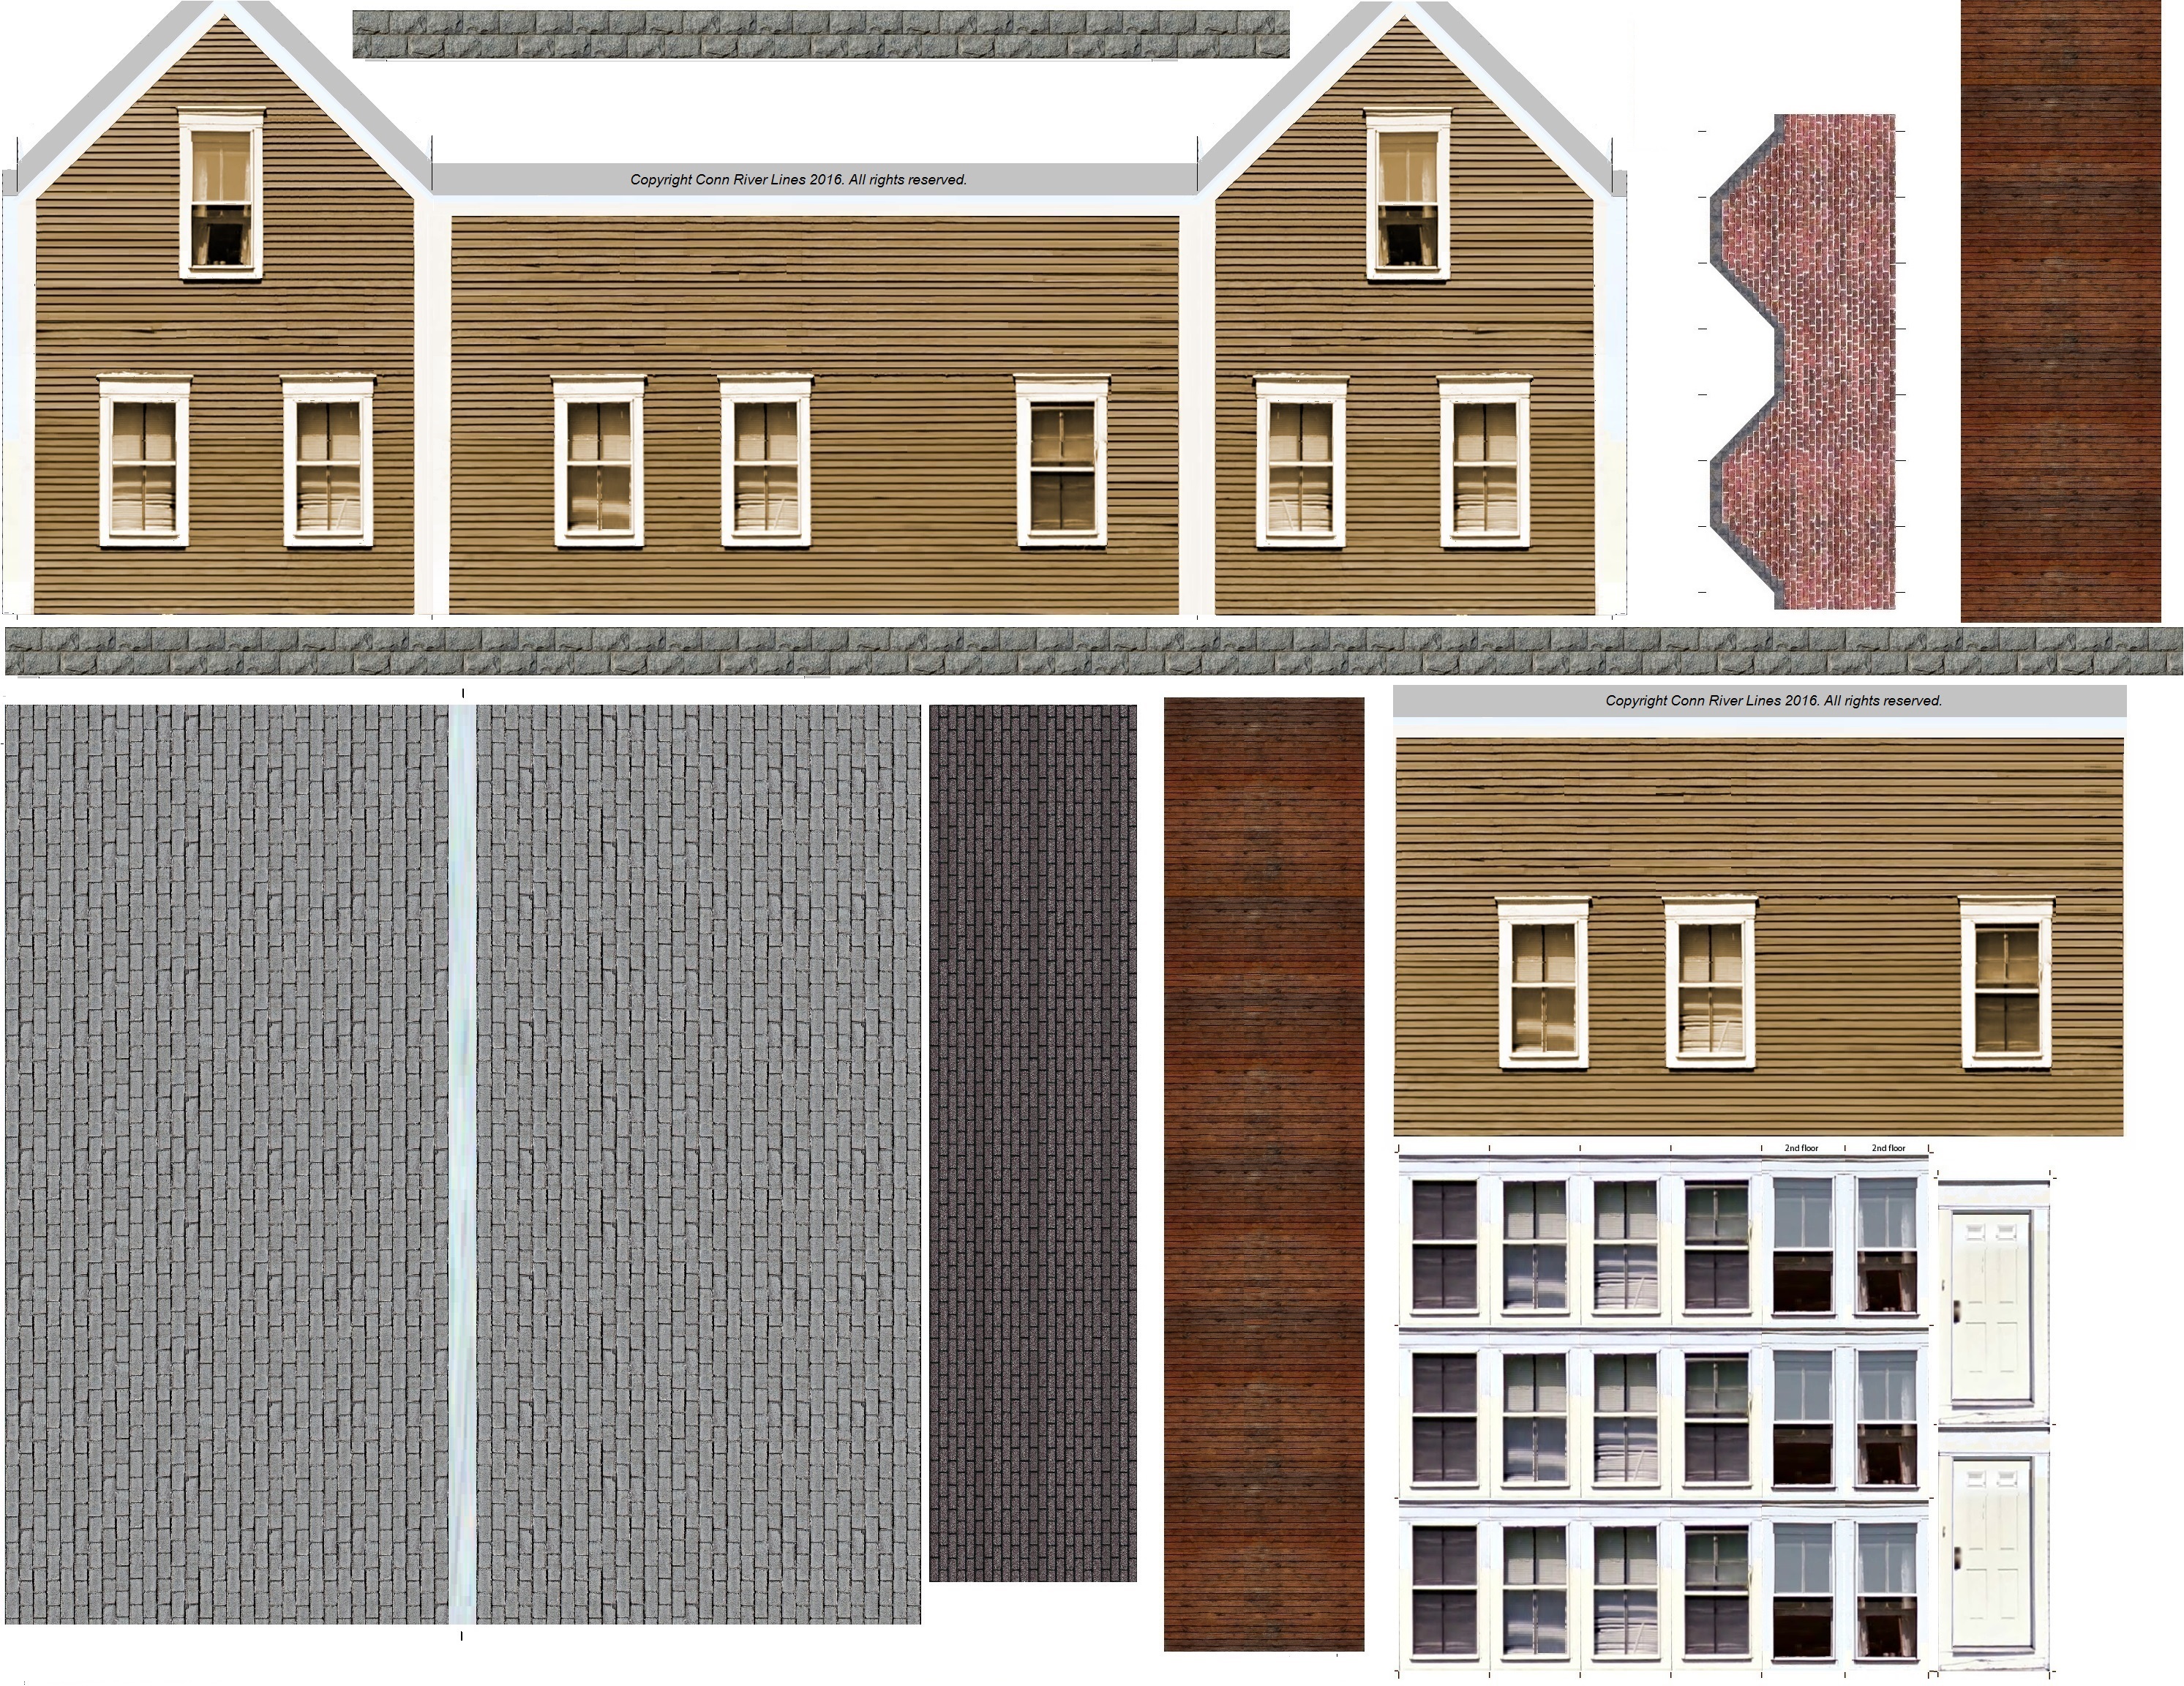
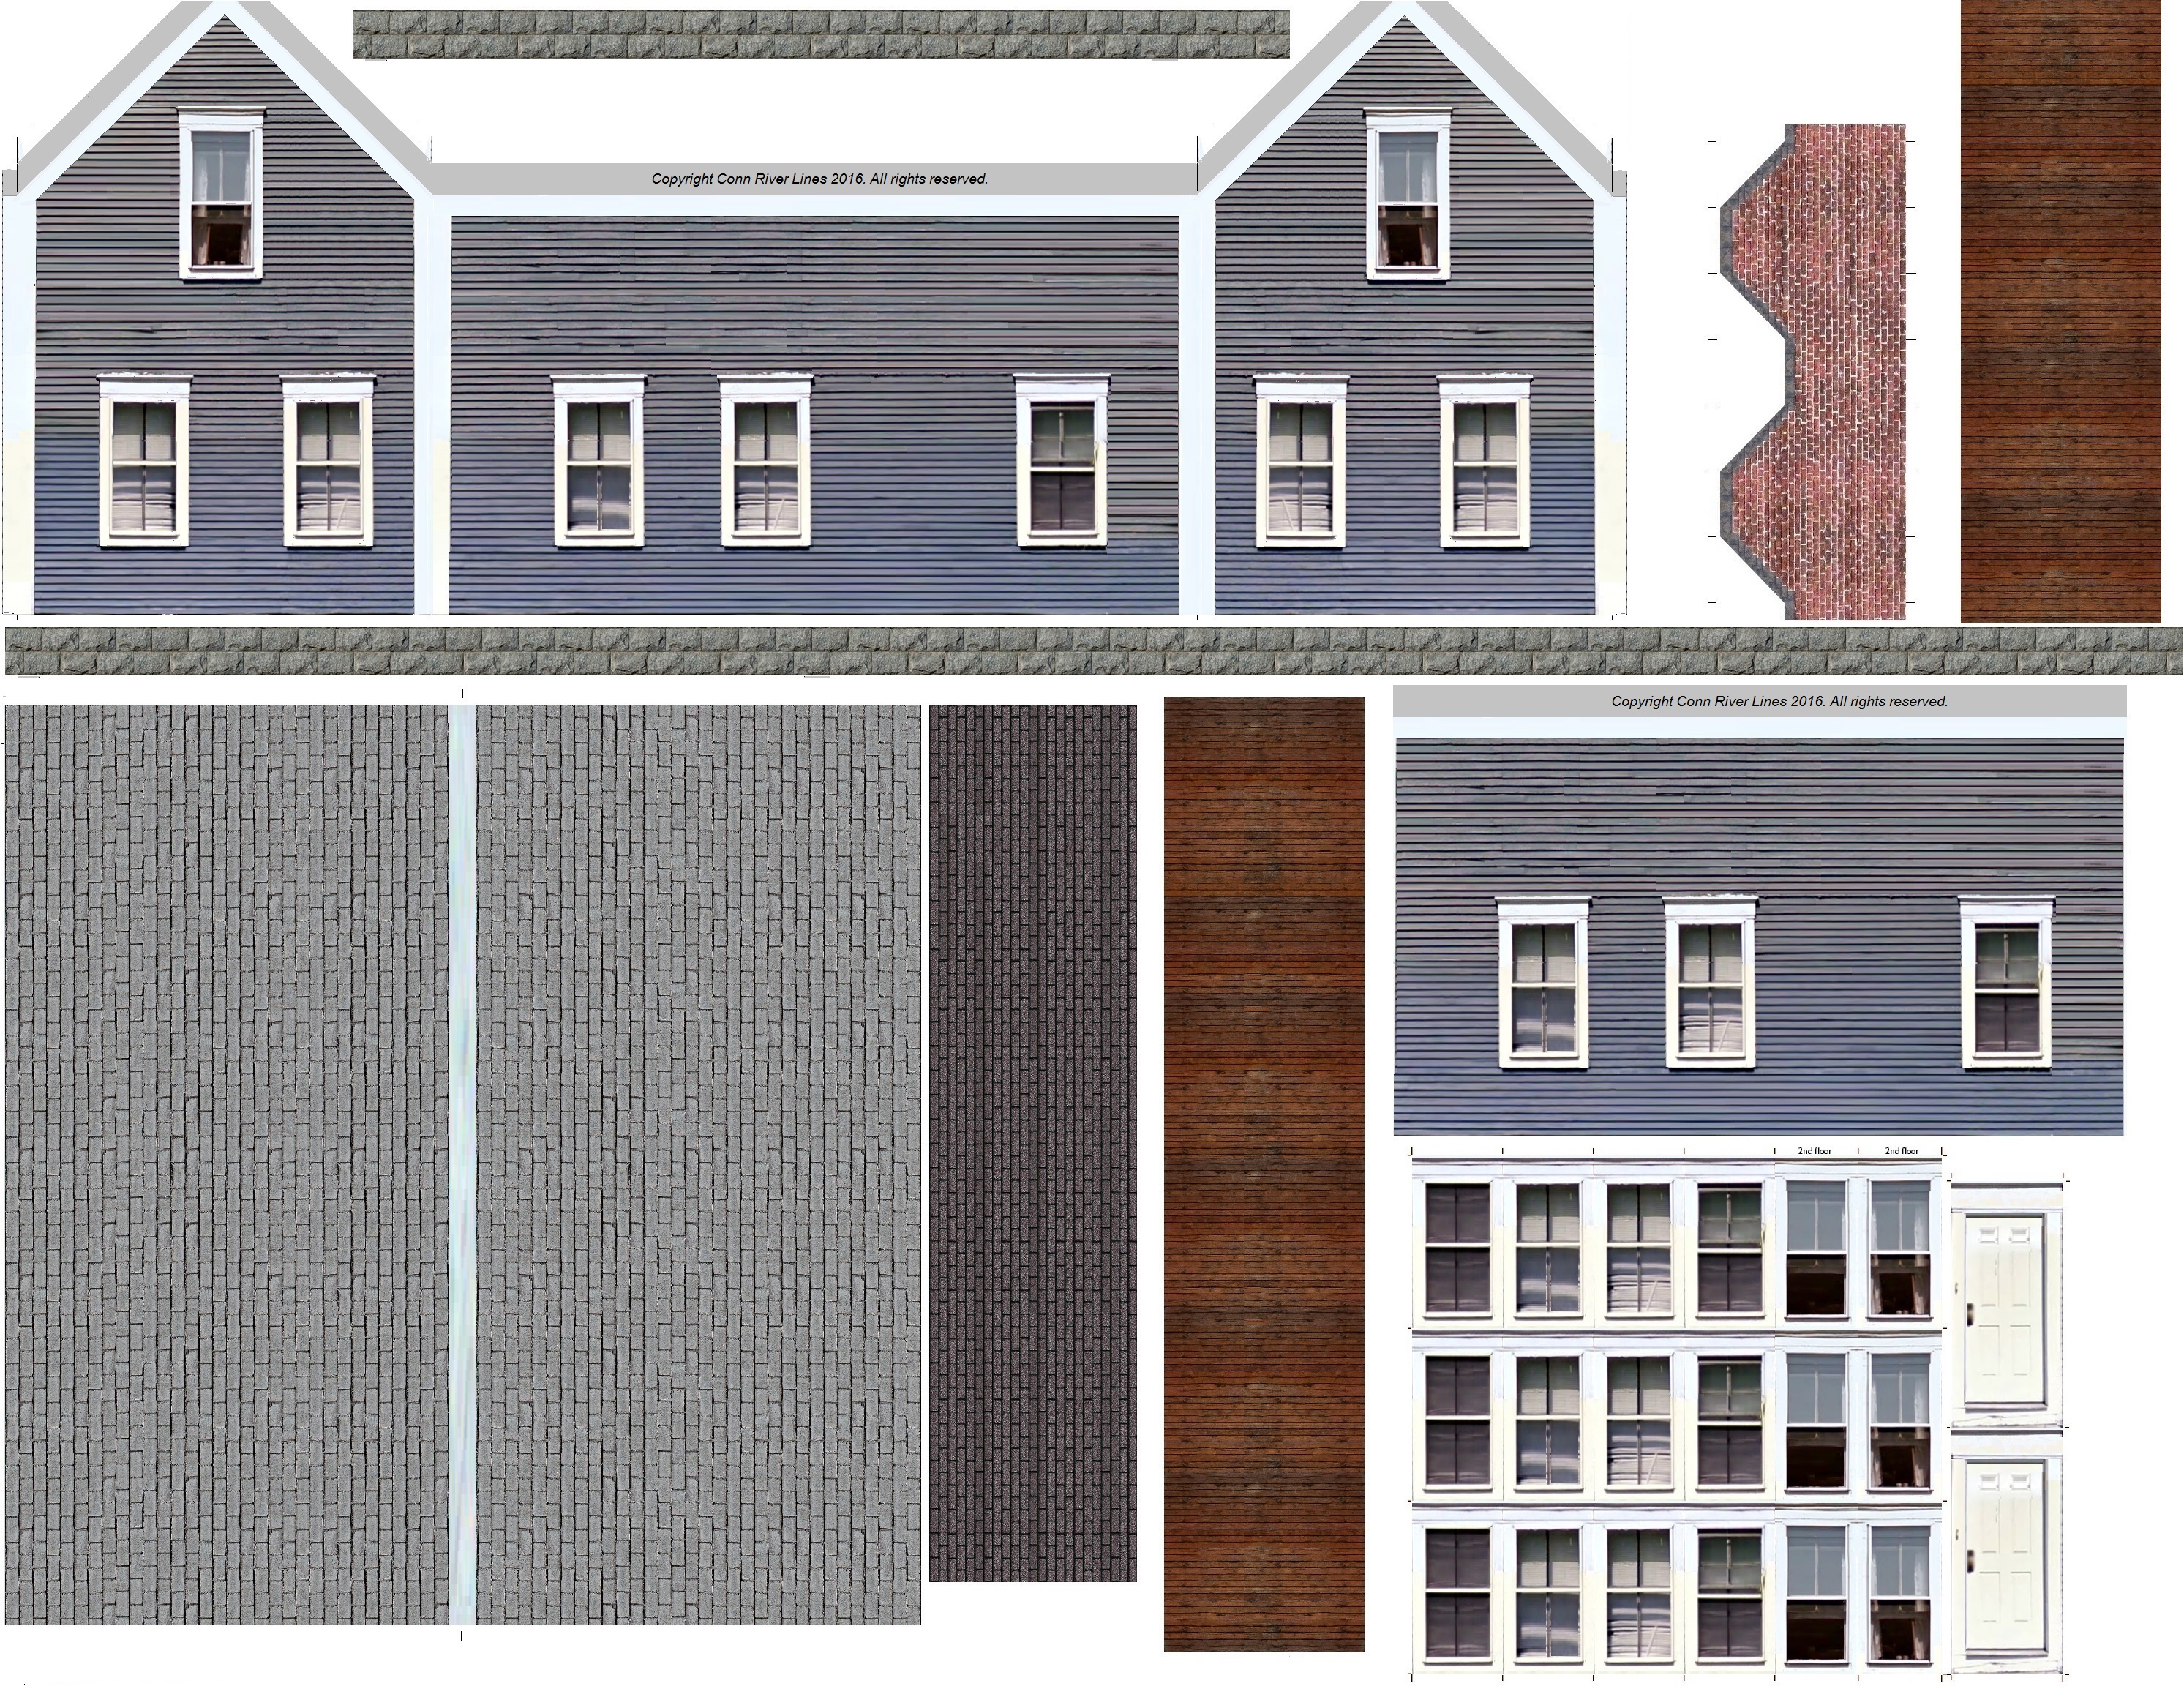
Houses are based on photos taken around White River Junction, Vermont.
They are designed to fit on a single 8.5" x 11" sheet of card stock (thicker than standard paper).
Roofs are printed on a separate sheet - four to a sheet.
When printed at 100% they are slightly undersized - approximately 92% of scale size.
For example, the front door - when printed at 100% - ends up a scale size of 74" tall by 33" wide.
A standard front door is 80" tall by 36" wide.
The houses are intended to be background structures and by being slightly undersize it helps with the illusion that they are farther away.
Separate doors and windows are provided with each house.
These are glued to the house walls to provide some depth and give the impression of three-dimensions.
The separate doors are printed in white to cover up any windows that may have changed during the colorization process.
Some of the windows - labeled "2nd floor" - are slightly smaller than the others.
These are intended to be used on any second story windows.
Note that no doors are printed on the walls.
The user can choose where the door or doors will be located and simply glue a door over one of the first story windows.
This allows various combinations of front, side and back doors to give variety.
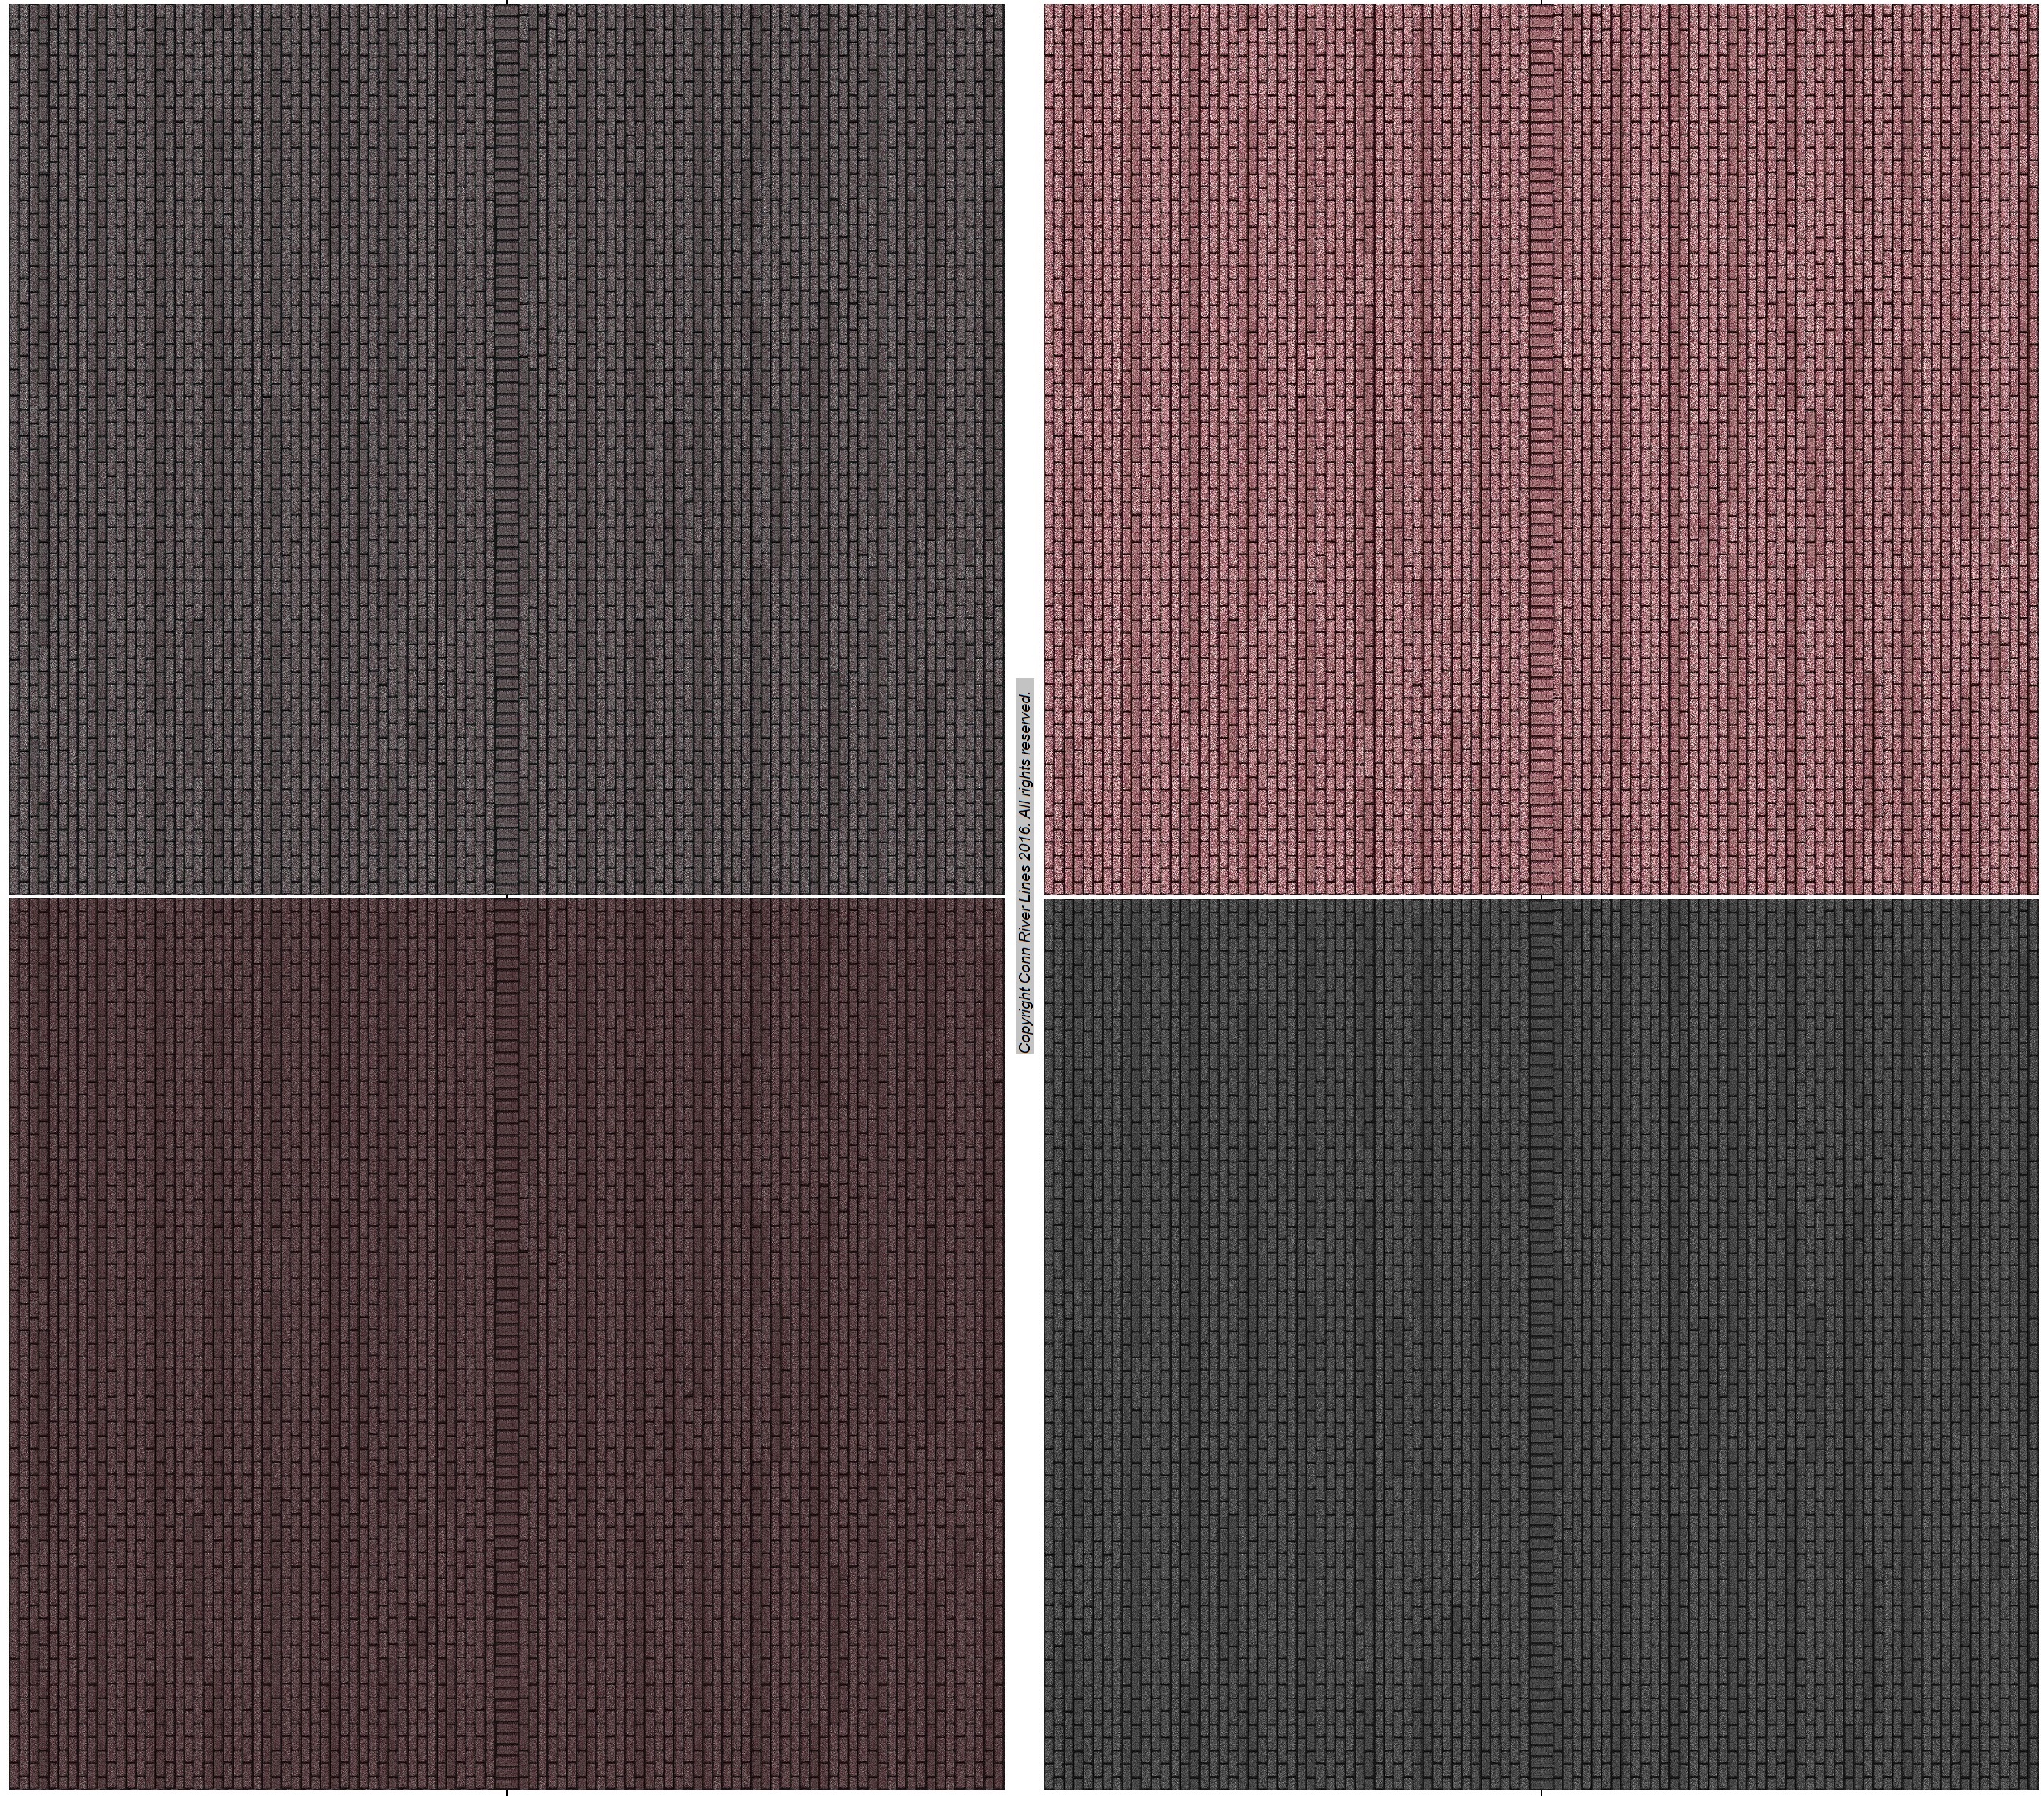
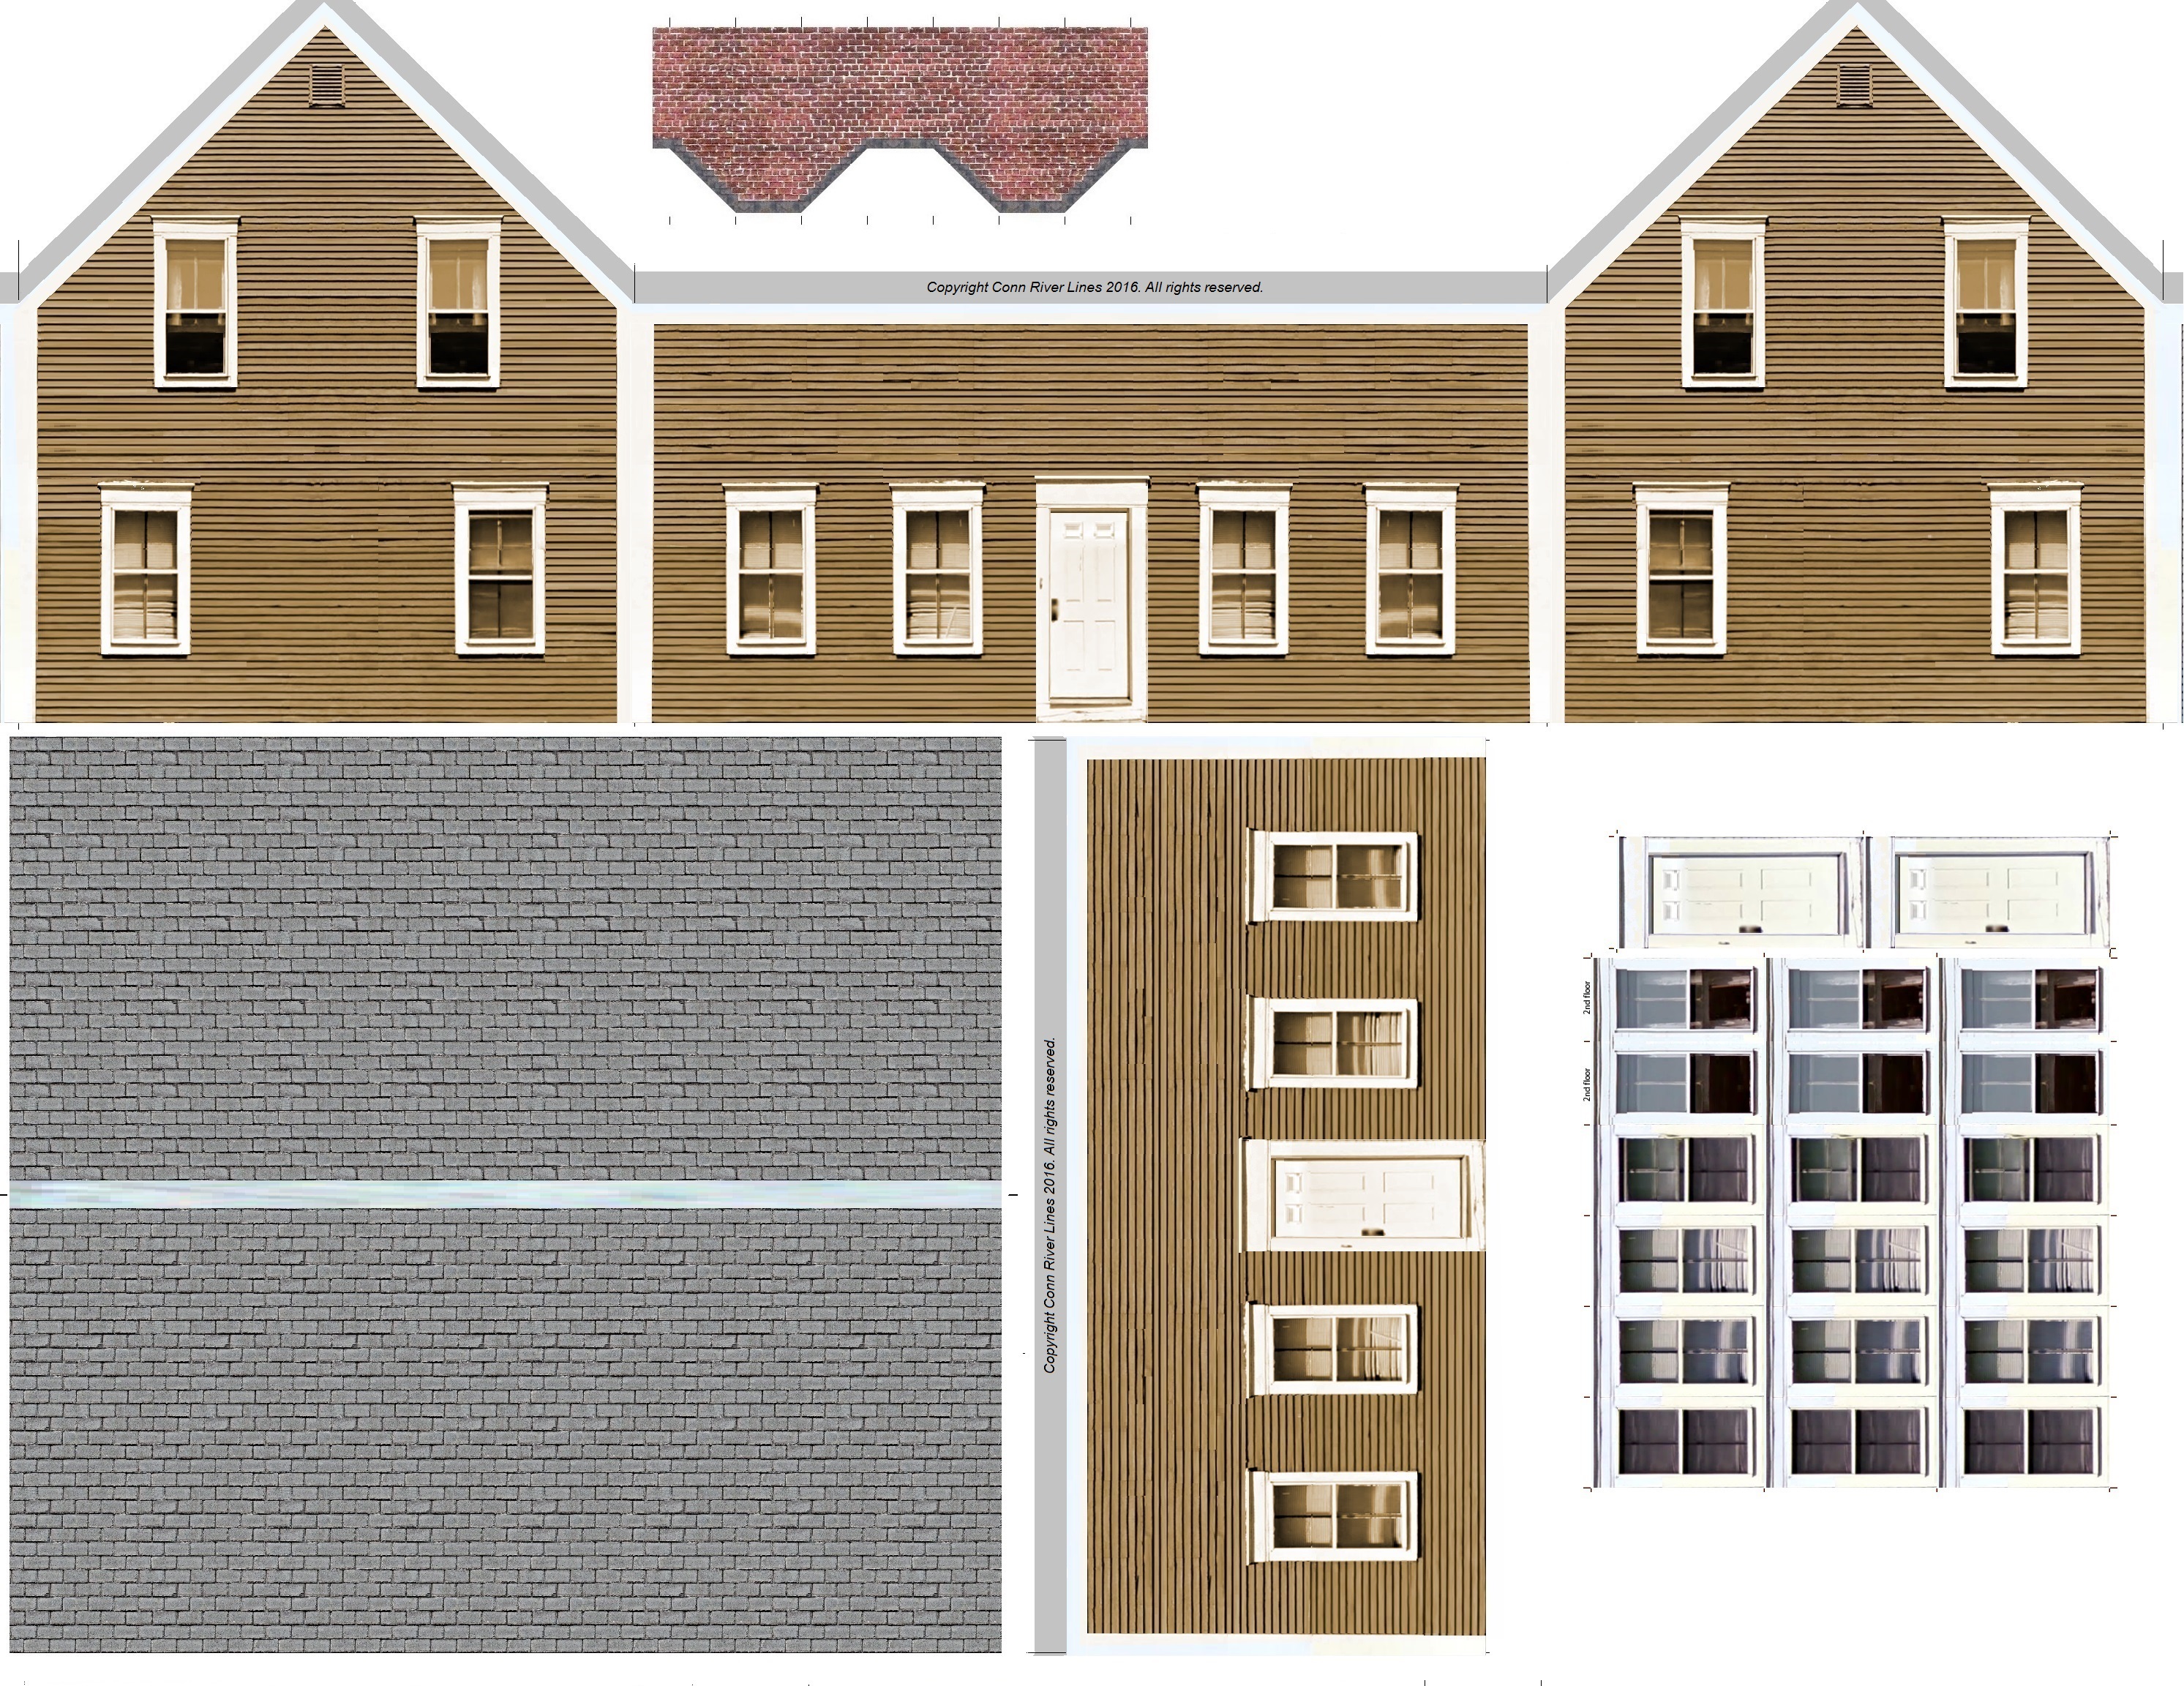
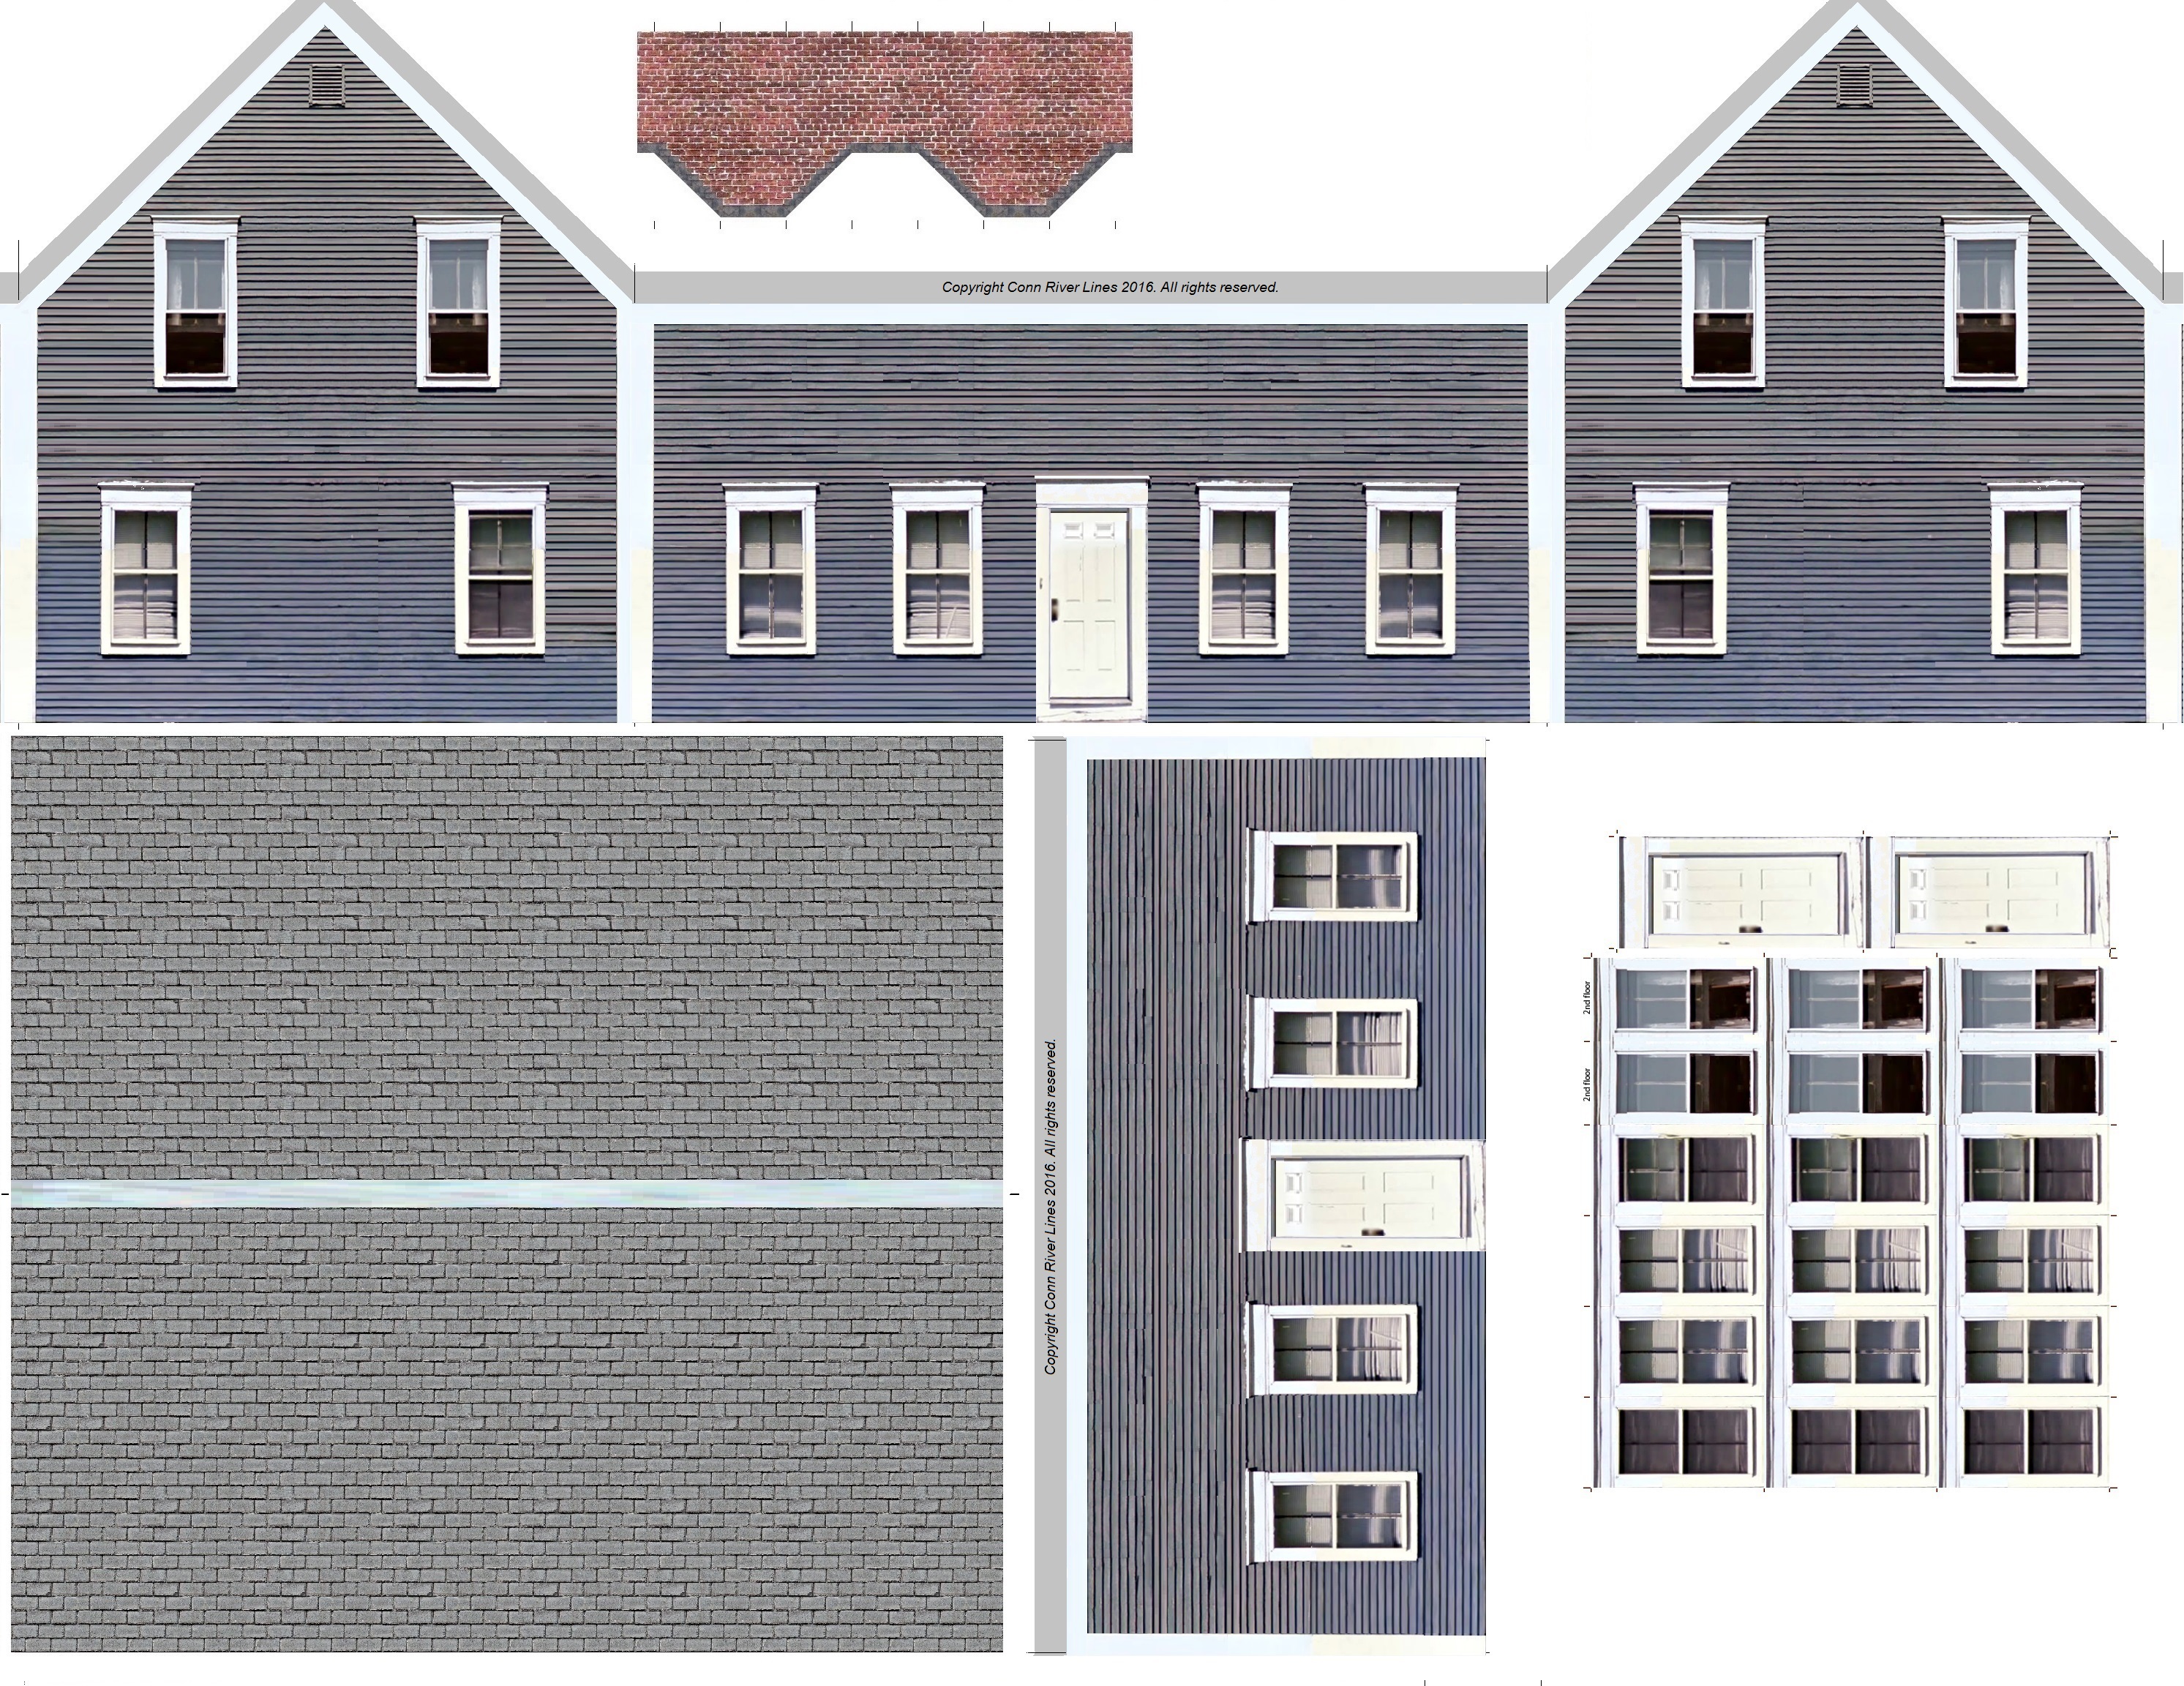
The houses come in a variety of colors.
Each house comes with three different materials for foundations to provide additional variety:
- Brick
- Granite blocks
- Concrete or cinder blocks
Each house also includes an optional porch.
Some have screens and some have plain faces that the glass windows and a door can be applied.
The porch roof is included.
It is also an option to cut the porch down and use the included simulated wooden deck.
It can be an open deck or the roof can be added and held up with some posts.
Recommended Glues
Basically the only glue required for construction is ordinary white glue.
While something generic like Elmer's is acceptable, it is recommended that a craft glue like Aleene's Tacky Glue is used.
It "grabs" and sets up a little quicker and it stays flexible over time.
Attaching the doors and windows is done most easily with a glue stick.
The item can be flipped over and rubbed with the glue stick and then secured.
Make sure it is permanent glue, some sticks contain a weaker glue for temporary attachments and it can be annoying to have windows falling off the house after installation.
Using white glue and a brush is also an option.
"Super glue" - type glues set very quickly but tend to bleed into the paper and discolor it so should be avoided for general construction.
They could be used to add details like steps or posts but should be used sparingly.
The best selection of glues and glue stick is available at craft stores (Michael's, AC Moore, etc.).
Wall Printing
The easiest application to use for printing is Microsoft Paint.
Other editing/printing applications can be used but the following instructions are specific to Paint.
It is recommended to use 80lb card stock but any thicker paper will work adequately.
Open the desired JPEG in Paint - "File | Open" or right click the file and select "Open with | Paint"
Select "Print | Page Setup"
Under "Scaling" select "Adjust to: 100% normal size"
At this point the image will probably appear to be slightly larger than a single sheet of paper.
To correct this, go to the "Margins" option and change values to zero (0) until the image fits on a single sheet.
Note that if you choose "Fit to 1 by 1 page(s)" you won't be sure exactly what scale the final printout will be and it could be inconsistent between houses.
Note that you could also be creative in what "% normal size" you choose.
Maybe the nearest houses could be 100% and the ones slightly further away could be 90%, and then 80%, etc.
Also, if working in another scale, such as N, you could adjust the size accordingly (N is approx. 54% of HO).
When done, select OK.
To confirm, select "Print | Print Preview" and make sure the image fits on a single sheet.
When ready, place the card stock in the printer and print the image.
Wall Scoring and Cutting
Don't be in a hurry to cut the walls out of the main sheet.
Things will be much easier if you score the corners and edges first.
There are tick marks at the ends of all the score lines and if you cut the walls out too early these will be lost.
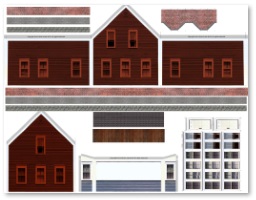
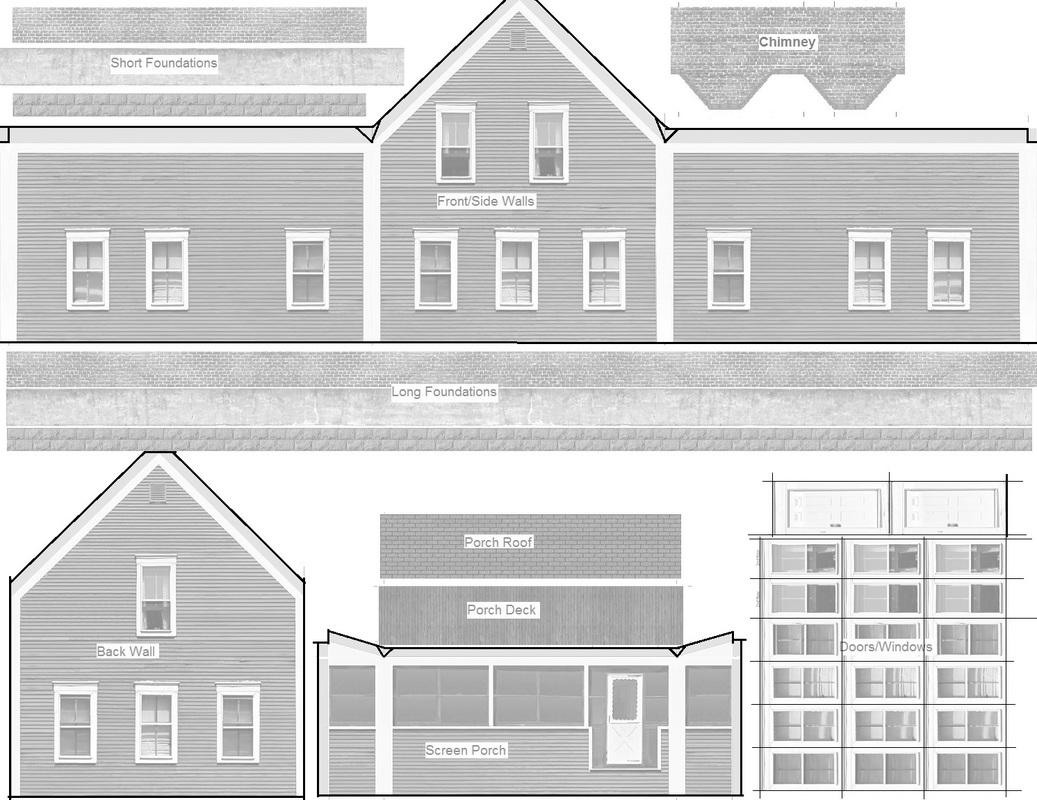
Houses are based on photos taken around White River Junction, Vermont.
They are designed to fit on a single 8.5" x 11" sheet of card stock (thicker than standard paper).
Roofs are printed on a separate sheet - four to a sheet.
When printed at 100% they are slightly undersized - approximately 92% of scale size.
For example, the front door - when printed at 100% - ends up a scale size of 74" tall by 33" wide.
A standard front door is 80" tall by 36" wide.
The houses are intended to be background structures and by being slightly undersize it helps with the illusion that they are farther away.
Separate doors and windows are provided with each house.
These are glued to the house walls to provide some depth and give the impression of three-dimensions.
The separate doors are printed in white to cover up any windows that may have changed during the colorization process.
Some of the windows - labeled "2nd floor" - are slightly smaller than the others.
These are intended to be used on any second story windows.
Note that no doors are printed on the walls.
The user can choose where the door or doors will be located and simply glue a door over one of the first story windows.
This allows various combinations of front, side and back doors to give variety.
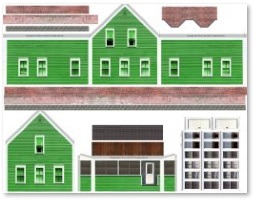
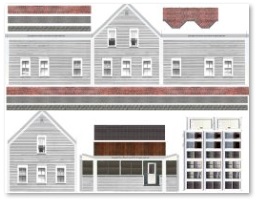
The houses come in a variety of colors.
Each house comes with three different materials for foundations to provide additional variety:
- Brick
- Granite blocks
- Concrete or cinder blocks
Each house also includes an optional porch.
Some have screens and some have plain faces that the glass windows and a door can be applied.
The porch roof is included.
It is also an option to cut the porch down and use the included simulated wooden deck.
It can be an open deck or the roof can be added and held up with some posts.
Recommended Glues
Basically the only glue required for construction is ordinary white glue.
While something generic like Elmer's is acceptable, it is recommended that a craft glue like Aleene's Tacky Glue is used.
It "grabs" and sets up a little quicker and it stays flexible over time.
Attaching the doors and windows is done most easily with a glue stick.
The item can be flipped over and rubbed with the glue stick and then secured.
Make sure it is permanent glue, some sticks contain a weaker glue for temporary attachments and it can be annoying to have windows falling off the house after installation.
Using white glue and a brush is also an option.
"Super glue" - type glues set very quickly but tend to bleed into the paper and discolor it so should be avoided for general construction.
They could be used to add details like steps or posts but should be used sparingly.
The best selection of glues and glue stick is available at craft stores (Michael's, AC Moore, etc.).
Wall Printing
The easiest application to use for printing is Microsoft Paint.
Other editing/printing applications can be used but the following instructions are specific to Paint.
It is recommended to use 80lb card stock but any thicker paper will work adequately.
Open the desired JPEG in Paint - "File | Open" or right click the file and select "Open with | Paint"
Select "Print | Page Setup"
Under "Scaling" select "Adjust to: 100% normal size"
At this point the image will probably appear to be slightly larger than a single sheet of paper.
To correct this, go to the "Margins" option and change values to zero (0) until the image fits on a single sheet.
Note that if you choose "Fit to 1 by 1 page(s)" you won't be sure exactly what scale the final printout will be and it could be inconsistent between houses.
Note that you could also be creative in what "% normal size" you choose.
Maybe the nearest houses could be 100% and the ones slightly further away could be 90%, and then 80%, etc.
Also, if working in another scale, such as N, you could adjust the size accordingly (N is approx. 54% of HO).
When done, select OK.
To confirm, select "Print | Print Preview" and make sure the image fits on a single sheet.
When ready, place the card stock in the printer and print the image.
Wall Scoring and Cutting
Don't be in a hurry to cut the walls out of the main sheet.
Things will be much easier if you score the corners and edges first.
There are tick marks at the ends of all the score lines and if you cut the walls out too early these will be lost.
coring is best done with the BACK of a #11 X-Acto knife and a metal straight edge (such as a scale rule).
When you score the front the resulting fold will expose the white paper underneath.
Since the trim boards are basically all white this is not an issue.
For things like the foundations or the chimneys it is best to score the back of the item so the white does not show at the fold (more on that later).
Begin by lining the scale rule up with the tick marks on the vertical edges of the front and side walls and score with the back of the X-Acto knife.
Light pressure is all that is needed - just enough to allow a straight fold but not weaken the corner too much.
Repeat on the vertical edges of the back wall and the porch (if you are using it).
Next, score the horizontal and diagonal edges of the tabs used to support the roof for all four walls.
Repeat for the porch (if used) and include the vertical tabs that are used to secure the porch to the house.
Don't score anything else but the walls and porch at this time.
Now it is time to cut out the assorted pieces.
Cutting can be done with the same X-Acto knife used to score the walls provided it is BRAND NEW.
However, using a fresh SINGLE EDGE razor blade works best and is recommended.
Cutting should be done on a self-healing cutting mat. These are available at craft stores (Michael's, AC Moore, etc.) or office supply stores (Staples, Office Depot, etc.).
Using the metal straight edge and razor blade, cut out the front/side wall panel.
Include the gray tabs along the tops of the walls - these will secure the roof.
Also include the wide trim "boards" on either side of the panel - these will hold on the back wall.
Repeat for the back wall and the porch (if used).
When the walls are eventually folded, the tabs at the corners will overlap - this results in uneven "bumps",
To handle this, make "V" shaped cuts at all corners.
Resist the urge to start folding things at this point.
It is much easier to add the windows and doors while things are still flat.
Do not cut a foundation out at his point - the process will be covered later.
Cut out all the windows and doors.
The method below works best to minimize cuts and leave the tick marks in place as long as possible:
Cut all the horizontal door/window lines first - cutting from tick mark to tick mark.
Cut along the middle two vertical window lines to free up the middle windows.
Cut the left and right vertical window lines to free up the rest of the windows.
Cut the middle vertical line of the doors to separate them.
Separate the top two rows of windows from the rest - these are second story windows and are a little narrower than the first floor windows.
Window/Door Assembly
Determine where the door or doors are to be attached and which window(s) will be covered.
In real life there is usually one door facing the street either on the left or right - very occasionally in the middle.
If the house has a driveway alongside there is sometimes a door facing it, or the door could be on the back wall.
If the porch is going to be used then there is no reason to glue on a front door or front first story windows - since they will be covered by the porch.
Of course, if any wall will not be seen the windows can be left off there too.
Align the door with the top of the selected window and glue it in place. Keep it square to the wall.
The door should completely cover the window and the bottom of the door should align with the bottom of the wall.
Glue the windows in place.
Keep in mind the smaller windows are for the second story.
There are a few different window detail varieties - horizontal blinds, shades and curtains.
These should be mixed to provide some variety.
House Assembly
Start the folding process with all four vertical seams on the front/side walls.
Fold back the roof tabs at the tops of all the walls (towards the inside of the house) - front/side/back.
Glue the narrow vertical trim folds at the ends of the side walls over the edges of the back wall.
A short strip of 1/4" square strip wood or plastic (6" or so) is helpful in gluing corners.
Place some glue on the back of the trim fold and align it with the back wall trim.
Then lay the wood/plastic strip into the corner and use it to press on the joint until the glue sets up.
At this point the core of the house is ready so let the glue set up and move to the roof.
Roof Print/Score/Cut
There are four roofs provided with each roof printout.
Each roof is slightly different in color to again provide some variety.
Print the roof JPEG the same way as the walls.
The walls and roofs should both be scaled to 100% of actual size - otherwise the roof may not fit properly.
If the house walls were scaled to a different percentage (90%, 80% etc.) then the roof scaling should match.
The roof sheet should be scored before an individual roof is cut out.
Again, there are tick marks to help in the scoring process.
HOWEVER, do not score the roofs from the front.
Scoring from the front leaves a white line along the roof peak that looks unrealistic.
Instead, score the roof from the back.
The easy way to do this is to take a sharp X-Acto knife and stab it slightly through the two top tick marks and the two bottom tick marks.
Make sure the cutting surface is clean of glue residue and flip the roof sheet over.
Then line up the straight edge with the small holes where the tick marks are and score with the back of the blade.
Flip the roof back over and cut out an individual roof using the straight edge and razor blade.
Adding the Roof
The roof is sized to fit on the walls with an approximate 1 scale foot overhang on all sides.
side.
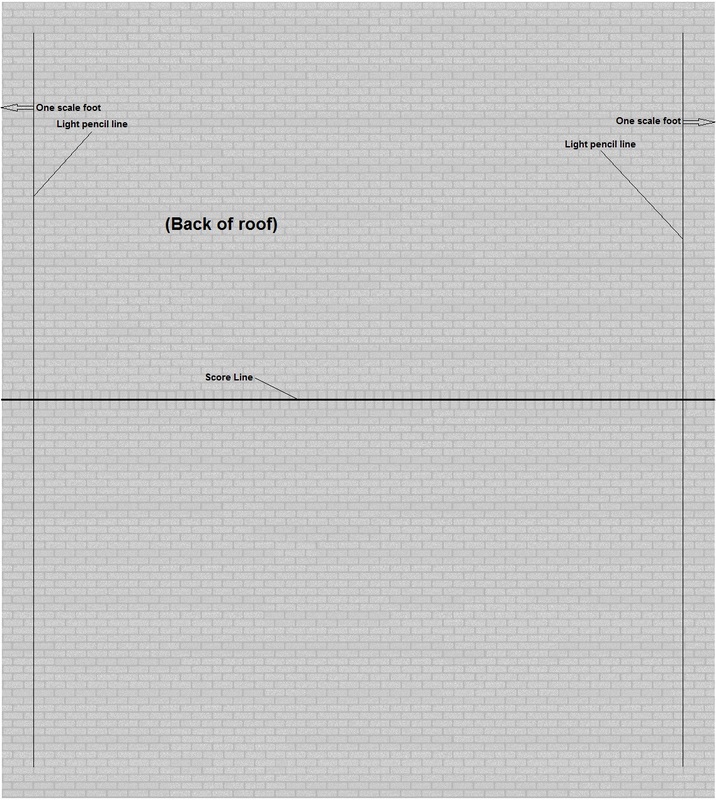
A tip to centering the roof and getting even overhang is to draw two light pencil lines on the BACK of the roof.
These are perpendicular to the score line and one scale foot in from the edge of the roof.
Stop the lines about a scale foot short of the upper and lower edges so they won't show after the roof is glued on.
Dry fit the roof to the house walls to make sure everything fits properly.
It is easiest to glue the roof on in two steps - one side of the peaked roof and then the other.
Apply a bead of glue along a roof support tab on one side of the peaked roof, across the side wall it touches, and back up the peaked roof on the opposite wall.
Place one side of the roof printed side down on a flat surface, flip the house upside down and press the glued tabs to the roof - using the score and pencil lines as a guide.
Gently apply pressure to the back of the tabs with a fingernail or the end of your wood/plastic strip so the glue adheres.
Clean up any glue that may have oozed out onto the roof eaves for a neater appearance.
Let the glue set up for a few minutes and then repeat with the other side of the peaked roof.
You may need a small brush or toothpick to apply the glue near the ridge line.
Let the glue set up for a while prior to the next step.
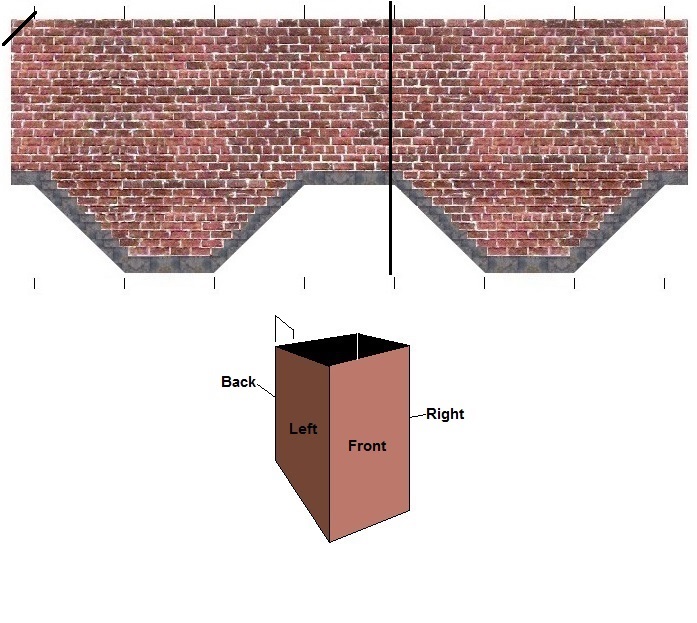
Foundations
In the real world, almost every house has a visible foundation.
Adding a foundation also allows the house to remain level on uneven scenery.
The foundations do not have measured tick marks like the walls and roofs.
They are glued inside the house walls and so must be slightly shorter than the walls.
Since the wall thickness can vary depending on the weight of paper used the foundation panels will be custom fit to the walls.
Select which foundation (brick, cinder block, etc.) will be used.
One part is a long panel for under the front/side walls and the other is a short panel is for the back.
DO NOT cut exactly along the top of the selected foundation.
A narrow gluing strip is needed to overlap the bottom edge of the house walls.
Instead, place the straight edge about 1/8" (approx. one scale foot) above the top of the foundation and cut.
Note that this may require cutting through part of another foundation.
Cut normally along the side and bottom edges of the foundation.
Select the least visible corner of the house to start the process of adding the foundation.
Place the house on its side with that corner resting on a flat surface.
Without any glue, slide the LONG foundation end, face down, into that corner and lay it along the bottom of the wall resting on the surface.
Where it meets the INSIDE of the next corner make a small mark with a sharp pencil - this will be the score point.
Using the SQUARE end of a straight edge, score the back of the foundation at the pencil mark and fold.
Apply glue along the bottom inside of that wall and press the foundation into place.
Pick up the house and align the bottom of the house with the top of the printed foundation to keep everything parallel.
Lay the next wall on the flat surface and repeat - pencil mark, score, fold, glue.
Repeat for the third wall but mark the wall slightly short of the inside corner - the thickness of the paper used.
Score and fold the last, short piece of the foundation up and glue the wall in place but not the last short tab.
Now slide the short foundation end, face down, into that corner - between the foundation fold and the wall.
Mark where the short foundation meets the starting corner, score and fold.
Now apply glue to the bottom inside of the wall as before and also to the tab from the previous step and the tab we just created on the short foundation.
The foundation is now complete - there will be a couple of locations where the paper end is showing but they should be away from the viewer.
If not, they can be concealed with a gray/red marker, a bush, or some other method.
Stiffening
Assuming a decent thickness card stock was used the house should not need any additional stiffening.
However, it is possible that the bottom of the walls could bow in or out (the roof and support tabs tend to keep the upper part of the walls straight).
To straighten/stiffen the lower walls the easiest method is to cut a piece of straight balsa or basswood - 1/8" square or so - slightly shorter than the wall and glue it in place along the foundation joint.
Porch construction (optional)
Score the porch vertical seams and tabs if not done above.
Cut out the porch walls.
If using the screen porch it is ready for folding and installation.
If using the porch enclosed with windows the windows and door must be glued on first.
The porch uses only first story windows.
Glue a window to each side of the porch.
The front of the porch is sized to accept one door and five windows.
Typically it is one window, a door and then four windows (left or right), however, any combination is acceptable.
Glue the windows and door in place and let dry.
The porch is designed so that the bottom edge of the porch sits a couple of scale feet below the bottom edge of the house front.
The tops of the windows on the porch (either glass or screen) should end up aligned with the tops of the windows on the house sides.
One option is to cut the bottom of the porch off to match the bottom of the house and install a foundation.
Printing an extra house would provide ample material for the same style of foundation or using a different foundation from the same sheet could be used - and add some character to the house.
Another option is to trim the house foundation to match the bottom of the porch and have the porch sit "on the ground".
Yet another option - if the house foundation leaves the porch slightly raised - is to sit the porch on strip wood painted a cement color to represent concrete footings.
This could be a solid piece along all three bottom edges or small squares at the corners and a couple of locations along the front bottom edge (evenly spaced).
Any porch height cutting is easier before attaching - do so before progressing to the next step.
Porch installation (optional)
Fold the vertical corners of the porch, attachment tabs and roof support tabs.
Apply glue to the attachment tabs and press them to the house trim corner boards.
Keep the tops of the porch windows aligned with the tops of the house side windows and the sides of the porch even with the sides of the house.
Let dry.
Cut the porch roof out.
A support is needed where the porch roof meets the front of the house.
Cut a piece of strip wood (around 1/16" square) slightly shorter than the width of the porch and glue it along the front wall of the house.
The strip should be level, and even with the points where the back of the porch walls meet the house. Let dry.
Apply glue to the top of the wood strip and the roof support tabs of the porch and press the roof in place.
Keep the porch roof centered and keep the porch square by checking for equal overhang of the roof.
Let dry.
Porch Deck (optional)
A wood porch deck is included - cut it from the sheet.
The porch height should be slightly below the height of the front foundation (to leave room for the deck).
SCORE the bottom of the porch parallel to the bottom (use the clapbords as a guide).
Cut the porch about 1/8" above this score line - this will create a gluing tab for the deck.
Make "V" shaped cuts at the front corners and cut the gluing tabs off the top of the porch attachment tabs.
Glue the shortened porch attachment tabs to the foundation - even with the sides of the house.
Glue a support piece of strip wood along the house front even with the foundation (as described above).
Let things dry.
Apply a bead of glue along the top of the wood strip and the folded gluing tabs.
Press the wood deck in place - keeping even overhang on each side.
The wood deck will have a white edge where it was cut from the paper.
This can be left white to look like painted trim or a brown marker or paint could be applied to make it look like solid wood.
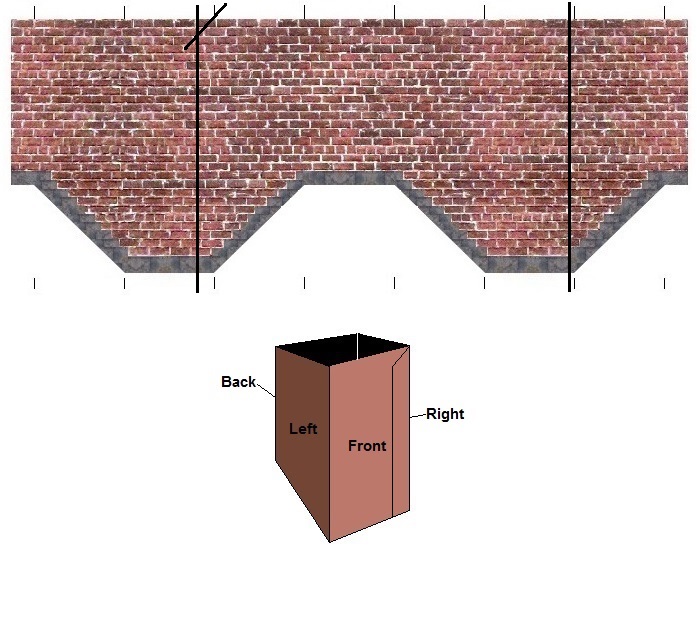
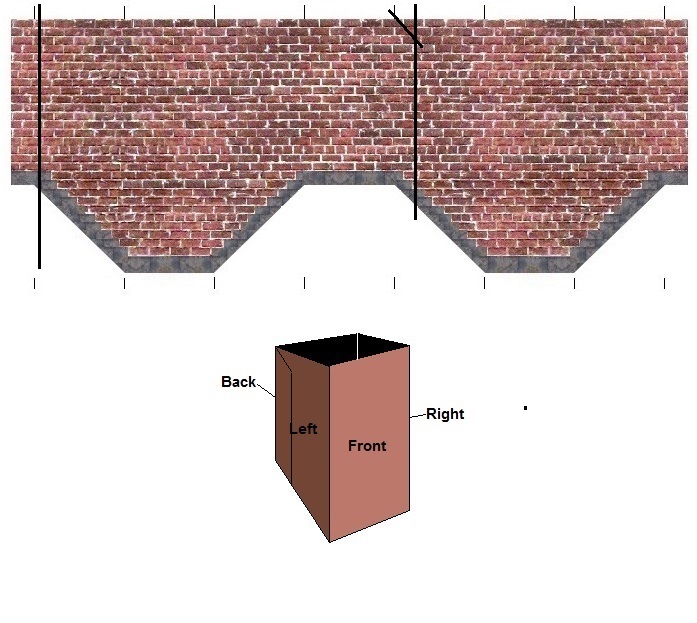
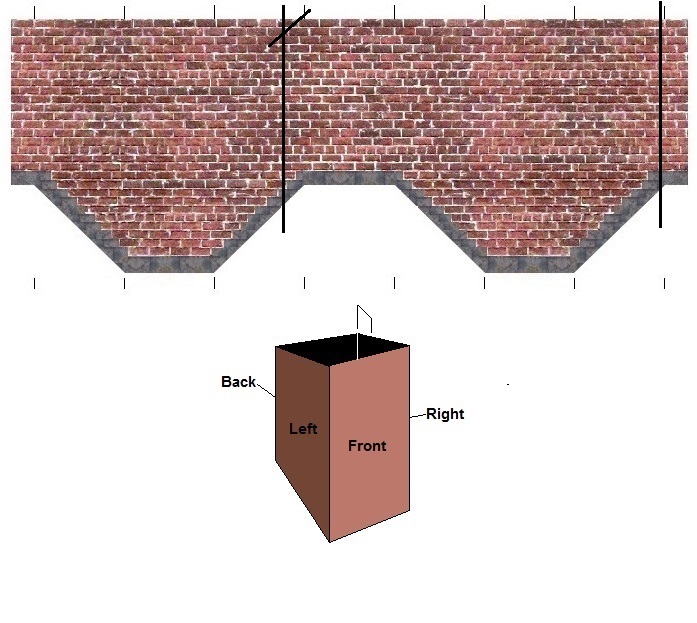
Chimney
The chimney is not intended to be viewed from all four sides.
As designed, there will be a seam/joint along one face.
Preferably that one will be the least visible when the house is viewed.
This is why the chimney has more than four faces - some will be trimmed off.
As usual, DO NOT cut the chimneys out until they are scored.
Like the roof, the chimney is scored from the back to avoid white fold lines.
Stab small vertical holes at the upper and lower chimney tick marks.
Flip the sheet face down, align the straight edge with each pair of holes and score.
Flip back to face up.
Decide which face of the chimney will be away from the viewer.
The chimney faces used will be the selected one and the next three on its left or right.
Make a cut through the chimney on the vertical edge away from the attached three sides.
The cut should be inside the tick marks the thickness of the paper being used - making that face slightly narrower than the others.
If you cut exactly on the tick marks that face ends up being slightly too wide (it is glued while the others are folded) - and the chimney will not be square.
On the opposite side of the four faces make a vertical cut about 1/8" outside the tick marks.
This will create a gluing tab.
Make the horizontal and diagonal cuts to release the chimney from the sheet.
Make a small diagonal cut at the top of the gluing tab created in the above step.
This hides the top edge of the gluing tab from the viewer.
These are perpendicular to the score line and one scale foot in from the edge of the roof.
Stop the lines about a scale foot short of the upper and lower edges so they won't show after the roof is glued on.
Dry fit the roof to the house walls to make sure everything fits properly.
It is easiest to glue the roof on in two steps - one side of the peaked roof and then the other.
Apply a bead of glue along a roof support tab on one side of the peaked roof, across the side wall it touches, and back up the peaked roof on the opposite wall.
Place one side of the roof printed side down on a flat surface, flip the house upside down and press the glued tabs to the roof - using the score and pencil lines as a guide.
Gently apply pressure to the back of the tabs with a fingernail or the end of your wood/plastic strip so the glue adheres.
Clean up any glue that may have oozed out onto the roof eaves for a neater appearance.
Let the glue set up for a few minutes and then repeat with the other side of the peaked roof.
You may need a small brush or toothpick to apply the glue near the ridge line.
Let the glue set up for a while prior to the next step.
Foundations
In the real world, almost every house has a visible foundation.
Adding a foundation also allows the house to remain level on uneven scenery.
The foundations do not have measured tick marks like the walls and roofs.
They are glued inside the house walls and so must be slightly shorter than the walls.
Since the wall thickness can vary depending on the weight of paper used the foundation panels will be custom fit to the walls.
Select which foundation (brick, cinder block, etc.) will be used.
One part is a long panel for under the front/side walls and the other is a short panel is for the back.
DO NOT cut exactly along the top of the selected foundation.
A narrow gluing strip is needed to overlap the bottom edge of the house walls.
Instead, place the straight edge about 1/8" (approx. one scale foot) above the top of the foundation and cut.
Note that this may require cutting through part of another foundation.
Cut normally along the side and bottom edges of the foundation.
Select the least visible corner of the house to start the process of adding the foundation.
Place the house on its side with that corner resting on a flat surface.
Without any glue, slide the LONG foundation end, face down, into that corner and lay it along the bottom of the wall resting on the surface.
Where it meets the INSIDE of the next corner make a small mark with a sharp pencil - this will be the score point.
Using the SQUARE end of a straight edge, score the back of the foundation at the pencil mark and fold.
Apply glue along the bottom inside of that wall and press the foundation into place.
Pick up the house and align the bottom of the house with the top of the printed foundation to keep everything parallel.
Lay the next wall on the flat surface and repeat - pencil mark, score, fold, glue.
Repeat for the third wall but mark the wall slightly short of the inside corner - the thickness of the paper used.
Score and fold the last, short piece of the foundation up and glue the wall in place but not the last short tab.
Now slide the short foundation end, face down, into that corner - between the foundation fold and the wall.
Mark where the short foundation meets the starting corner, score and fold.
Now apply glue to the bottom inside of the wall as before and also to the tab from the previous step and the tab we just created on the short foundation.
The foundation is now complete - there will be a couple of locations where the paper end is showing but they should be away from the viewer.
If not, they can be concealed with a gray/red marker, a bush, or some other method.
Stiffening
Assuming a decent thickness card stock was used the house should not need any additional stiffening.
However, it is possible that the bottom of the walls could bow in or out (the roof and support tabs tend to keep the upper part of the walls straight).
To straighten/stiffen the lower walls the easiest method is to cut a piece of straight balsa or basswood - 1/8" square or so - slightly shorter than the wall and glue it in place along the foundation joint.
Porch construction (optional)
Score the porch vertical seams and tabs if not done above.
Cut out the porch walls.
If using the screen porch it is ready for folding and installation.
If using the porch enclosed with windows the windows and door must be glued on first.
The porch uses only first story windows.
Glue a window to each side of the porch.
The front of the porch is sized to accept one door and five windows.
Typically it is one window, a door and then four windows (left or right), however, any combination is acceptable.
Glue the windows and door in place and let dry.
The porch is designed so that the bottom edge of the porch sits a couple of scale feet below the bottom edge of the house front.
The tops of the windows on the porch (either glass or screen) should end up aligned with the tops of the windows on the house sides.
One option is to cut the bottom of the porch off to match the bottom of the house and install a foundation.
Printing an extra house would provide ample material for the same style of foundation or using a different foundation from the same sheet could be used - and add some character to the house.
Another option is to trim the house foundation to match the bottom of the porch and have the porch sit "on the ground".
Yet another option - if the house foundation leaves the porch slightly raised - is to sit the porch on strip wood painted a cement color to represent concrete footings.
This could be a solid piece along all three bottom edges or small squares at the corners and a couple of locations along the front bottom edge (evenly spaced).
Any porch height cutting is easier before attaching - do so before progressing to the next step.
Porch installation (optional)
Fold the vertical corners of the porch, attachment tabs and roof support tabs.
Apply glue to the attachment tabs and press them to the house trim corner boards.
Keep the tops of the porch windows aligned with the tops of the house side windows and the sides of the porch even with the sides of the house.
Let dry.
Cut the porch roof out.
A support is needed where the porch roof meets the front of the house.
Cut a piece of strip wood (around 1/16" square) slightly shorter than the width of the porch and glue it along the front wall of the house.
The strip should be level, and even with the points where the back of the porch walls meet the house. Let dry.
Apply glue to the top of the wood strip and the roof support tabs of the porch and press the roof in place.
Keep the porch roof centered and keep the porch square by checking for equal overhang of the roof.
Let dry.
Porch Deck (optional)
A wood porch deck is included - cut it from the sheet.
The porch height should be slightly below the height of the front foundation (to leave room for the deck).
SCORE the bottom of the porch parallel to the bottom (use the clapbords as a guide).
Cut the porch about 1/8" above this score line - this will create a gluing tab for the deck.
Make "V" shaped cuts at the front corners and cut the gluing tabs off the top of the porch attachment tabs.
Glue the shortened porch attachment tabs to the foundation - even with the sides of the house.
Glue a support piece of strip wood along the house front even with the foundation (as described above).
Let things dry.
Apply a bead of glue along the top of the wood strip and the folded gluing tabs.
Press the wood deck in place - keeping even overhang on each side.
The wood deck will have a white edge where it was cut from the paper.
This can be left white to look like painted trim or a brown marker or paint could be applied to make it look like solid wood.
Chimney
The chimney is not intended to be viewed from all four sides.
As designed, there will be a seam/joint along one face.
Preferably that one will be the least visible when the house is viewed.
This is why the chimney has more than four faces - some will be trimmed off.
As usual, DO NOT cut the chimneys out until they are scored.
Like the roof, the chimney is scored from the back to avoid white fold lines.
Stab small vertical holes at the upper and lower chimney tick marks.
Flip the sheet face down, align the straight edge with each pair of holes and score.
Flip back to face up.
Decide which face of the chimney will be away from the viewer.
The chimney faces used will be the selected one and the next three on its left or right.
Make a cut through the chimney on the vertical edge away from the attached three sides.
The cut should be inside the tick marks the thickness of the paper being used - making that face slightly narrower than the others.
If you cut exactly on the tick marks that face ends up being slightly too wide (it is glued while the others are folded) - and the chimney will not be square.
On the opposite side of the four faces make a vertical cut about 1/8" outside the tick marks.
This will create a gluing tab.
Make the horizontal and diagonal cuts to release the chimney from the sheet.
Make a small diagonal cut at the top of the gluing tab created in the above step.
This hides the top edge of the gluing tab from the viewer.
|
|
|
|
Fold the chimney to create a square tube.
Apply a bead of glue along the gluing tab, press in place and let dry.
Using black acrylic paint (like Folk Art or Americana) and a small brush paint the inside and top edge of the chimney to cover the white paper and represent soot.
Don't use a pen or marker as this will bleed through the paper.
Some of the black can also be dry-brushed over the outside edges of the top course of bricks but this should be done lightly.
Determine where on the roof the chimney will be installed.
Hold the chimney in place - align it along the front with a course of shingles and make sure the sides are square.
Then, using a toothpick, apply a bead of glue to the INSIDE of the chimney where the bottom edges meet the roof.
Be as neat as possible, but if some glue ends up visible along the outside bottom it can be painted dark gray or black to represent roofing tar.
Finish Touches
If the foundations were installed the doors will end up being somewhat higher than the surrounding scenery.
The simplest solution is to cut strips (1/8" square or so) of balsa, basswood or styrene about a scale 6" wider than the door and stack them to create steps.
They can be painted a gray mortar color to represent concrete, or a wood color.
Center them under the door even with the bottom and glue them to the foundation.
Steps from Central Valley or some other hobby manufacturer could also be used.
Roof streaks, bird droppings, mud splashes around the foundations, etc, can be applied with paint or chalks.
Try the affects out on scrap pieces or the side of the house least visible first.
Installation
If the terrain the house is to sit on is perfectly level then simply sit it in place.
If there is a slope, the foundation can be cut with scissors to allow the house to sit level - front to back and side to side.
The house can simply sit in place or mark the corners with a pen and glue small wood or foam blocks inside each corner to keep it in place.
The joint where the foundation meets the ground can be disguised with ground foam bushes or other scenery techniques.
Be very cautious when using typical water-based scenery techniques around the houses.
The ink can easily run if sprayed with misted water or if scenery water/glue wicks up from the surrounding ground.
A protective coating can be sprayed on - like a Krylon clear spray. Some even provide UV protection.
Again, try out the spray on a scrap piece first - several light coats are best to prevent the ink from bleeding.
If a large scenery project is planned, it is best to remove the house and put it away.
