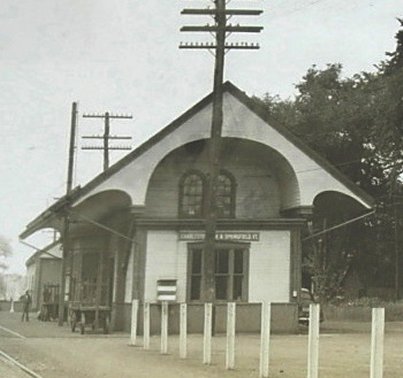
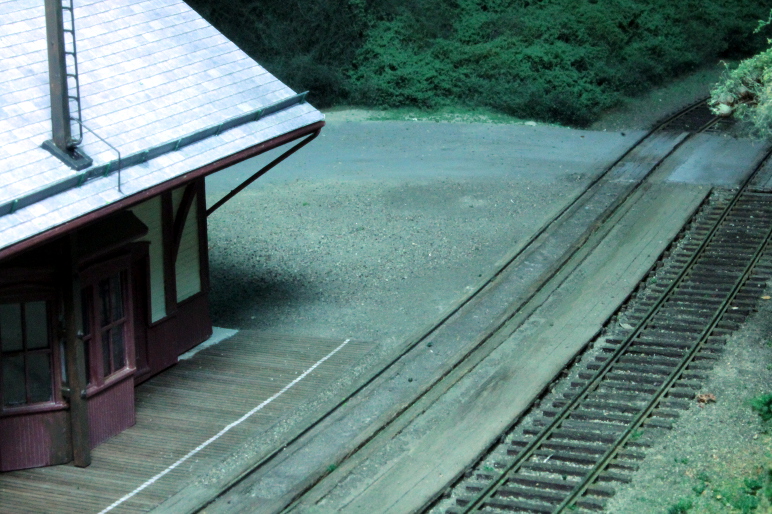
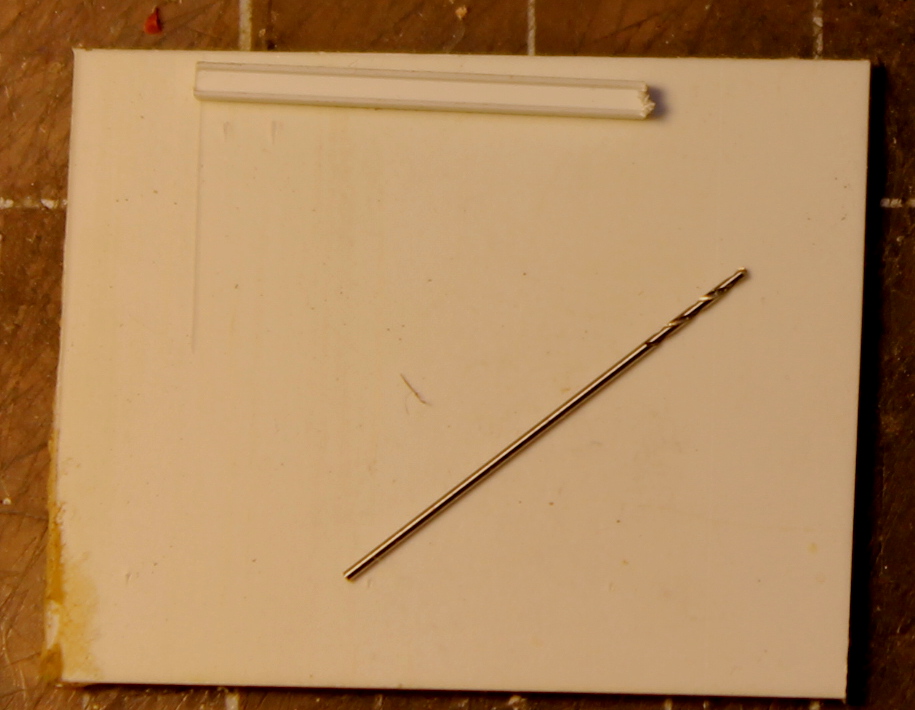
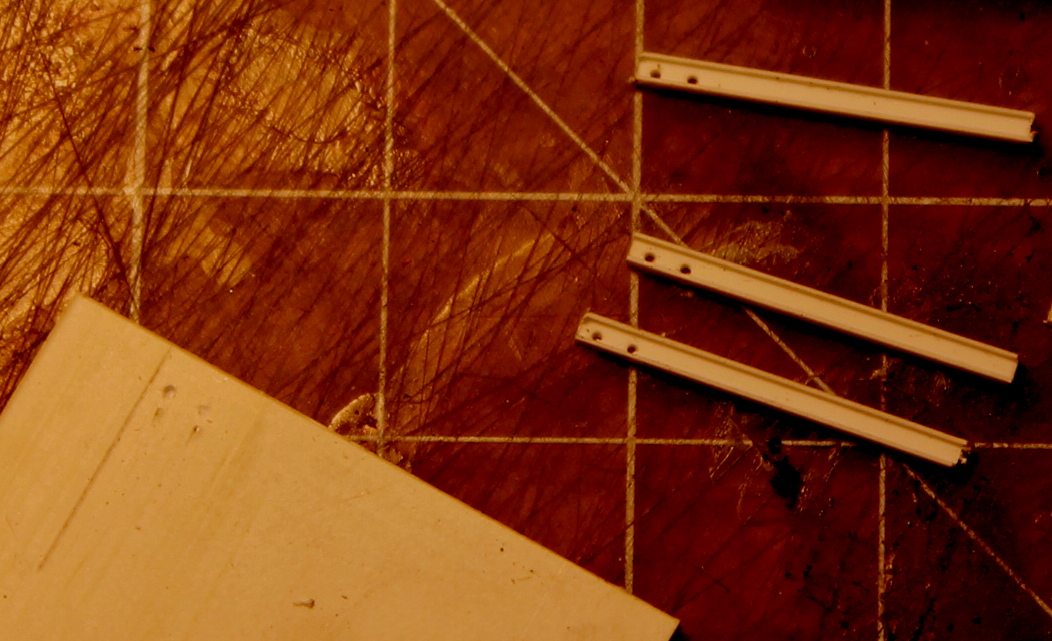
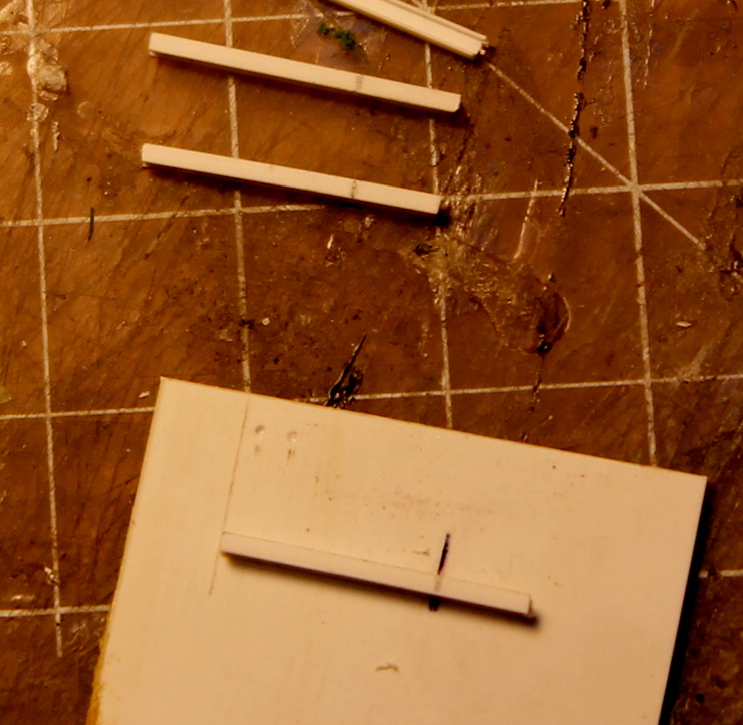
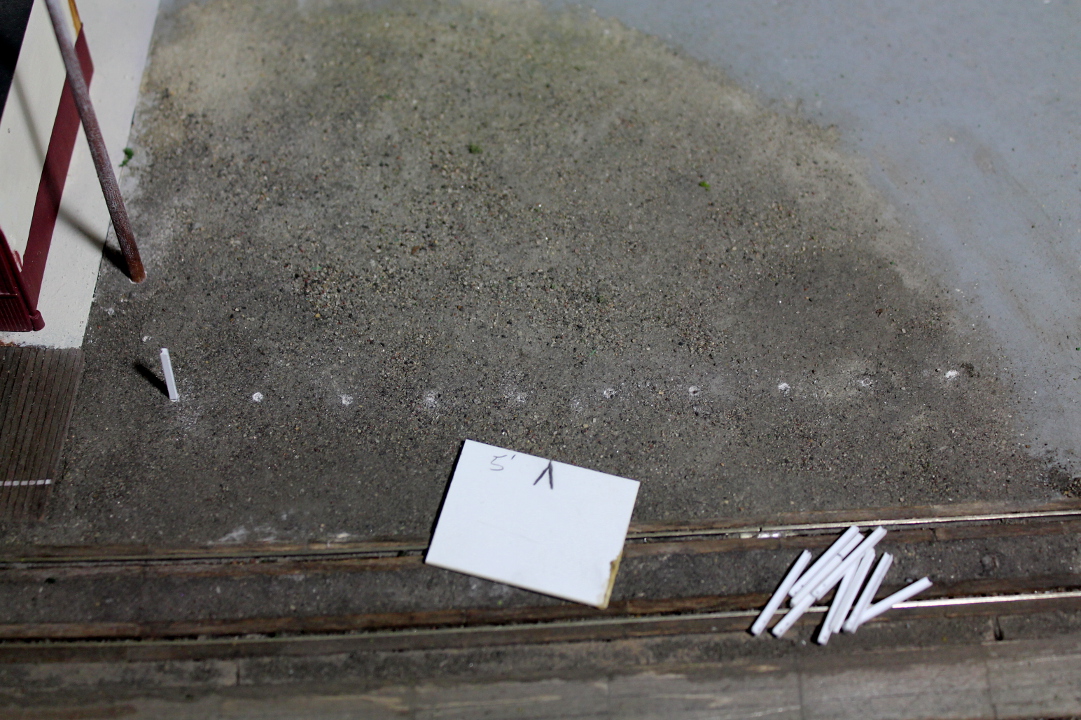
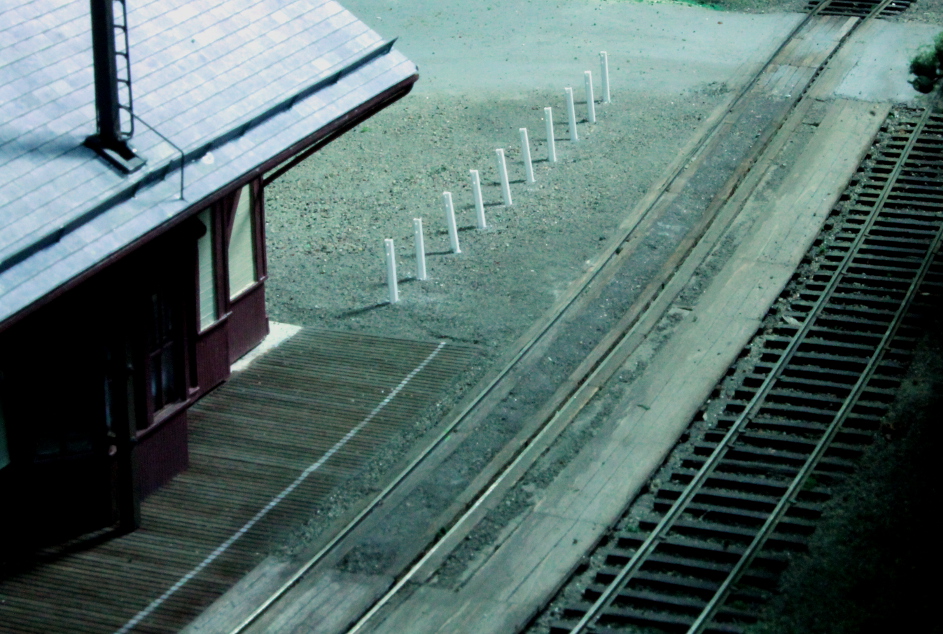
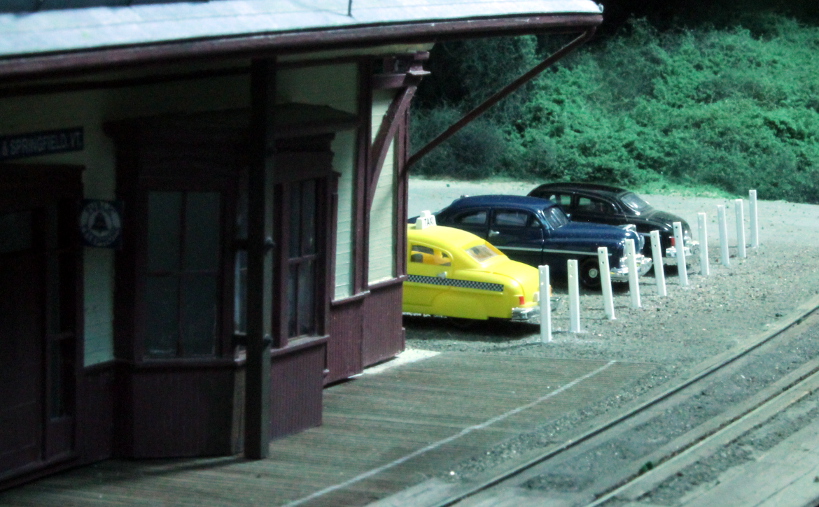
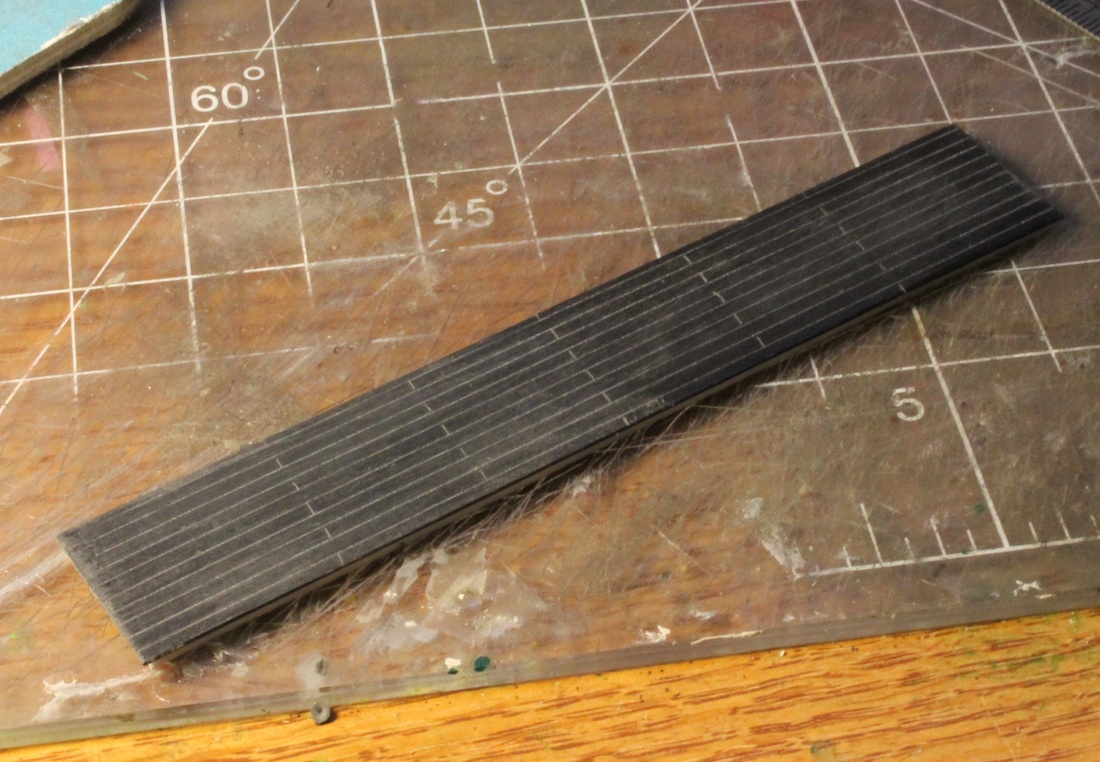
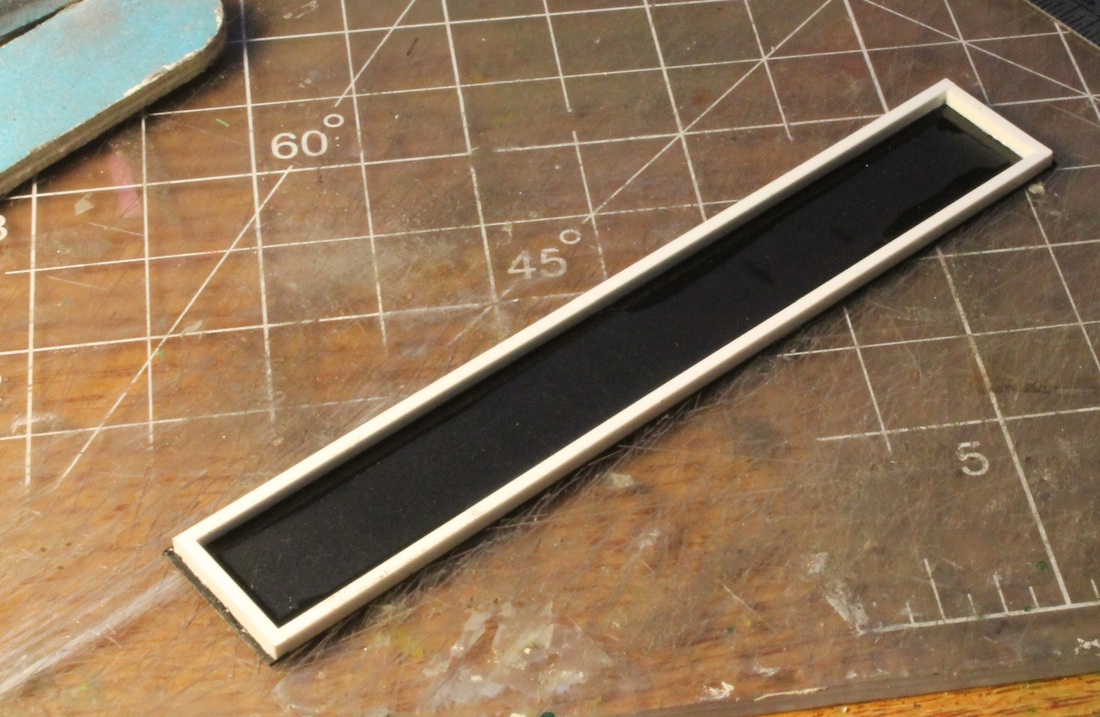
Charlestown Rail Posts
A quick project to add some posts next to the Charlestown passenger station. The prototype looks like it was made from railroad rails. It was used to keep automobiles from encroaching on the cinder platform or tracks. This took about an hour or so - start to finish.


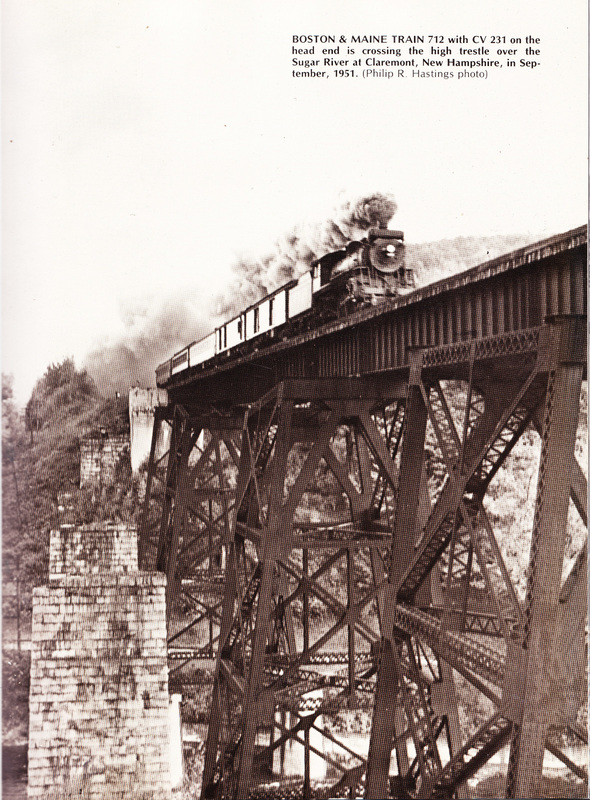
Claremont High Bridge Backdrop
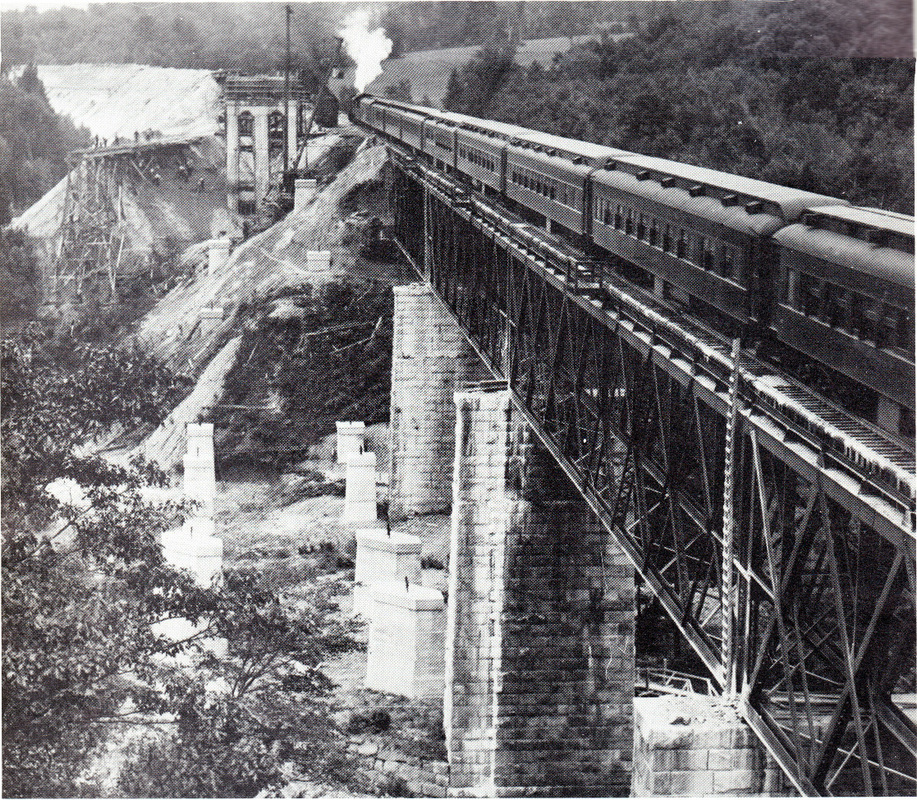
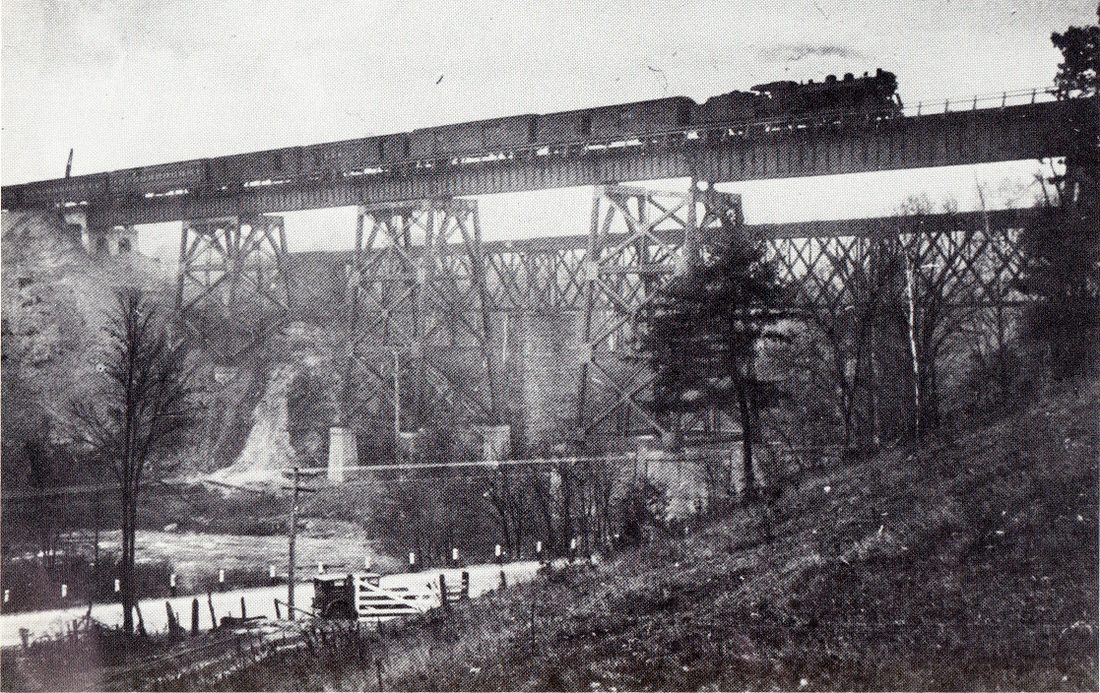
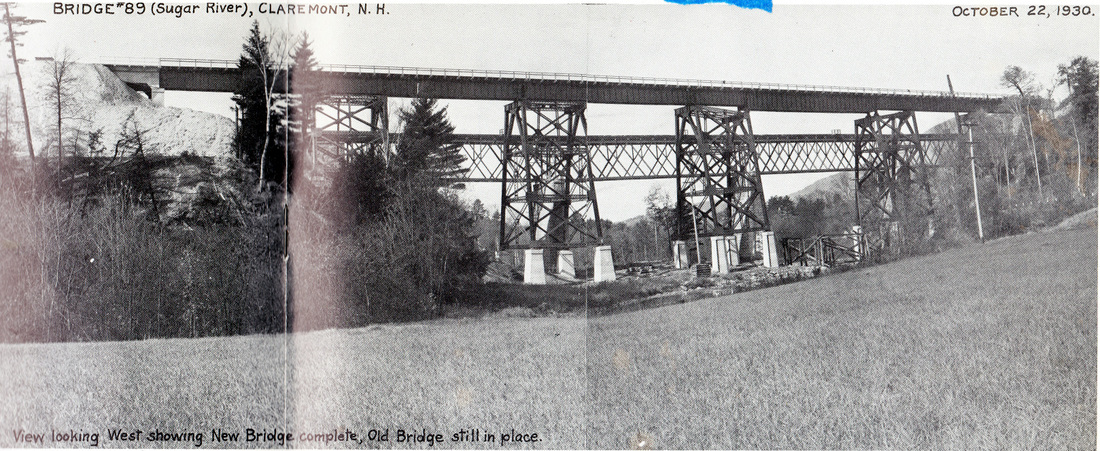
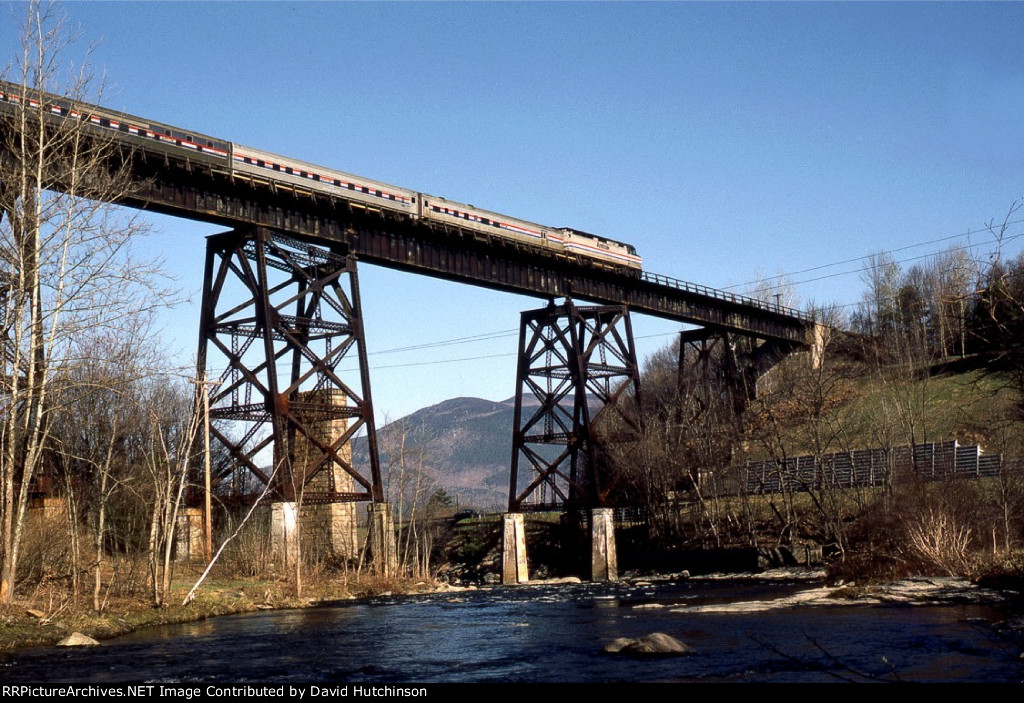
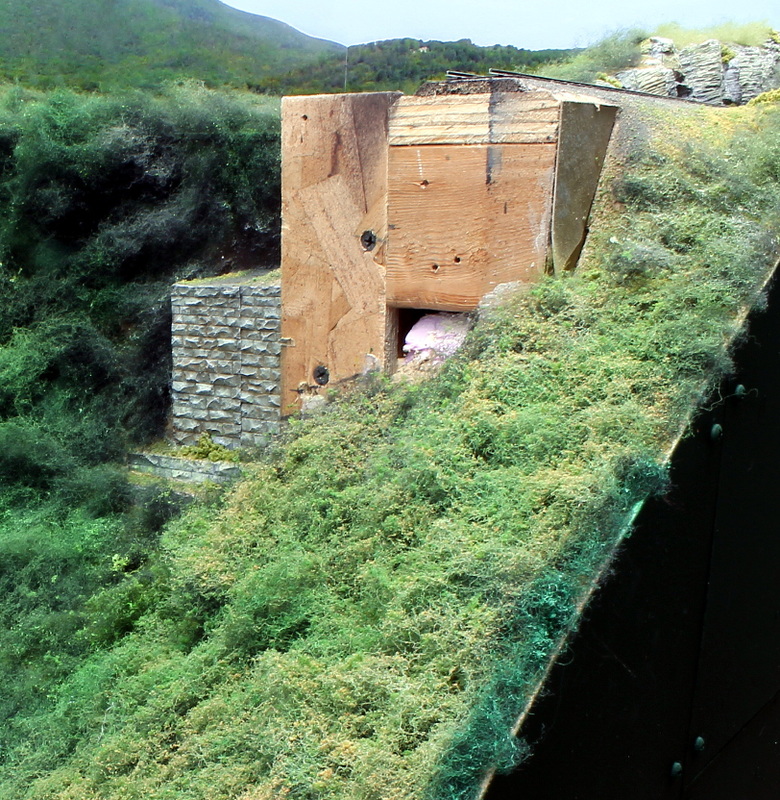
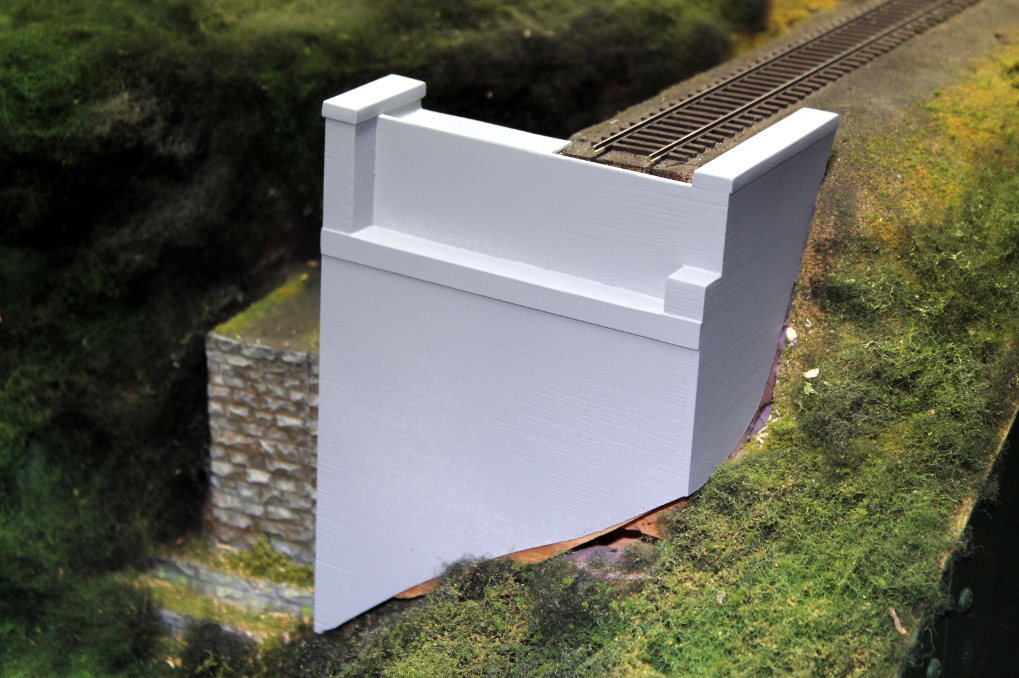
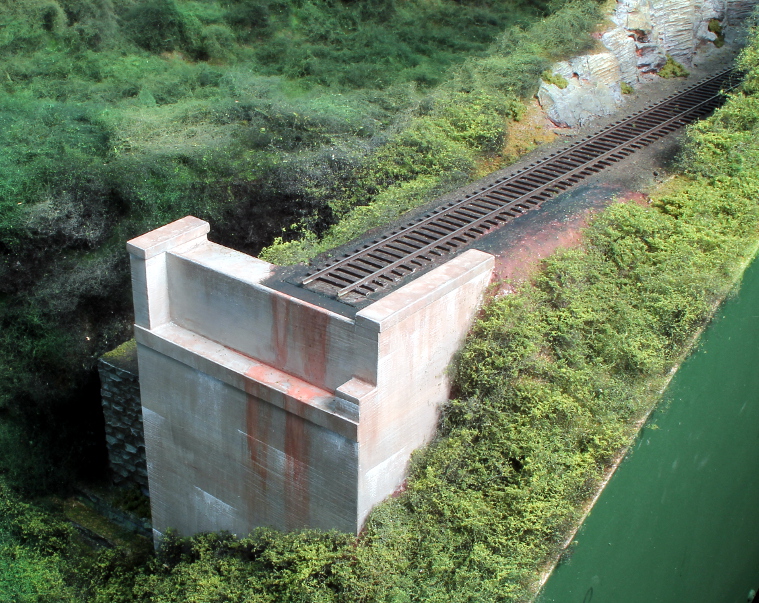
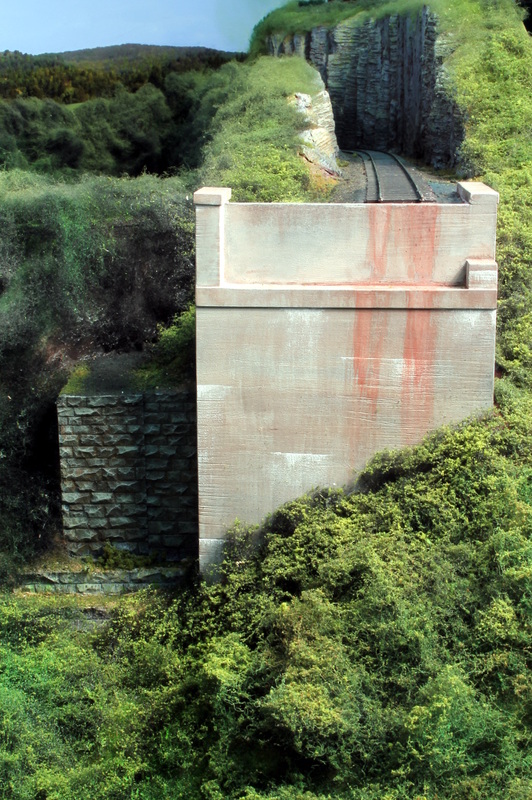
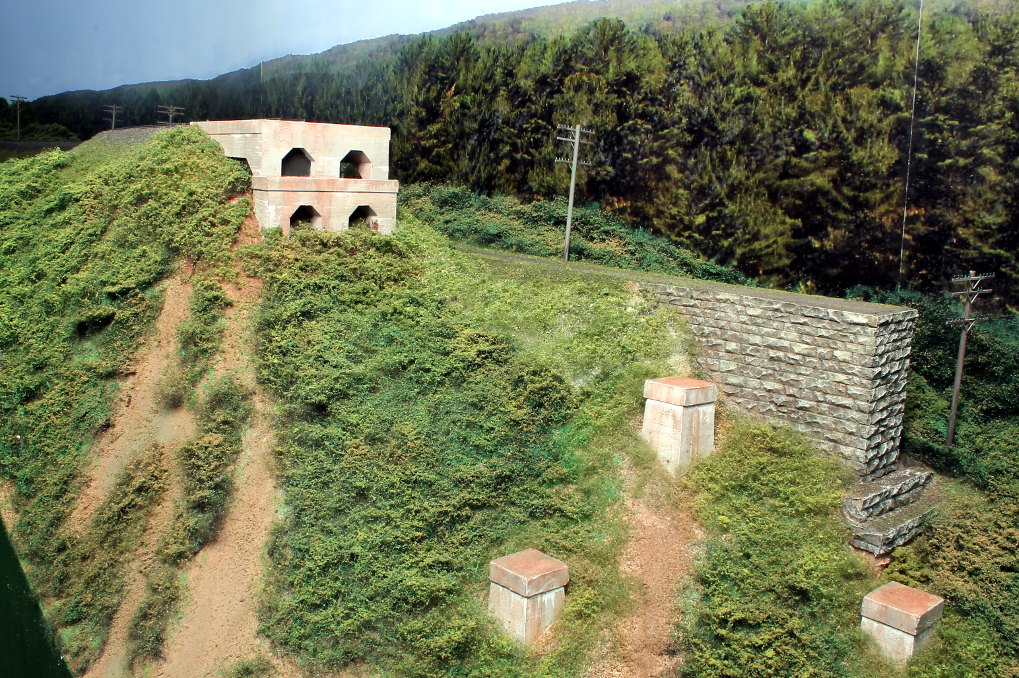
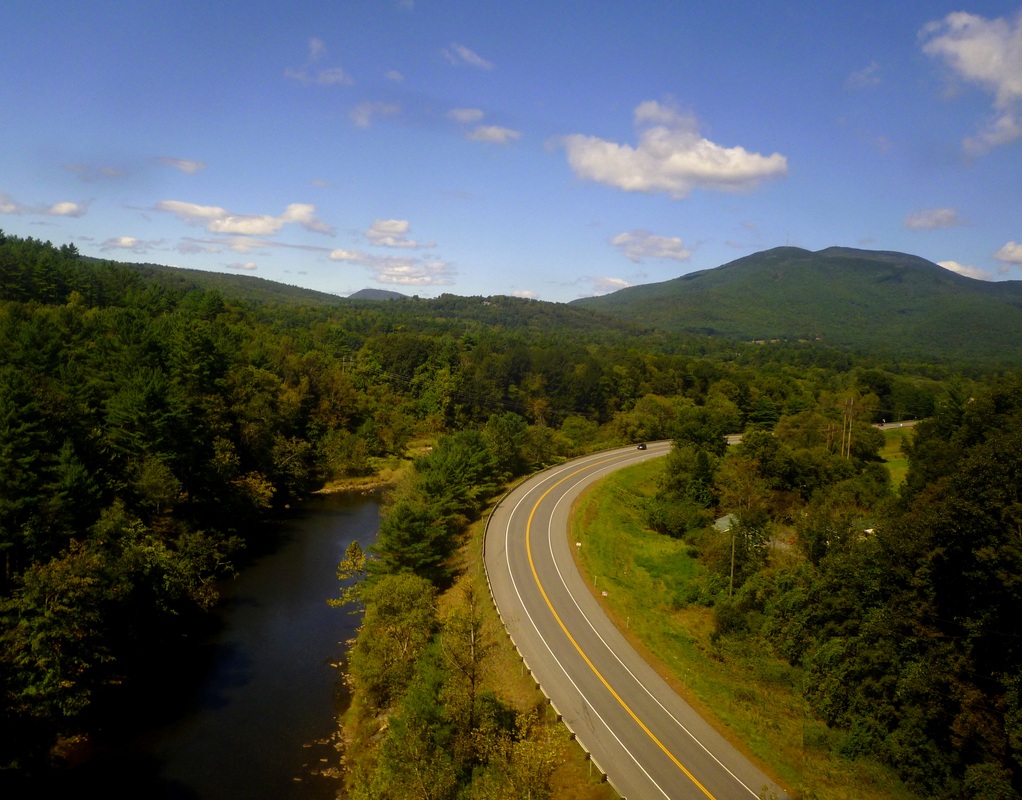
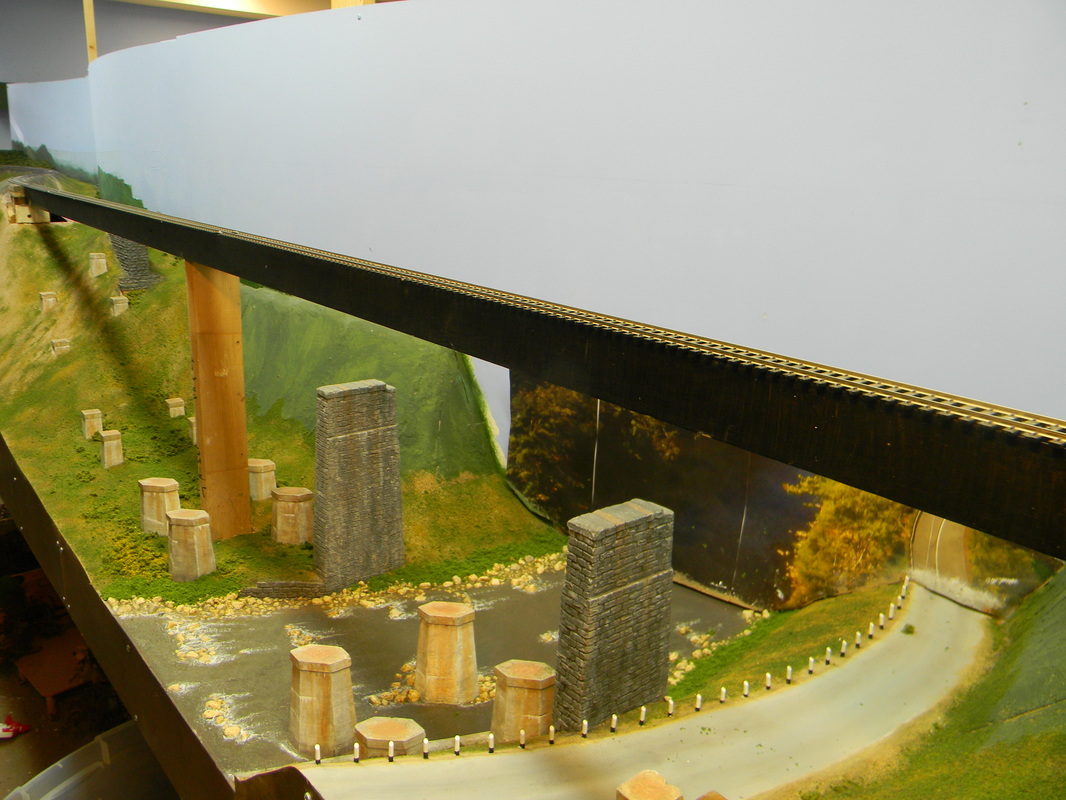
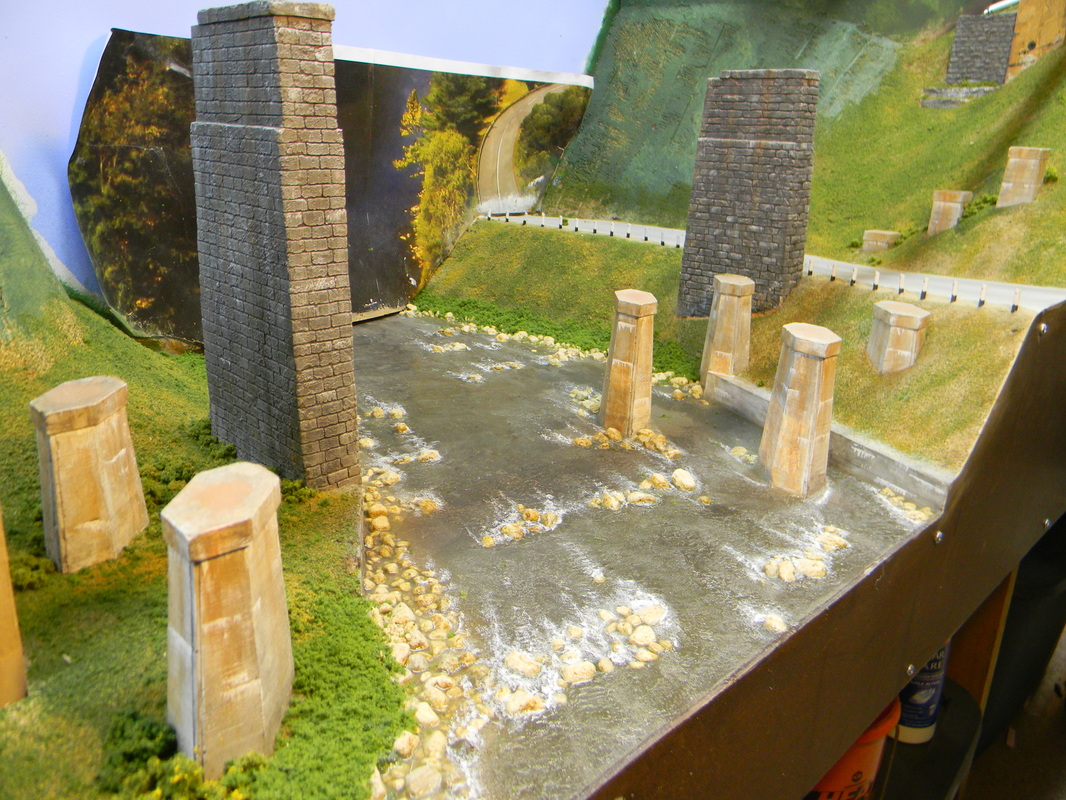
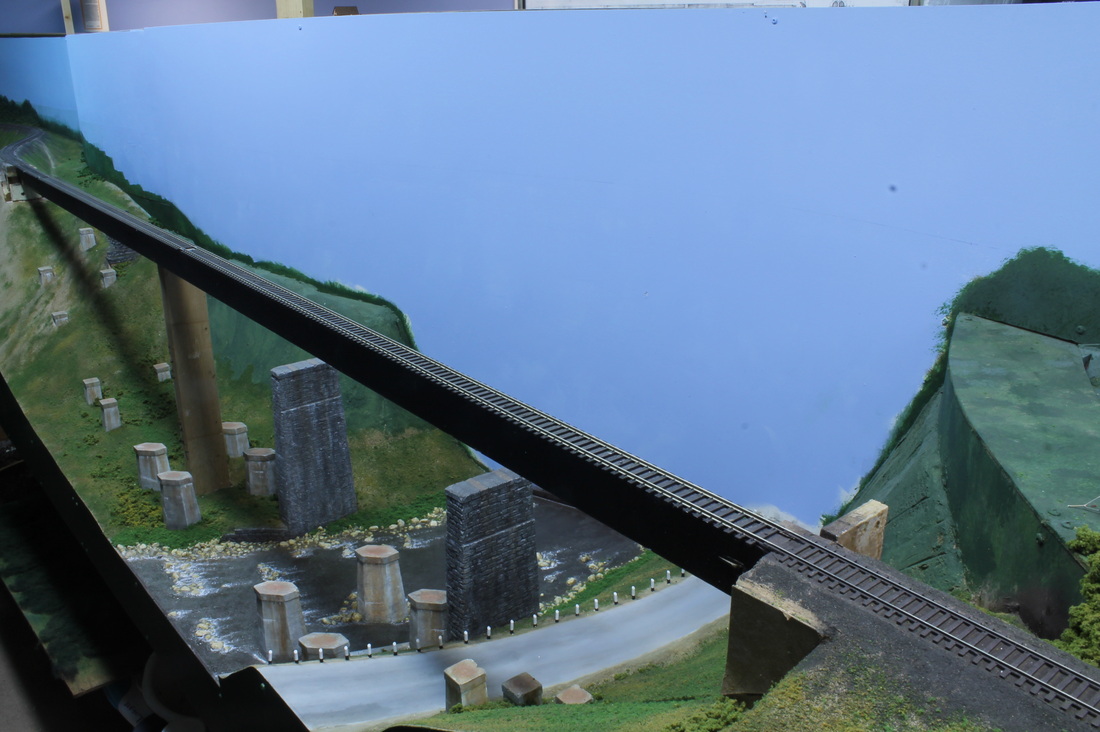
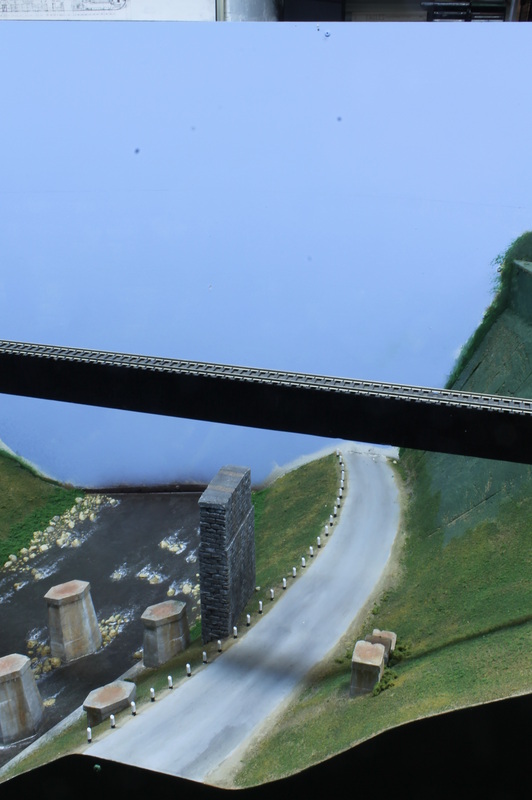
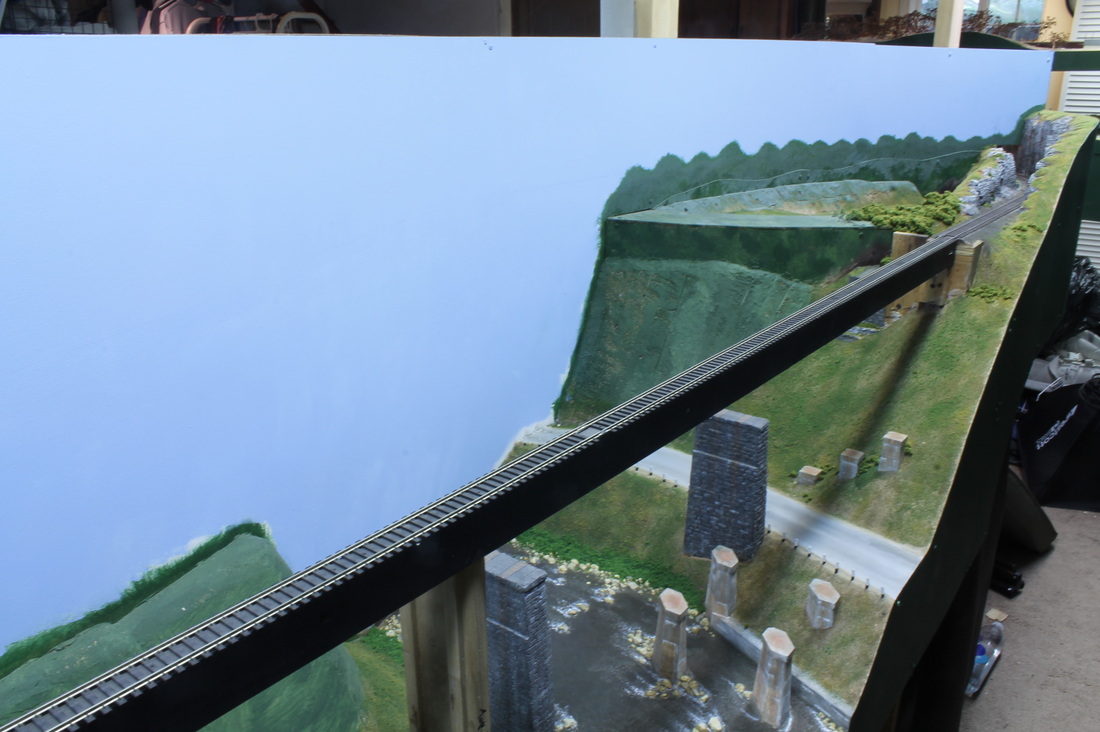
Just north of Claremont Junction the B&M crosses the Sugar River on a tall steel trestle - often referred to as the "Claremont High Bridge". This trestle replaced the old bridge in 1930 as part of a grade improvement project. The old bridge crossed the valley using 3 granite piers and iron lattice bridges. When the new bridge was complete two of these piers were left in place along with the abutments. The B&MRRHS Bulletin vol. XV #4 contains a great article describing the work. Sometime in the 50's or 60's a highway realignment and widening took place and the path of route 12/103 was changed. The widening process also led to the removal of one of the two remaining granite piers, but the other still remains to this day. Since the layout is set around 1950 I was looking to show the area before the highway changes and with the two piers in place. The bench work, trestle tower footings and rough scenery were in place (perhaps a future project to describe). The bridge was roughed in using a straight 1x2 painted black with code 100 flex track tacked on top. This allows me to keep trains running while the towers and girders for the trestle are built, plus I can work on the backdrop and scenery without risk of throwing an elbow into the bridge and ruining hours of work.
I had used photo backdrops in other locations and I hoped to do the same here. There were a few issues - where to find a photo, how to print an image large enough (11 feet long by 2 feet high) and how to mount something that large. At first I considered splicing together random scenery photos - a river here, a mountain there, some trees from over here... but that seemed like a lot of work and the end result might not be too good. Then I figured I would pick a nice summer day and drive up the couple of hours to Claremont and take a picture from the actual location. However, trespassing on a 100 foot tall active railroad bridge was not a fun option and buying a ticket on the Vermonter and getting one shot at the right location, in decent weather made me a little nervous too. Fortunately while searching internet photos on the web I came across a beautiful color photo of just what I needed. It faced the right direction, on a sunny day, from almost directly over the center of the bridge with Mount Ascutney towering in the background. Plus it was relatively large - not 11 feet large - but large enough.
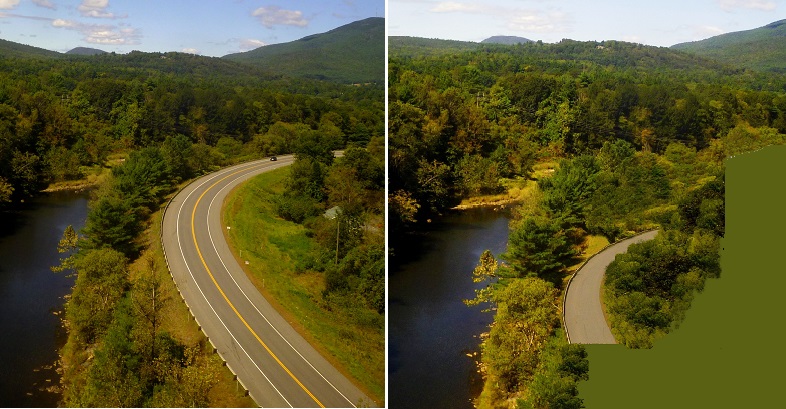
The next few days were spent enlarging the photo, adding more trees along the left side and adding more of Mount Ascutney on the right. Also, I had to relocate route 12/103 back to its original alignment in 1950 (more or less). So I used MS Paint and GNU Image Manipulation Program (GIMP) to duplicate objects and move things around.
I had made notes of all the bench work and scenery measurements and transferred these to the image so that the backdrop would fit properly when cut. I know that my local printer could handle almost any length image and a width of almost 24" (the machine needed approx. 1/4" along each edge). Some areas would be cut out of the final print so I moved parts around to reduce the amount of blank space and still minimized seams - and place most of them where I could hide them behind trees. When done, I converted the image from a JPEG to a PDF, copied it onto a USB flash drive and brought it to the printer.
A couple of days later I picked up the print and unrolled it. The printer had done a great job - a high-gloss image on photo paper ready to be cut and installed. I broke out my X-Acto knife and cut the add-on pieces from the master sheet. I cut out the bottoms and sides of each piece but left the sky on temporarily. This gave me places to tape the pieces to the blue hardboard panel without a risk of the tape damaging the final print. I could flip the print up and, with some scissors, trim the sides and bottom so that it sat neatly on top of the river, road and other scenery features. I left an inch or so overhang at each end to trim later. At this point I detached the prints, took them to the dining room table - covered with a large piece of box cardboard - and used a new X-Acto blade to trim off the sky. Now it was time for installation.
Oh yeah, installation. I still wasn't sure what sort of adhesive to use to mount the photo to the hardboard. In the past, I had used 3M General Purpose 45 to secure some backdrops but they were around 6" x 24" and I could spray them all at once and easily get them in place on the first try. The main image in this case was 8 feet long by 2 feet high. I was concerned about being able to get proper spray coverage and have everything stay tacky enough throughout the installation. Plus, there isn't really a lot of adjustment that can be done with the 3M spray.- if something got out of line I might not be able to move it without wrinkling or tearing the print. I looked into contact cements, pressure-sensitive adhesives and several other options but nothing seemed quite right.
Finally, I stumbled upon an internet forum for artists discussing ways to mount large images for display - on foam board or whatever. The consensus there was simply to use matte medium brushed or rolled over the back of the image as an adhesive. Matte medium is designed to be used with paper and won't yellow or crack over time. I just happened to have a brand new jar of Modge Podge sitting on shelf so why not give it a try? I had some other, smaller backdrop photos that needed mounting so I tried them first. I brushed on full strength Modge Podge to the back of the test print with a 2" brush - making sure to cover it evenly and coat the edges. Then I pushed it gently against the wall - not quite seating it at this point. I could move the print around to the exact position I wanted without wrinkling - up a 1/2" here, over a 1/4" there. When it was exactly where I wanted it I pressed it into place with my fingers and then took a clean cloth and smoothed it out from the center towards the edges. I took another cloth that was slightly wet and used it to wipe any large smears of matte medium that leaked outside the edges. Then, on sort of a whim, I brushed additional matte medium in an even coat over the top of the print - working carefully along the edges. When dry, this not only knocked down the high gloss of the prints but also sealed the edges so they don't curl away from the hardboard (which happens occasionally with the 3M adhesive).
So now it was time to tackle the large high bridge backdrop. I temporarily held the backdrop in place with some loops of painter's tape on the back near the top. Then I flipped the bottom up along the river and road and coated the back about 1/2 way up with the Modge Podge - again making sure the edges were coated. I pressed it into place
and then flipped down the upper half, pulled off the tape loops, coated it and pressed it into place. The matte medium has a relatively long working time so minor adjustments can be made and there is no need to rush. I then worked out from the center, coating a foot or so each time until I had reached both ends. At this point the earlier process is repeated - clean cloth from the center out, damp cloth to wipe up any leaks then brushing additional matte medium over everything. Well, almost everything. I thought it might be an interesting effect to leave the river part of the photo with a high gloss. I worked a little matte medium along the bottom 1/4 " but otherwise left it alone. When the layout lighting hits the glossy river it gives the illusion of reflected sunlight. The same process was repeated with the add-on pieces - taking time to get the butt joints as tight as possible.
When everything was dry I trimmed off the edges flush with the hardboard ends. I went back again with the damp cloth to wipe away any smears on the sky. Any matte medium that gets on the scenery is no problem - it's the same thing used there as well. The overall effect is nice - there is additional depth to the scene, I can cover up any joints with a tree or two and now I can tackle the finished scenery and eventually the bridge itself...
I had used photo backdrops in other locations and I hoped to do the same here. There were a few issues - where to find a photo, how to print an image large enough (11 feet long by 2 feet high) and how to mount something that large. At first I considered splicing together random scenery photos - a river here, a mountain there, some trees from over here... but that seemed like a lot of work and the end result might not be too good. Then I figured I would pick a nice summer day and drive up the couple of hours to Claremont and take a picture from the actual location. However, trespassing on a 100 foot tall active railroad bridge was not a fun option and buying a ticket on the Vermonter and getting one shot at the right location, in decent weather made me a little nervous too. Fortunately while searching internet photos on the web I came across a beautiful color photo of just what I needed. It faced the right direction, on a sunny day, from almost directly over the center of the bridge with Mount Ascutney towering in the background. Plus it was relatively large - not 11 feet large - but large enough.
The next few days were spent enlarging the photo, adding more trees along the left side and adding more of Mount Ascutney on the right. Also, I had to relocate route 12/103 back to its original alignment in 1950 (more or less). So I used MS Paint and GNU Image Manipulation Program (GIMP) to duplicate objects and move things around.
I had made notes of all the bench work and scenery measurements and transferred these to the image so that the backdrop would fit properly when cut. I know that my local printer could handle almost any length image and a width of almost 24" (the machine needed approx. 1/4" along each edge). Some areas would be cut out of the final print so I moved parts around to reduce the amount of blank space and still minimized seams - and place most of them where I could hide them behind trees. When done, I converted the image from a JPEG to a PDF, copied it onto a USB flash drive and brought it to the printer.
A couple of days later I picked up the print and unrolled it. The printer had done a great job - a high-gloss image on photo paper ready to be cut and installed. I broke out my X-Acto knife and cut the add-on pieces from the master sheet. I cut out the bottoms and sides of each piece but left the sky on temporarily. This gave me places to tape the pieces to the blue hardboard panel without a risk of the tape damaging the final print. I could flip the print up and, with some scissors, trim the sides and bottom so that it sat neatly on top of the river, road and other scenery features. I left an inch or so overhang at each end to trim later. At this point I detached the prints, took them to the dining room table - covered with a large piece of box cardboard - and used a new X-Acto blade to trim off the sky. Now it was time for installation.
Oh yeah, installation. I still wasn't sure what sort of adhesive to use to mount the photo to the hardboard. In the past, I had used 3M General Purpose 45 to secure some backdrops but they were around 6" x 24" and I could spray them all at once and easily get them in place on the first try. The main image in this case was 8 feet long by 2 feet high. I was concerned about being able to get proper spray coverage and have everything stay tacky enough throughout the installation. Plus, there isn't really a lot of adjustment that can be done with the 3M spray.- if something got out of line I might not be able to move it without wrinkling or tearing the print. I looked into contact cements, pressure-sensitive adhesives and several other options but nothing seemed quite right.
Finally, I stumbled upon an internet forum for artists discussing ways to mount large images for display - on foam board or whatever. The consensus there was simply to use matte medium brushed or rolled over the back of the image as an adhesive. Matte medium is designed to be used with paper and won't yellow or crack over time. I just happened to have a brand new jar of Modge Podge sitting on shelf so why not give it a try? I had some other, smaller backdrop photos that needed mounting so I tried them first. I brushed on full strength Modge Podge to the back of the test print with a 2" brush - making sure to cover it evenly and coat the edges. Then I pushed it gently against the wall - not quite seating it at this point. I could move the print around to the exact position I wanted without wrinkling - up a 1/2" here, over a 1/4" there. When it was exactly where I wanted it I pressed it into place with my fingers and then took a clean cloth and smoothed it out from the center towards the edges. I took another cloth that was slightly wet and used it to wipe any large smears of matte medium that leaked outside the edges. Then, on sort of a whim, I brushed additional matte medium in an even coat over the top of the print - working carefully along the edges. When dry, this not only knocked down the high gloss of the prints but also sealed the edges so they don't curl away from the hardboard (which happens occasionally with the 3M adhesive).
So now it was time to tackle the large high bridge backdrop. I temporarily held the backdrop in place with some loops of painter's tape on the back near the top. Then I flipped the bottom up along the river and road and coated the back about 1/2 way up with the Modge Podge - again making sure the edges were coated. I pressed it into place
and then flipped down the upper half, pulled off the tape loops, coated it and pressed it into place. The matte medium has a relatively long working time so minor adjustments can be made and there is no need to rush. I then worked out from the center, coating a foot or so each time until I had reached both ends. At this point the earlier process is repeated - clean cloth from the center out, damp cloth to wipe up any leaks then brushing additional matte medium over everything. Well, almost everything. I thought it might be an interesting effect to leave the river part of the photo with a high gloss. I worked a little matte medium along the bottom 1/4 " but otherwise left it alone. When the layout lighting hits the glossy river it gives the illusion of reflected sunlight. The same process was repeated with the add-on pieces - taking time to get the butt joints as tight as possible.
When everything was dry I trimmed off the edges flush with the hardboard ends. I went back again with the damp cloth to wipe away any smears on the sky. Any matte medium that gets on the scenery is no problem - it's the same thing used there as well. The overall effect is nice - there is additional depth to the scene, I can cover up any joints with a tree or two and now I can tackle the finished scenery and eventually the bridge itself...


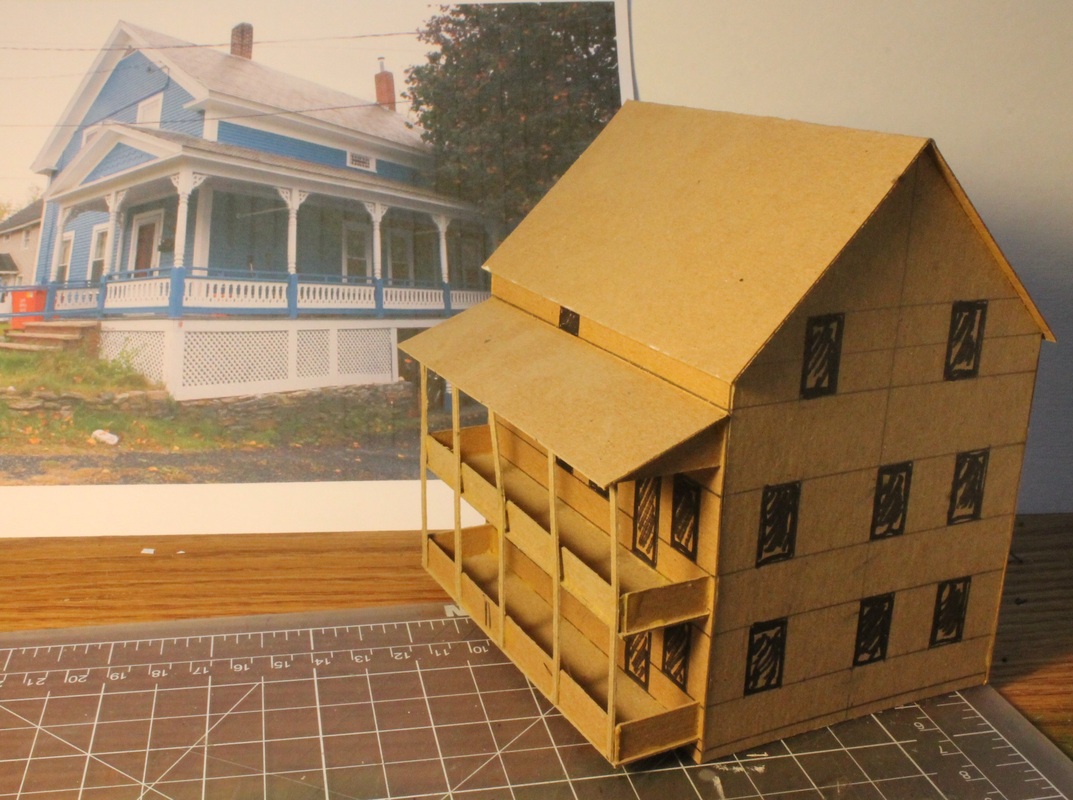
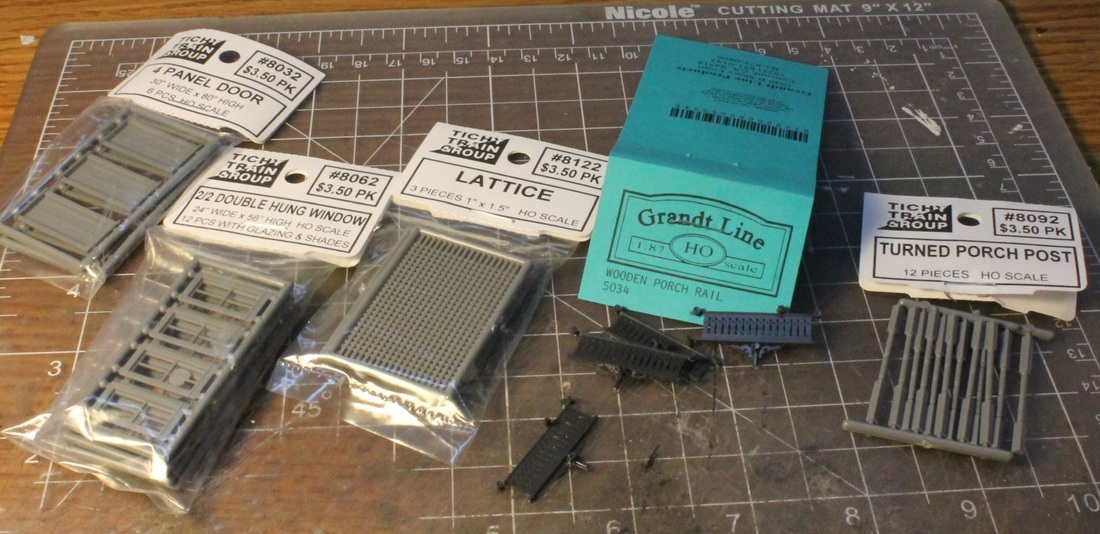
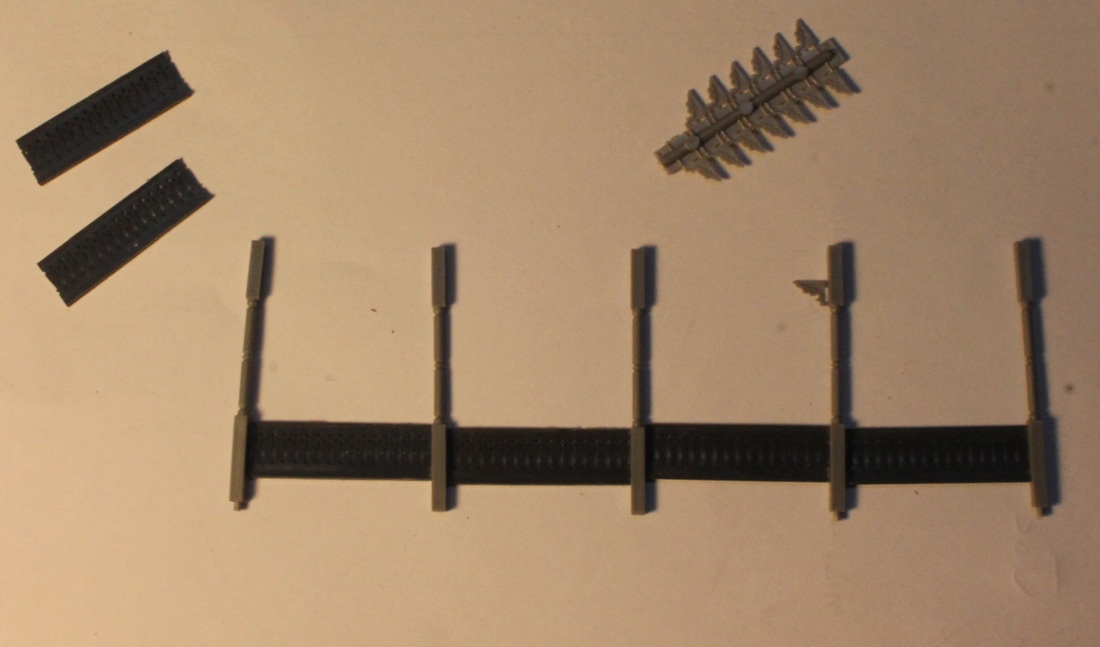
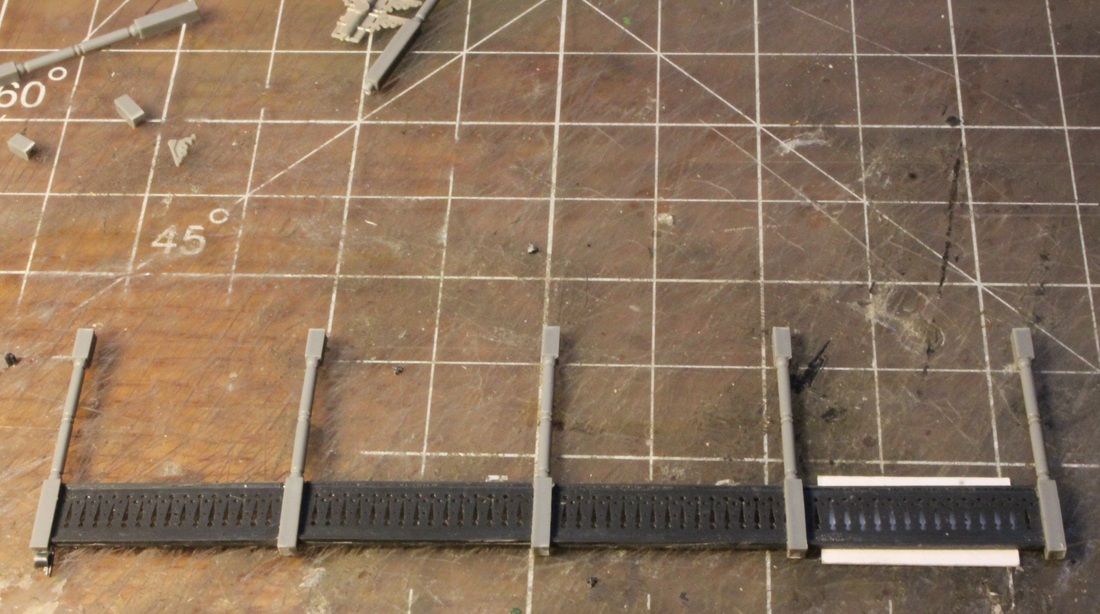
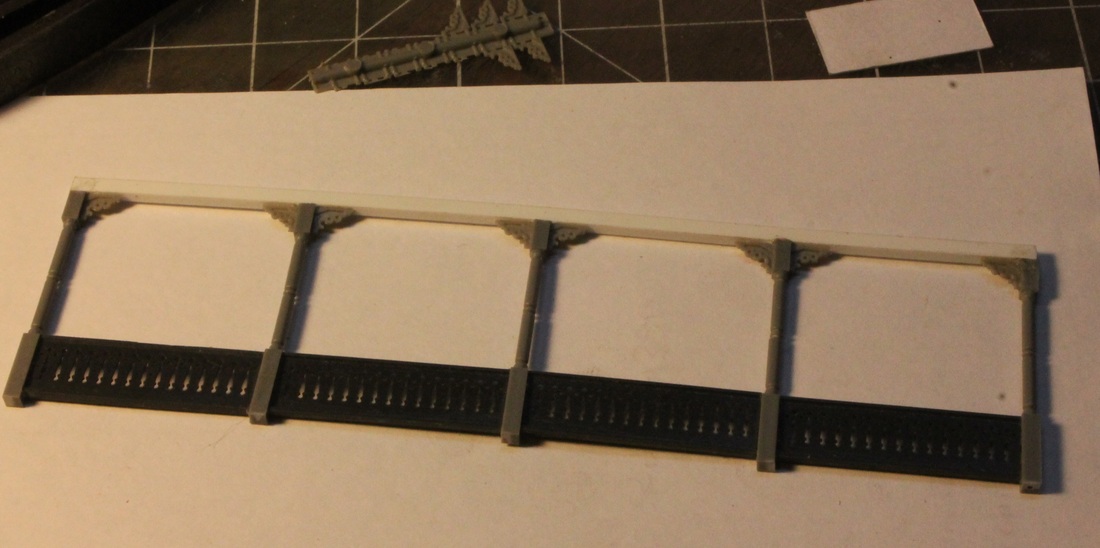
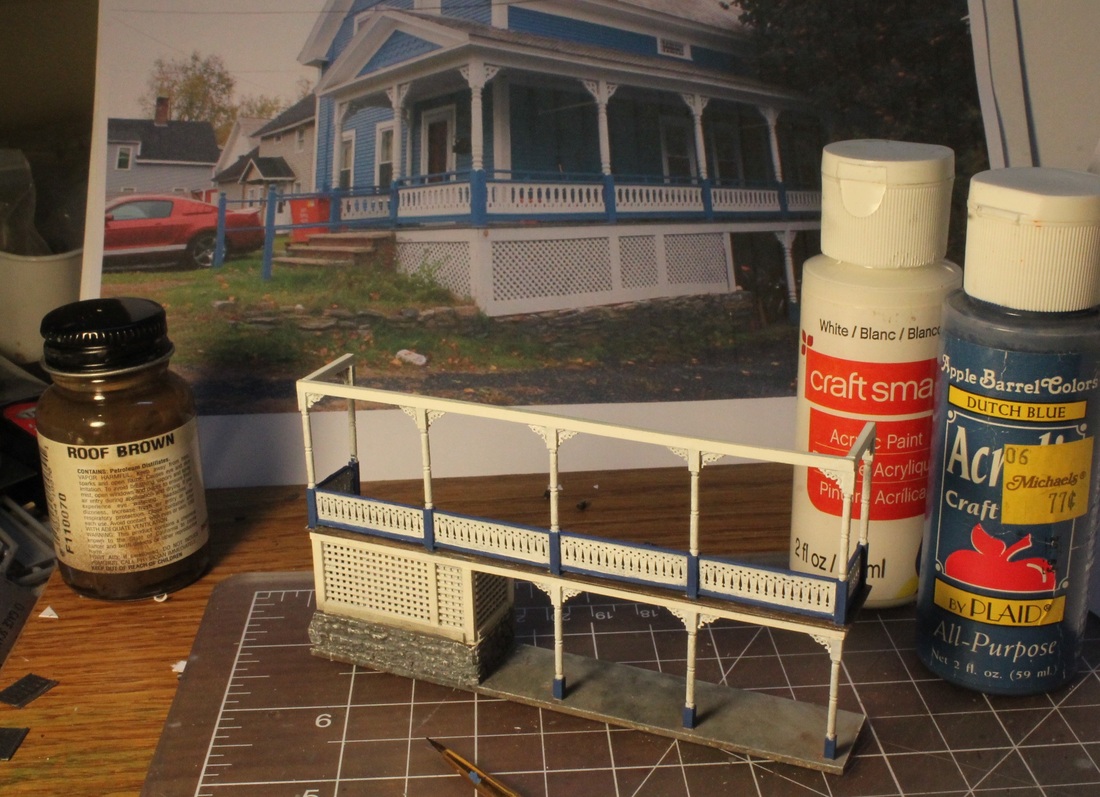
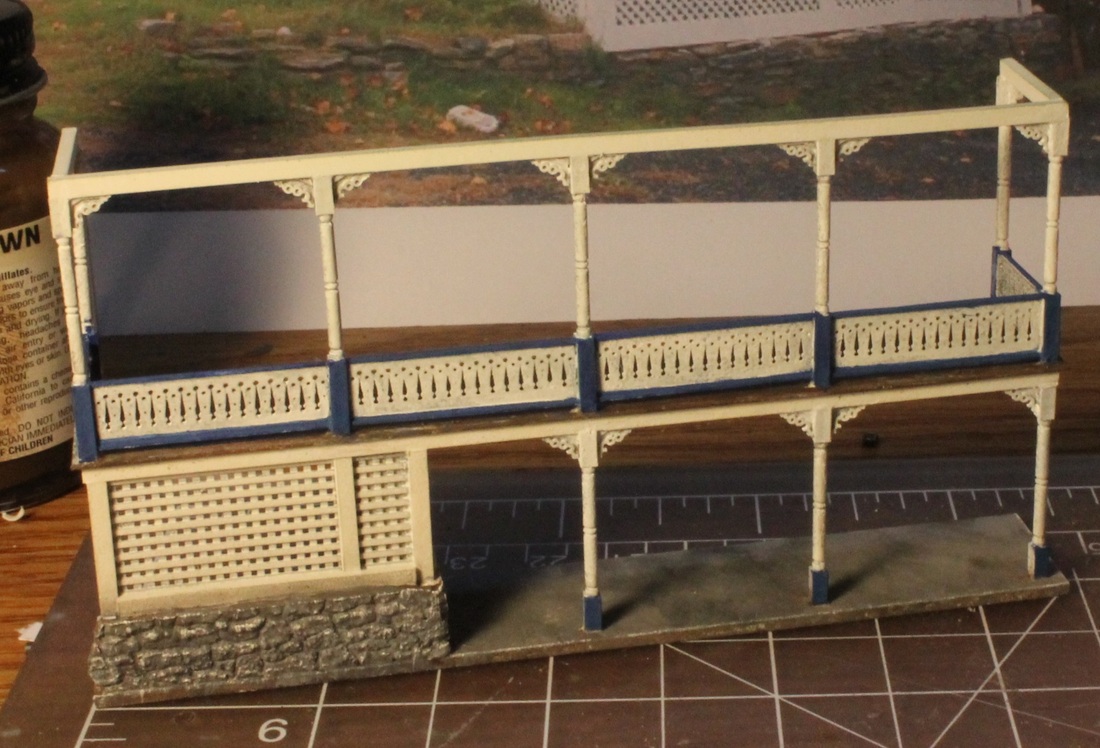
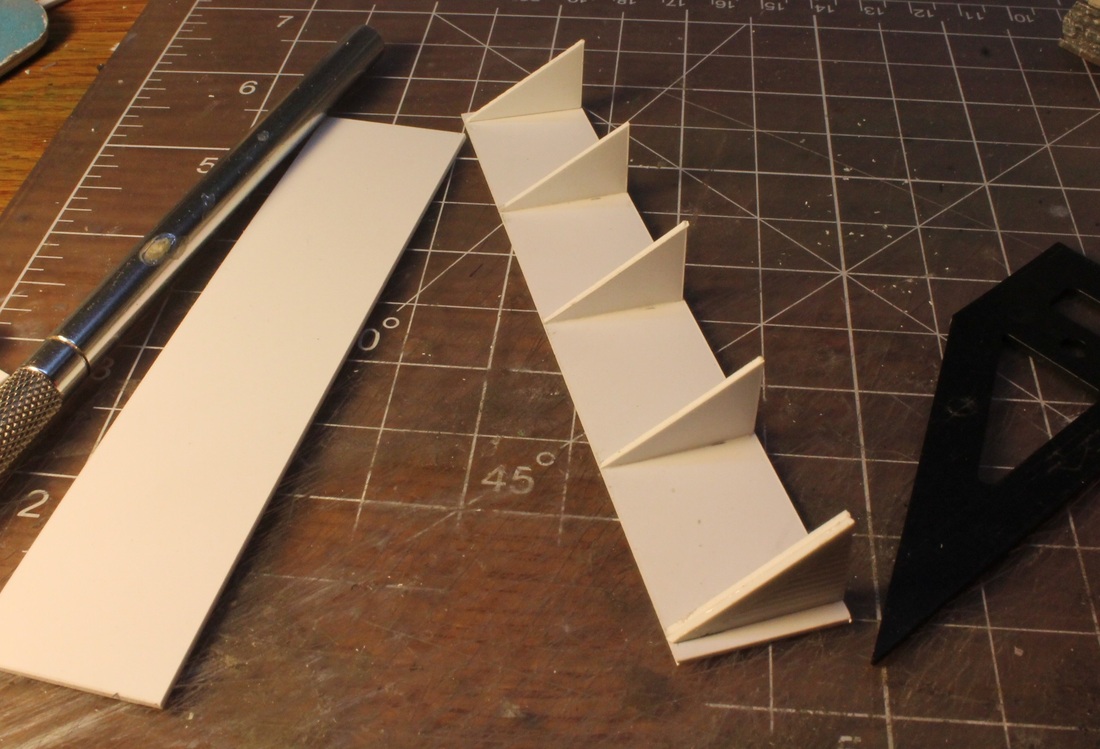
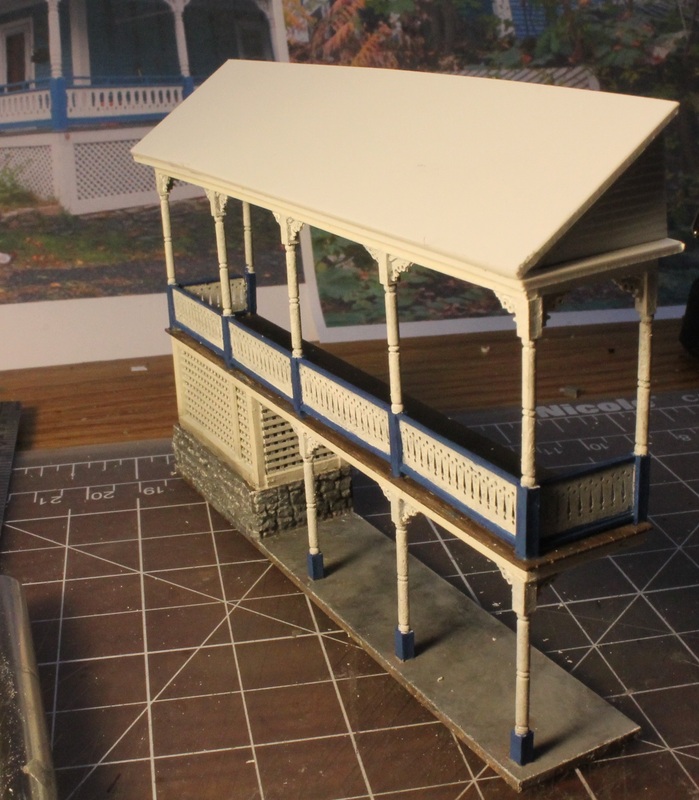
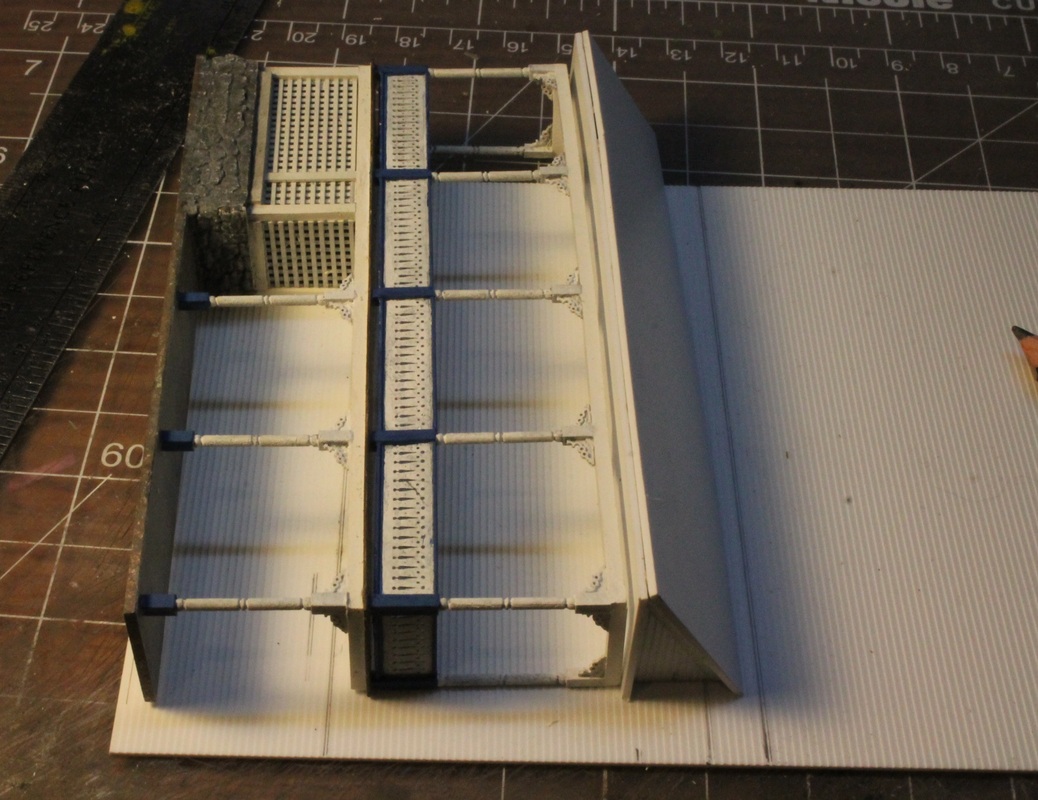
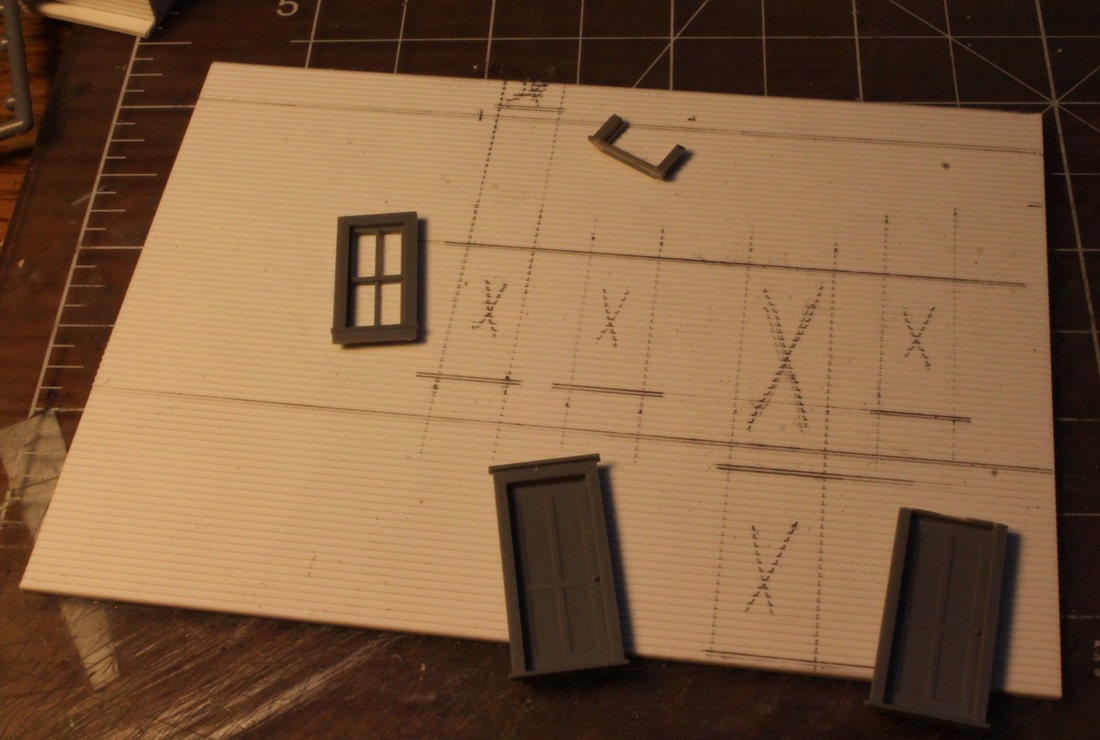
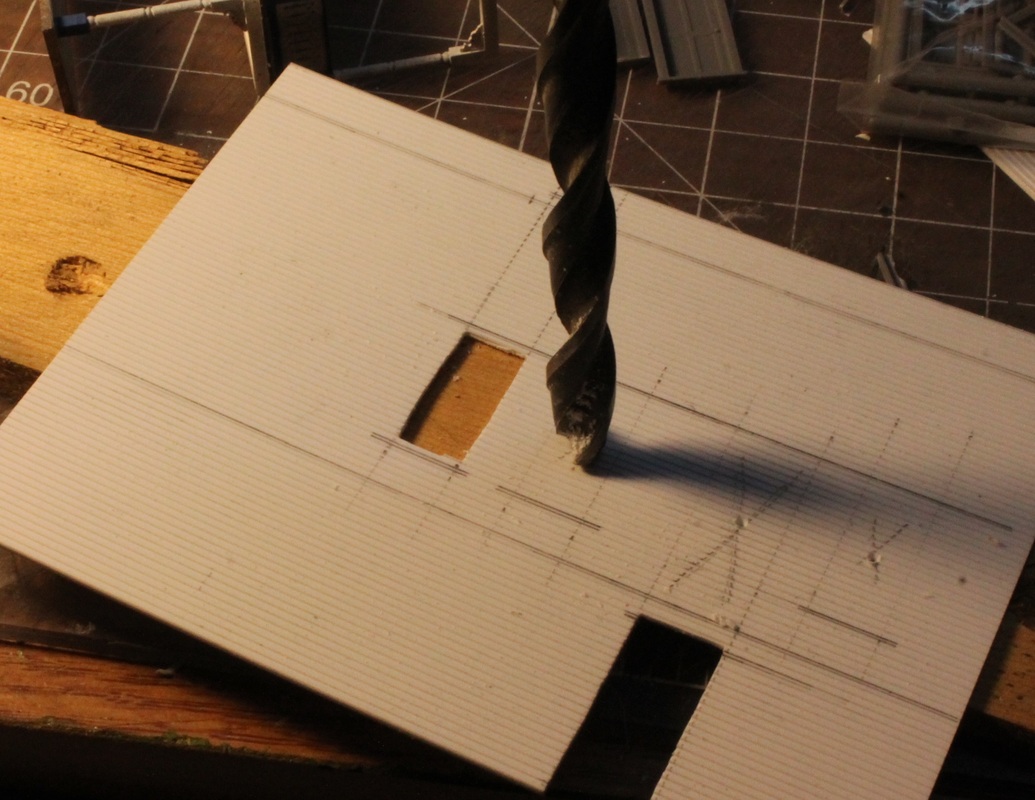
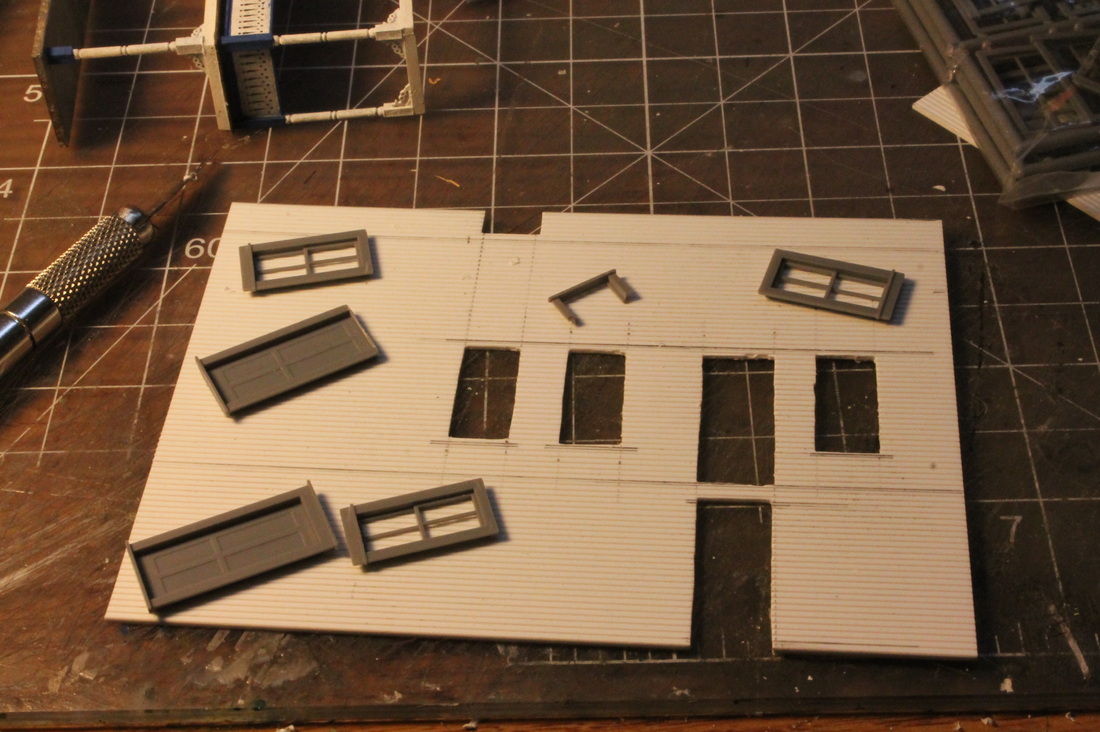
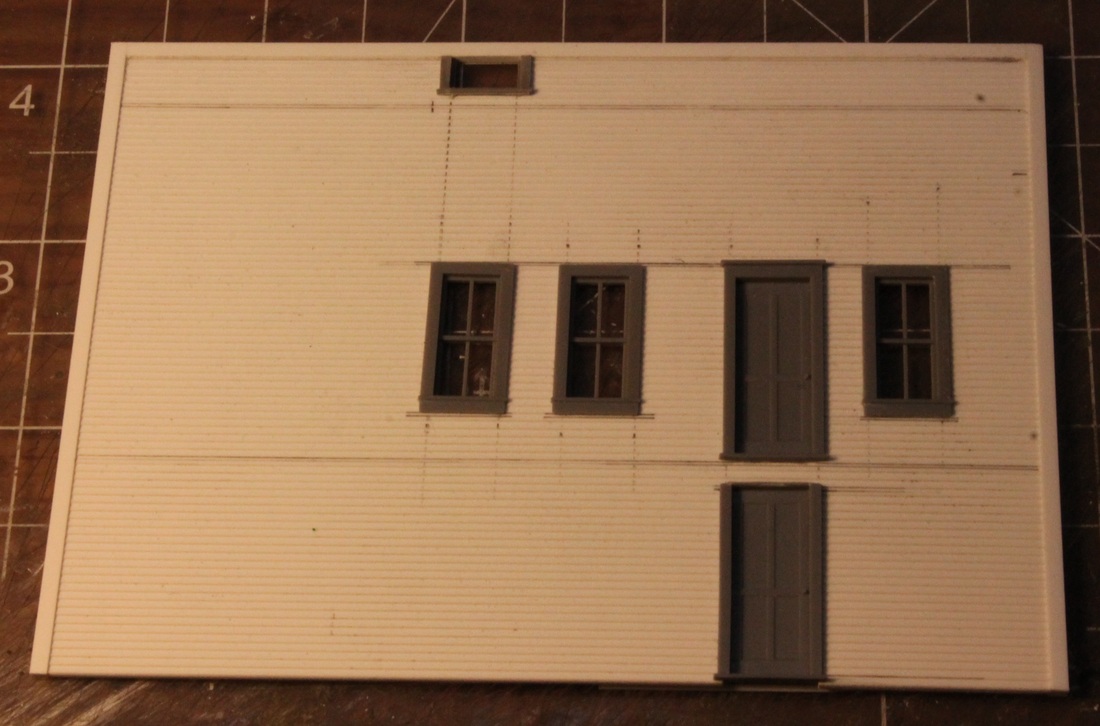
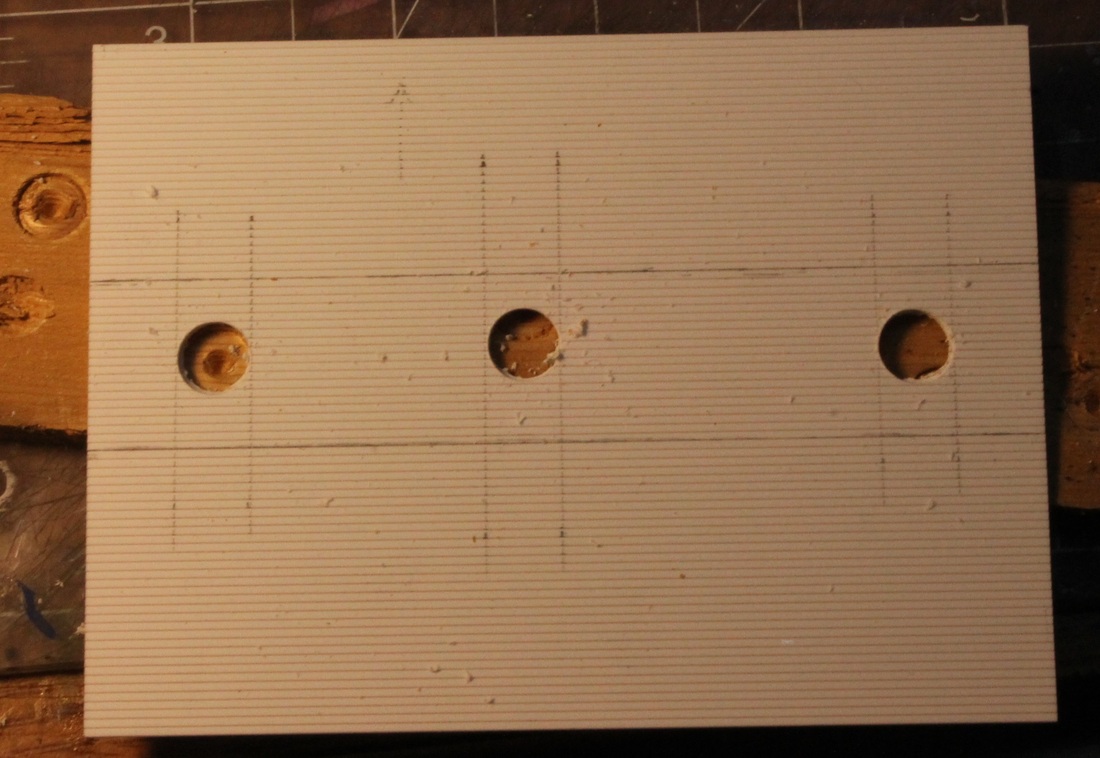
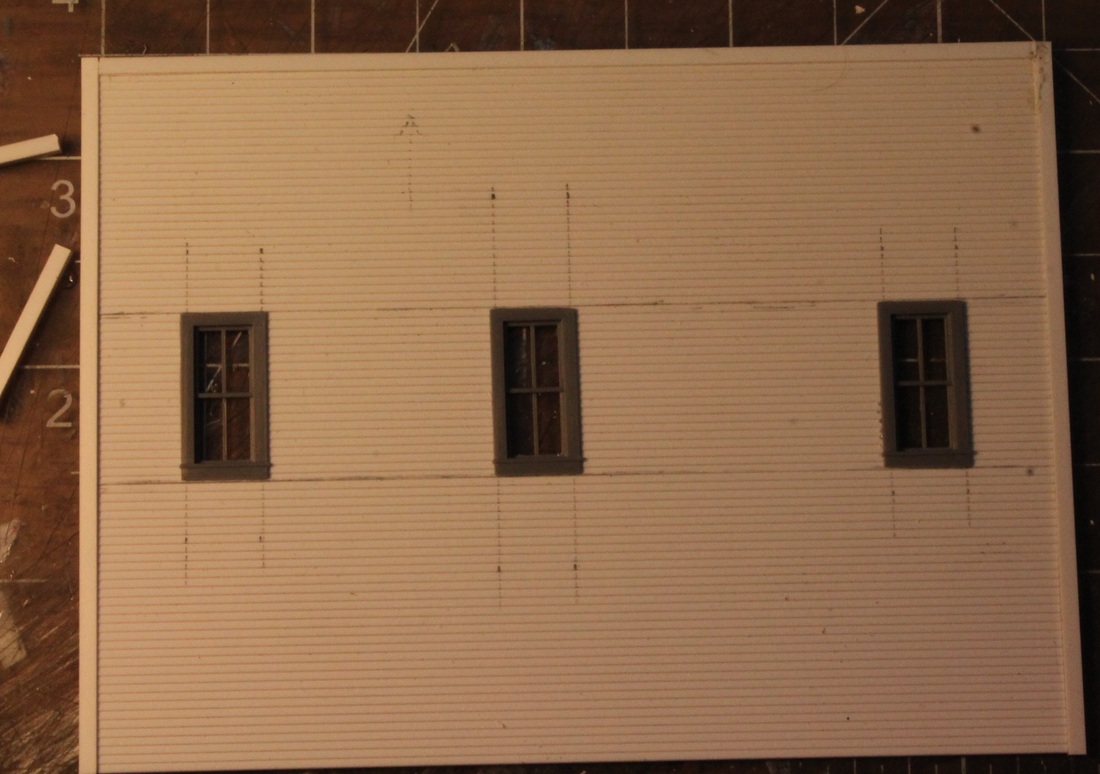
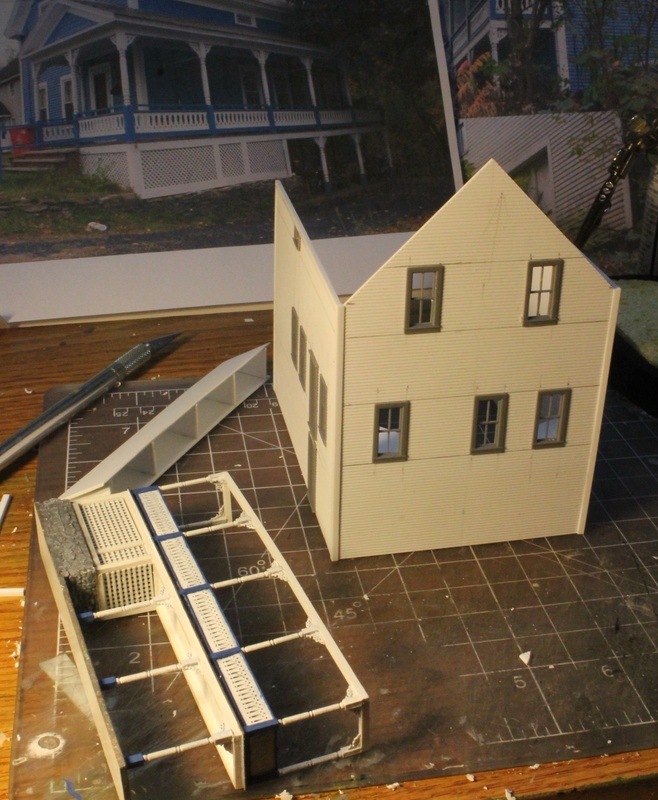
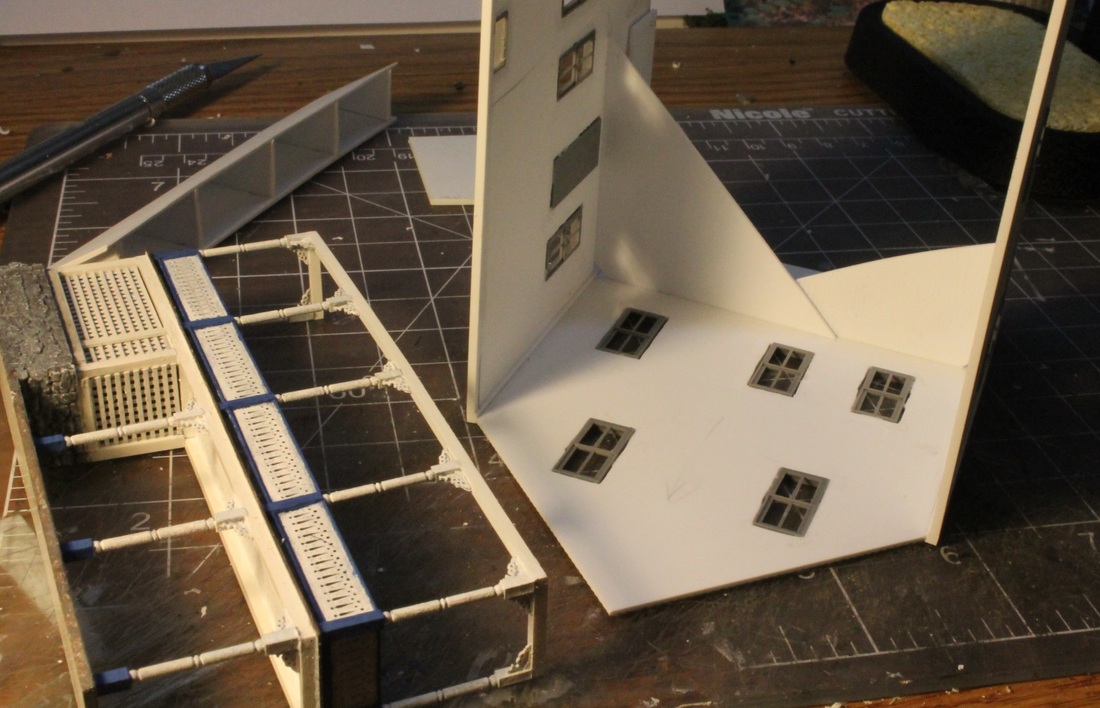
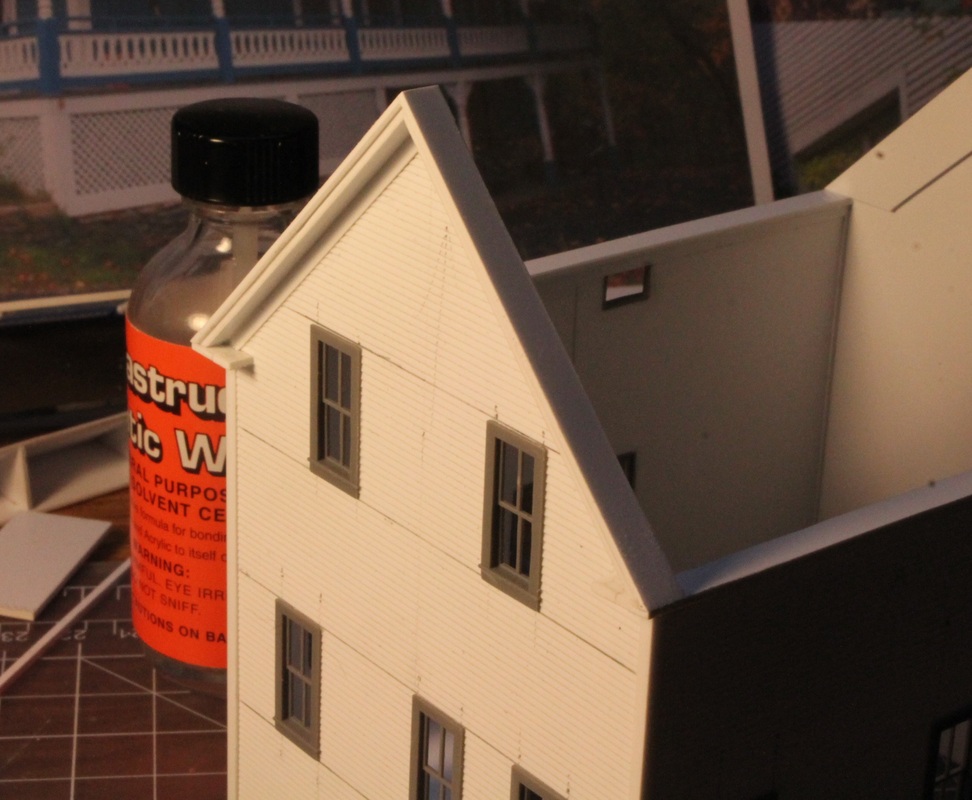
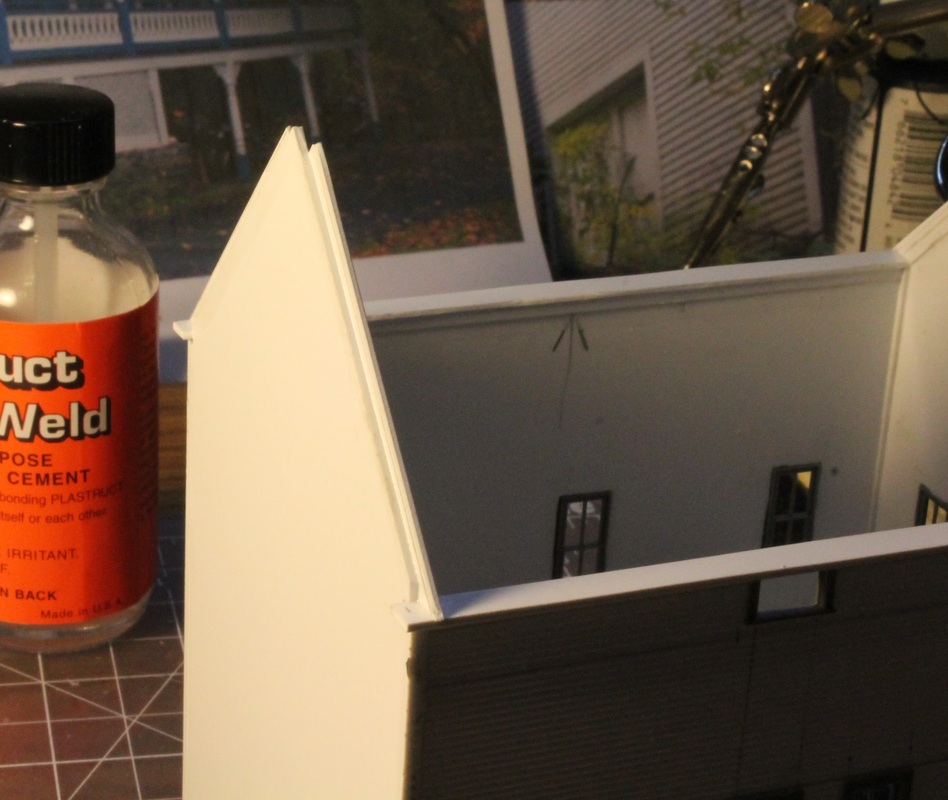
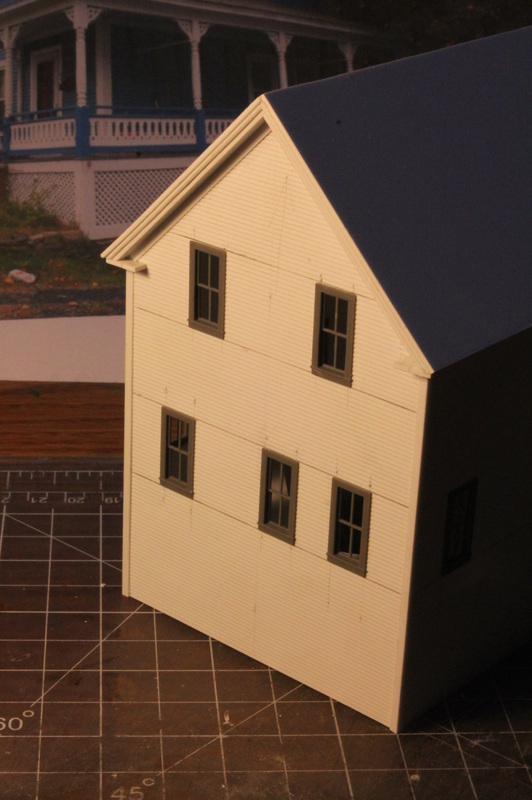
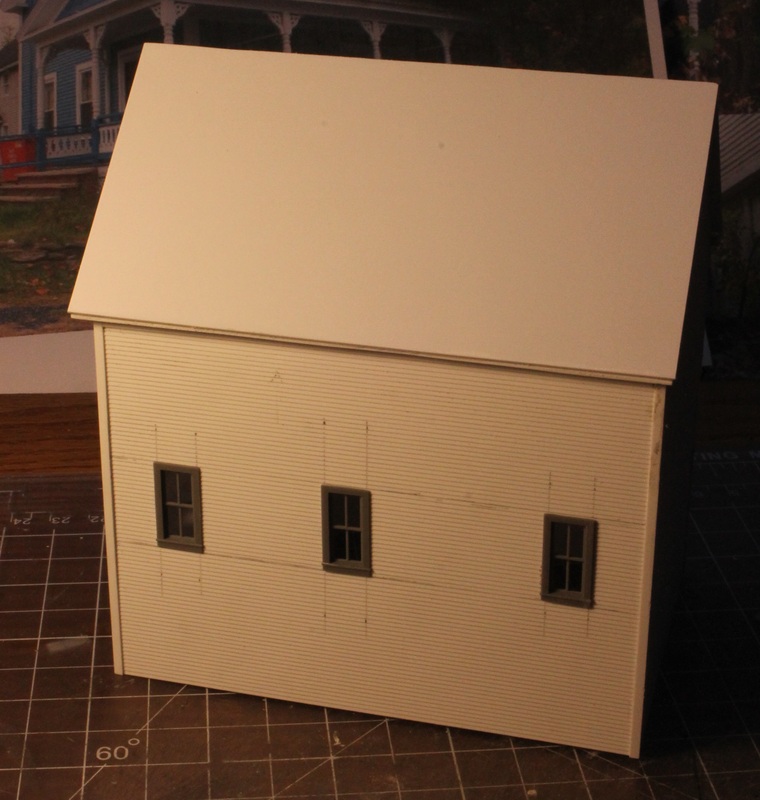
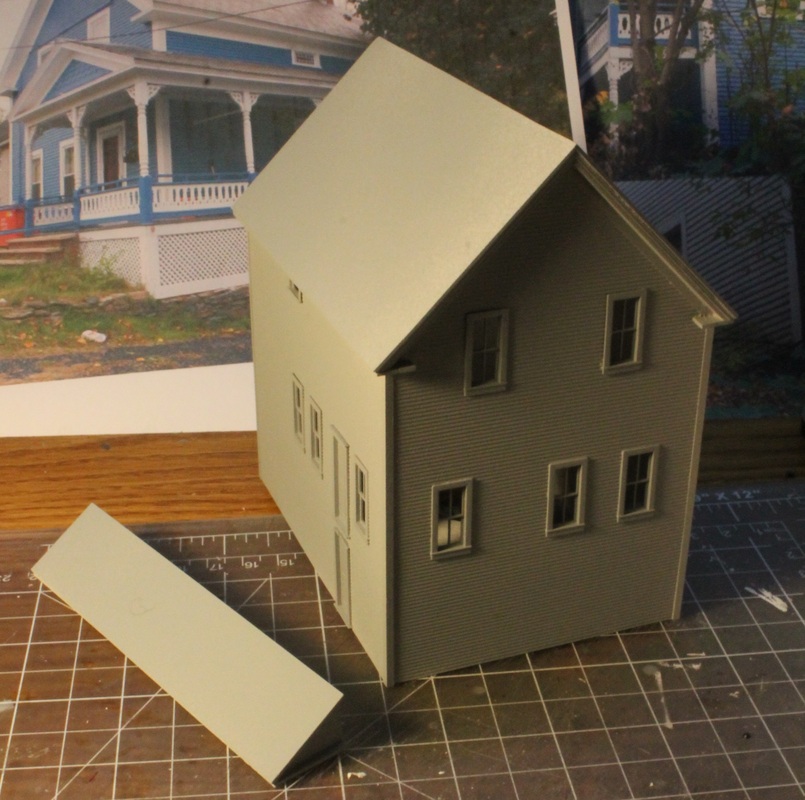
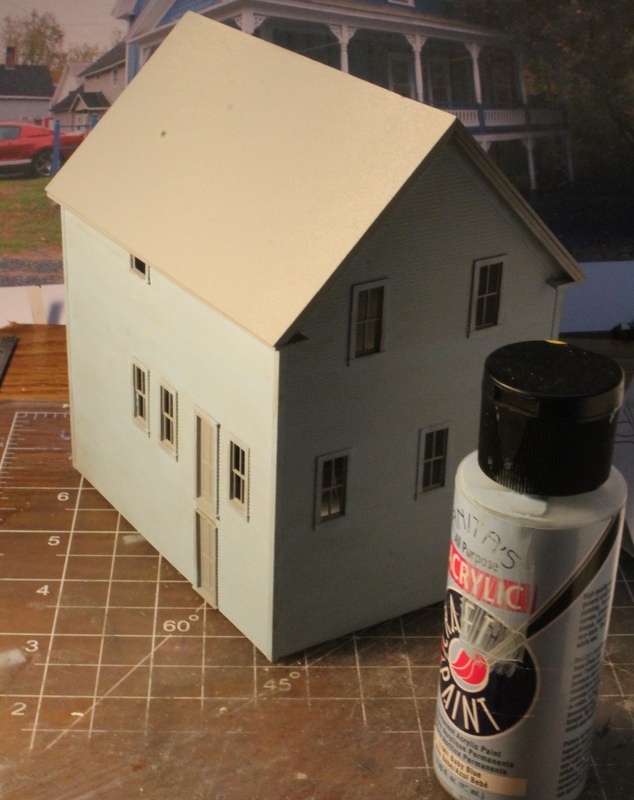
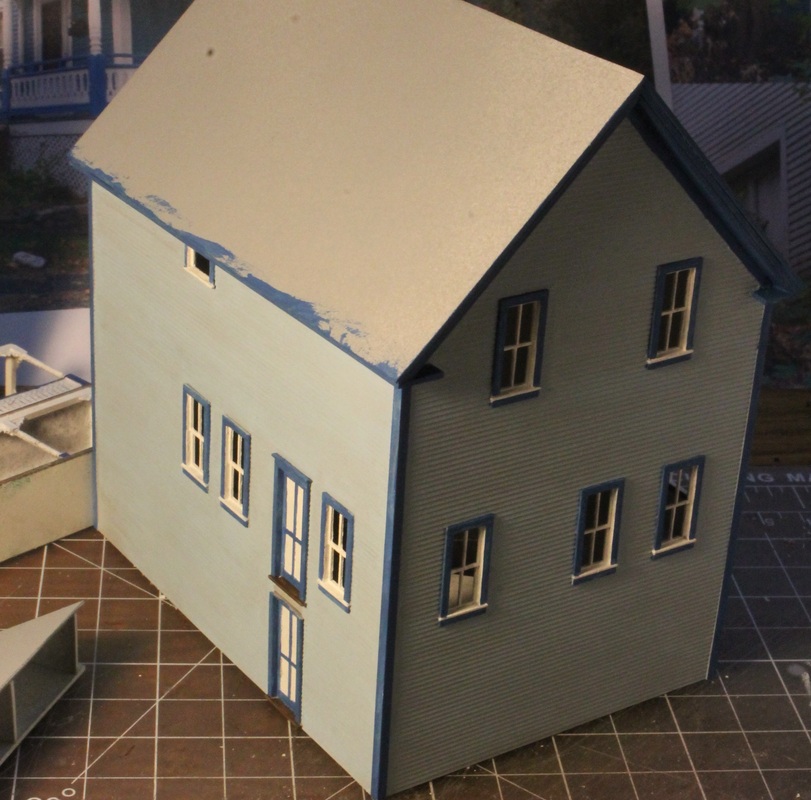
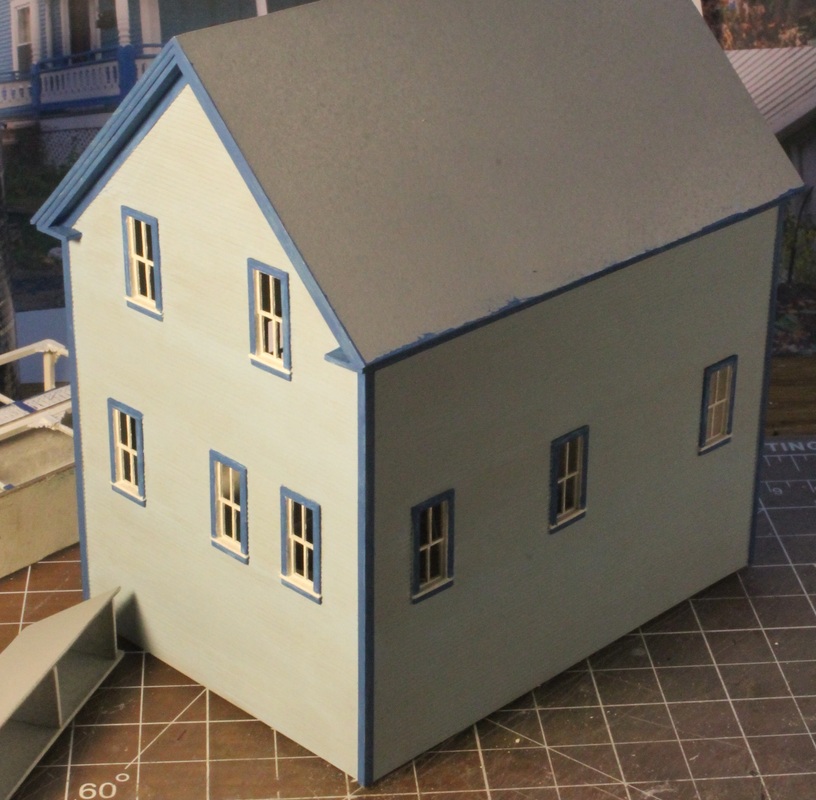
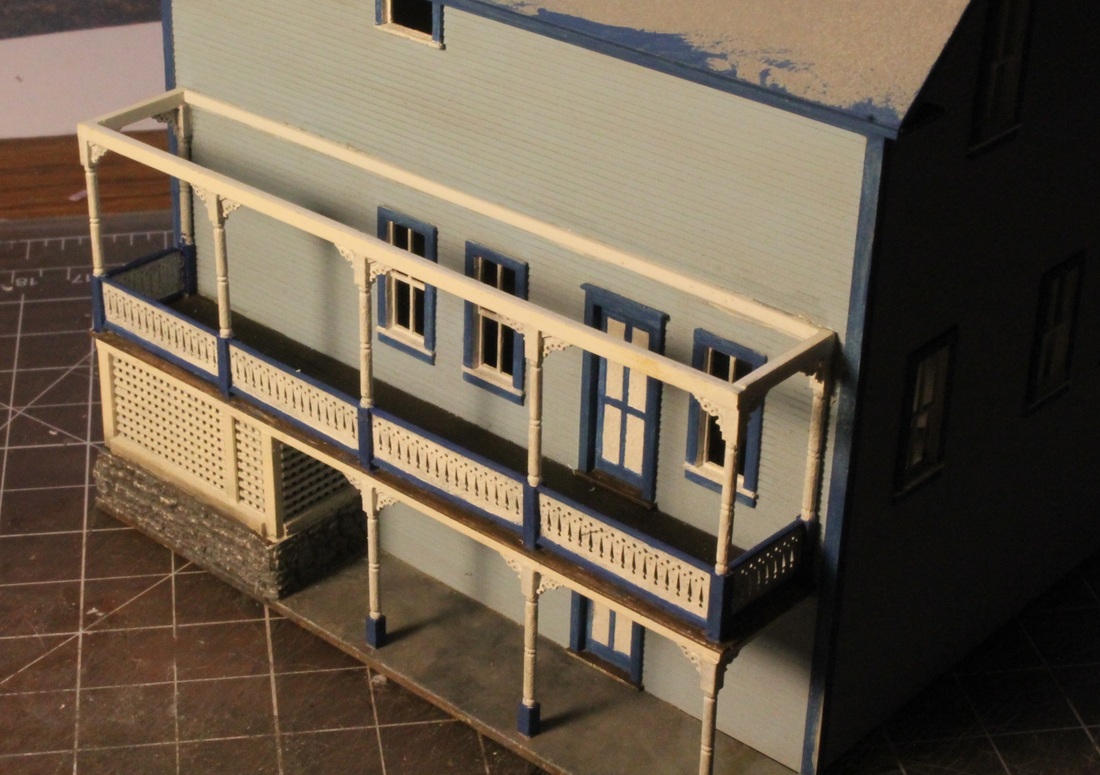
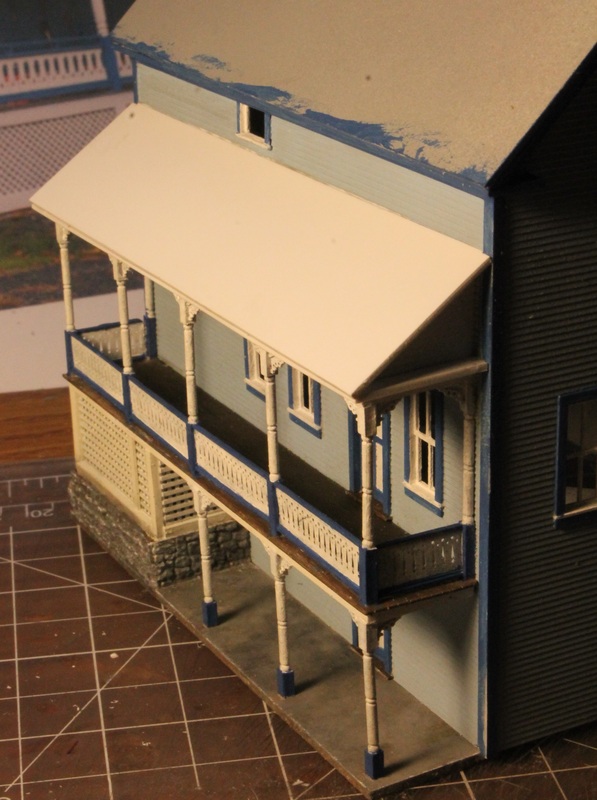
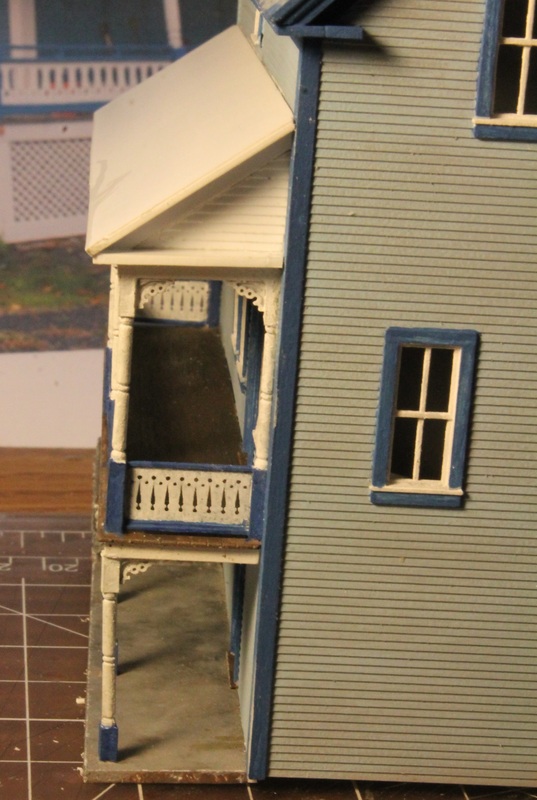
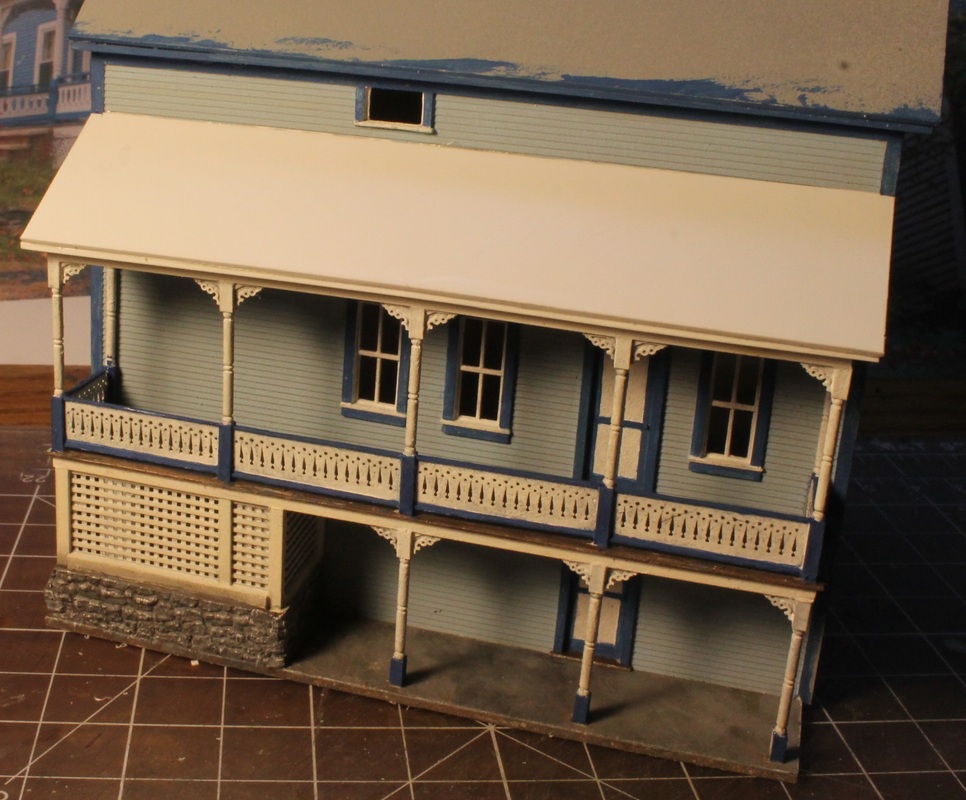
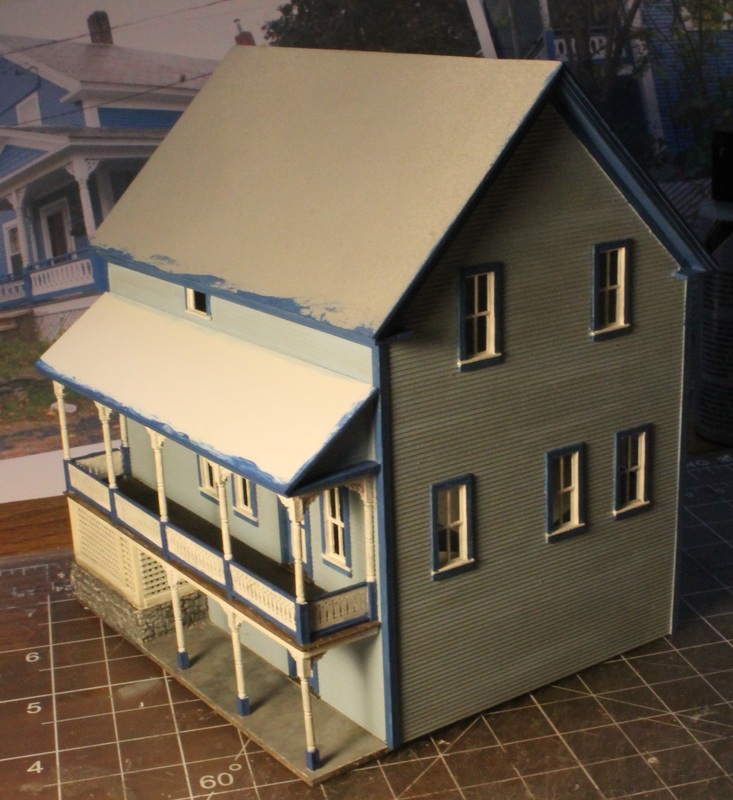
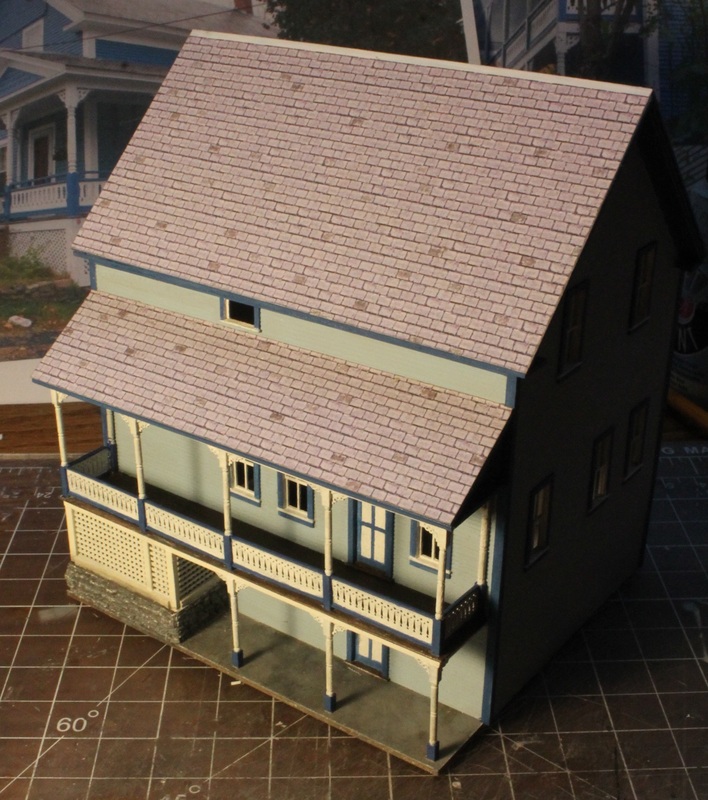
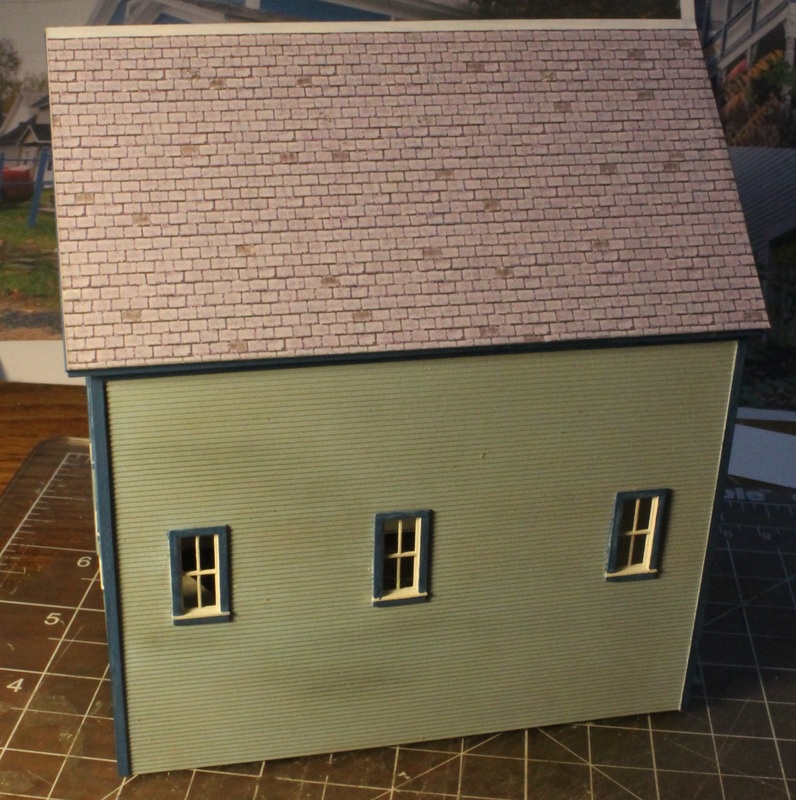
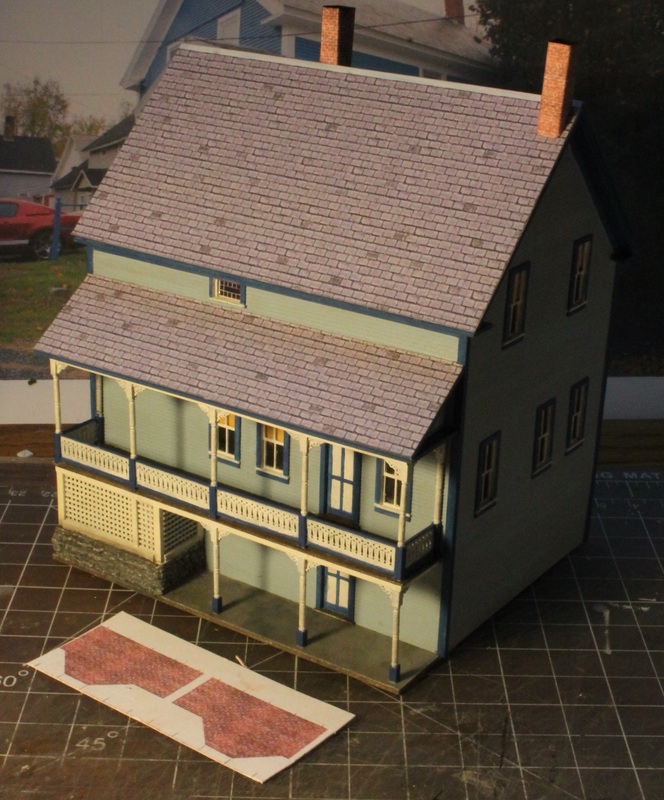
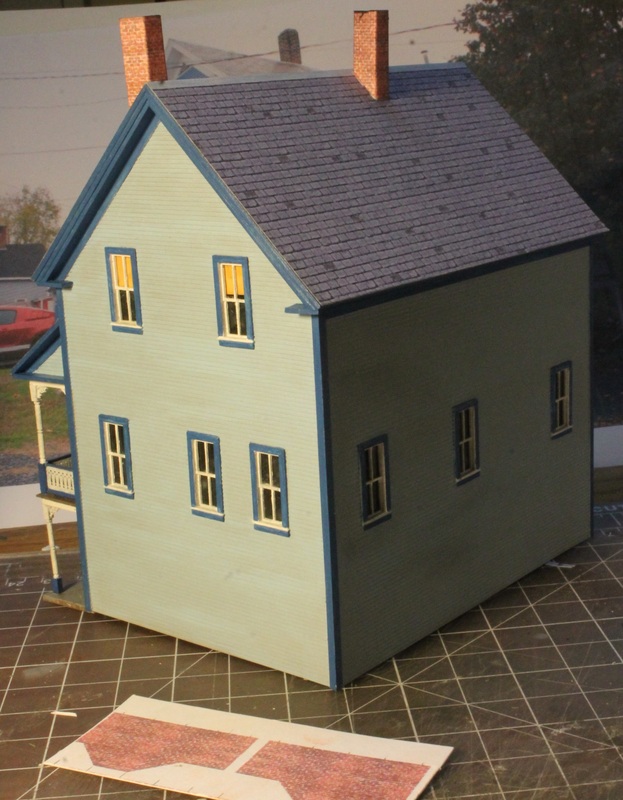
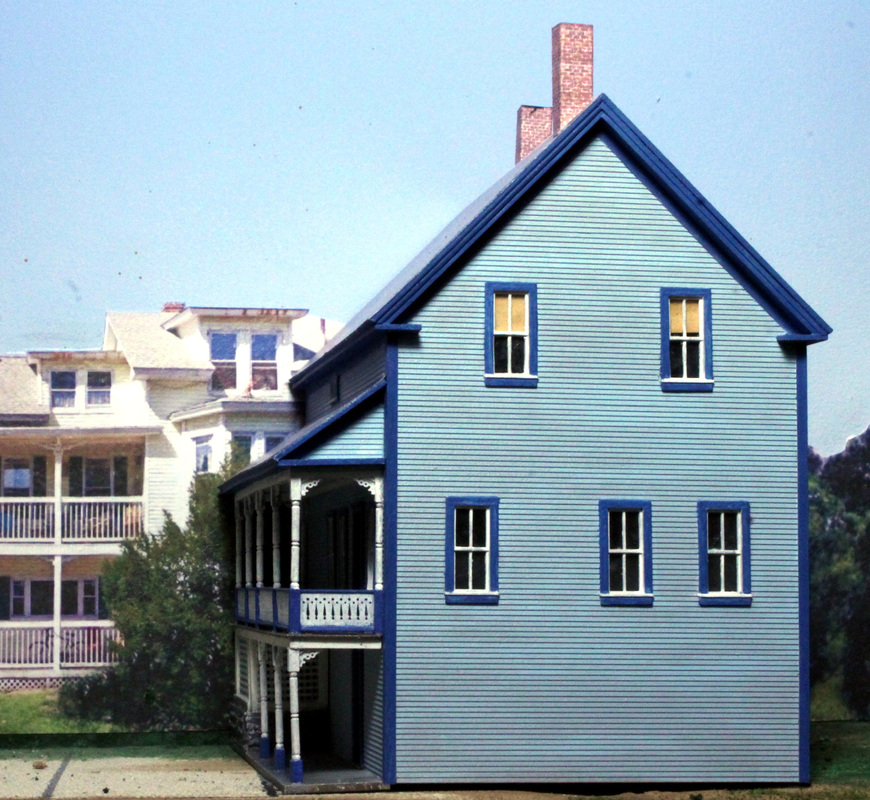
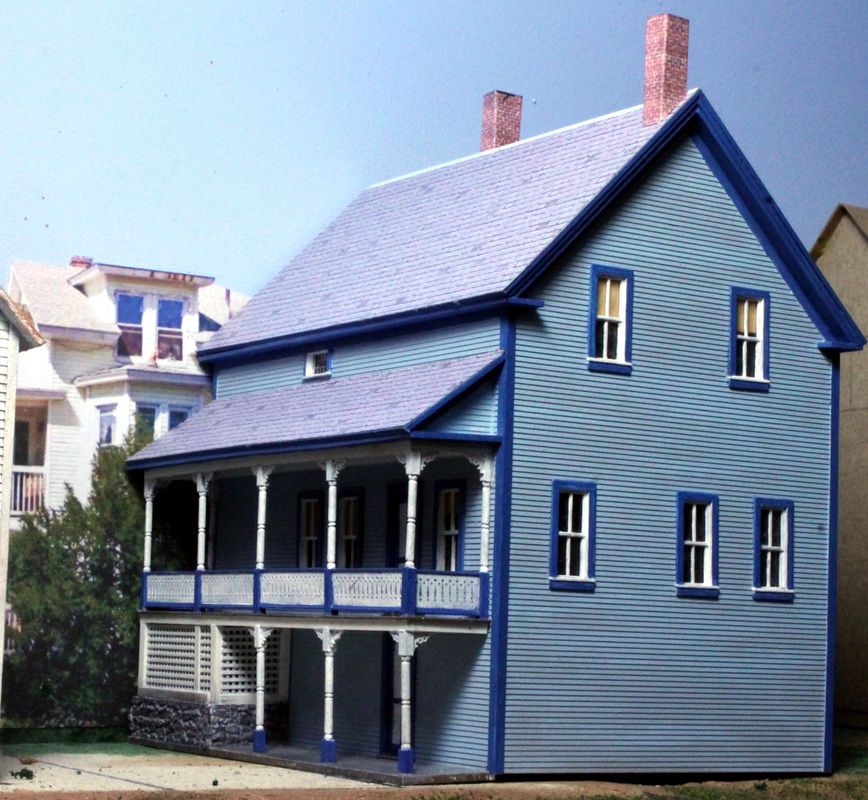
Balcony House
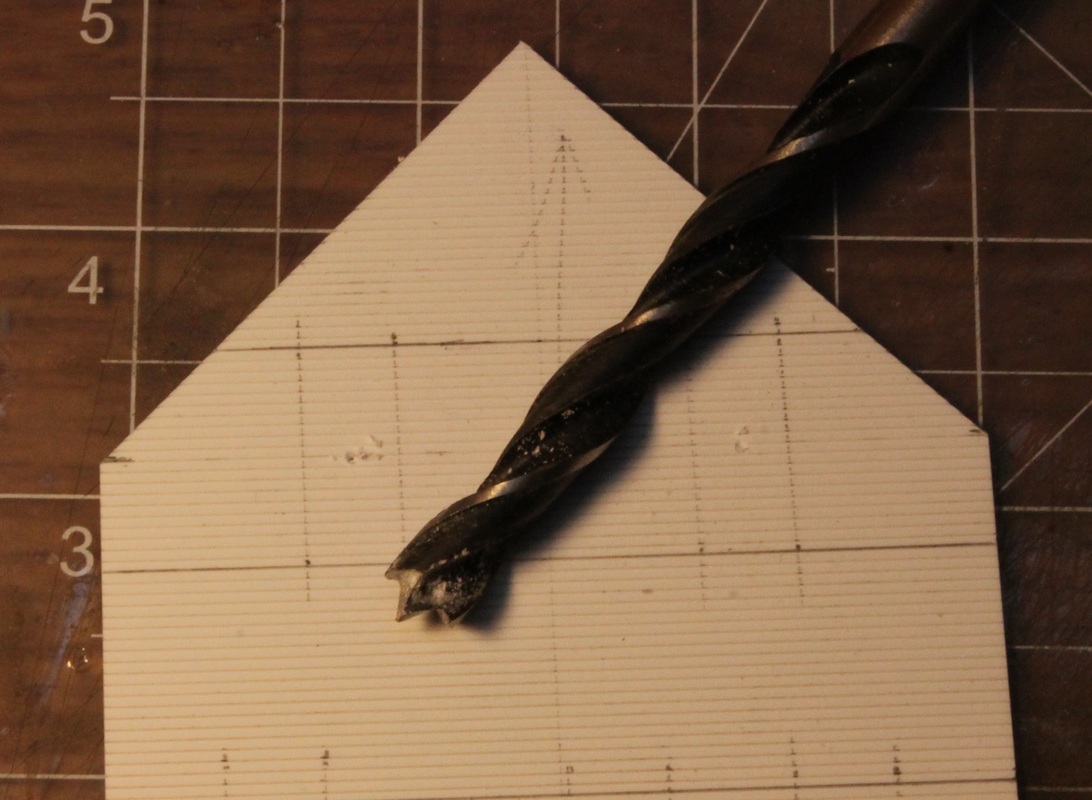
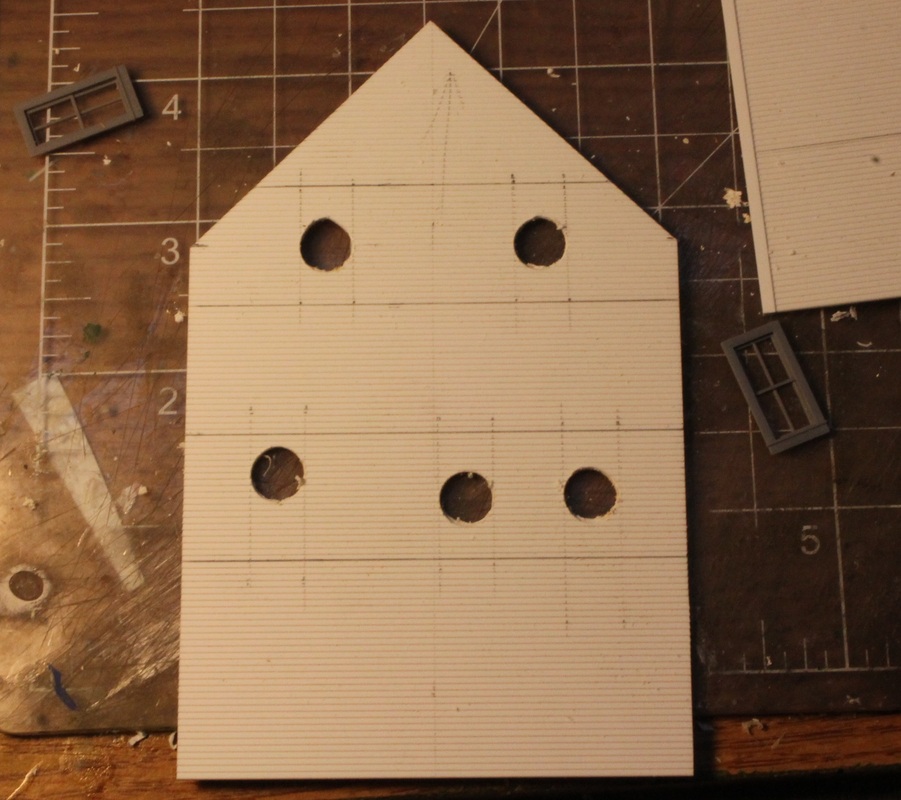
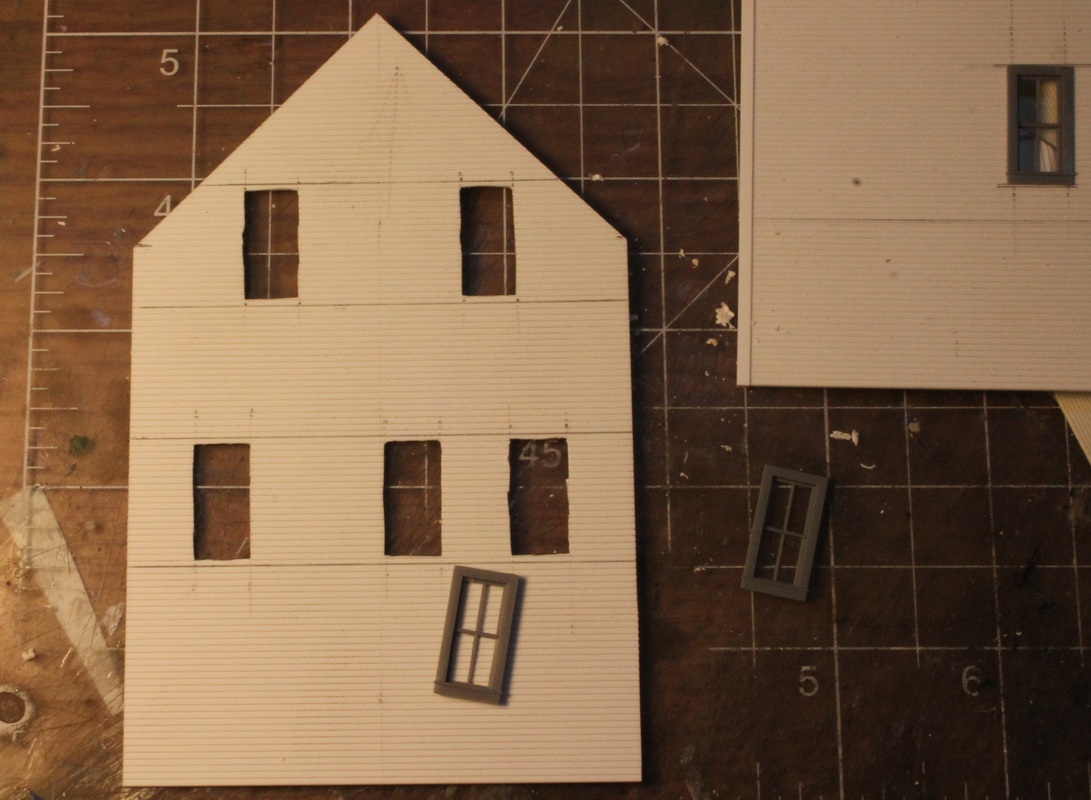
On the upper level, off Pleasant Street in Claremont, were a series of granite sheds and houses. Most of these buildings still exist today. They show up in many pictures and I thought it would be interesting to model them as completely as possible. One of the key houses was one I named "Balcony House" due to the Victorian detailed balcony that hung on one side. As usual, I couldn't find anything commercially available to use or kitbash so time for a little scratchbuilding...


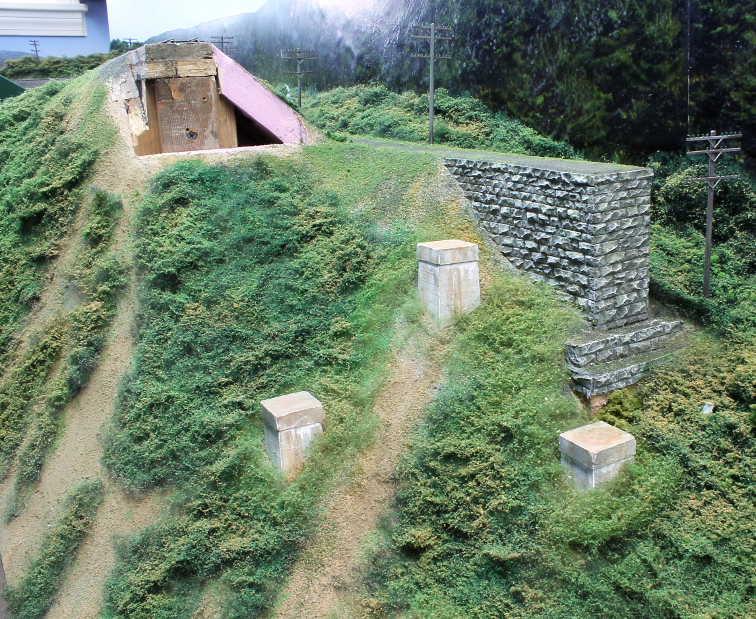
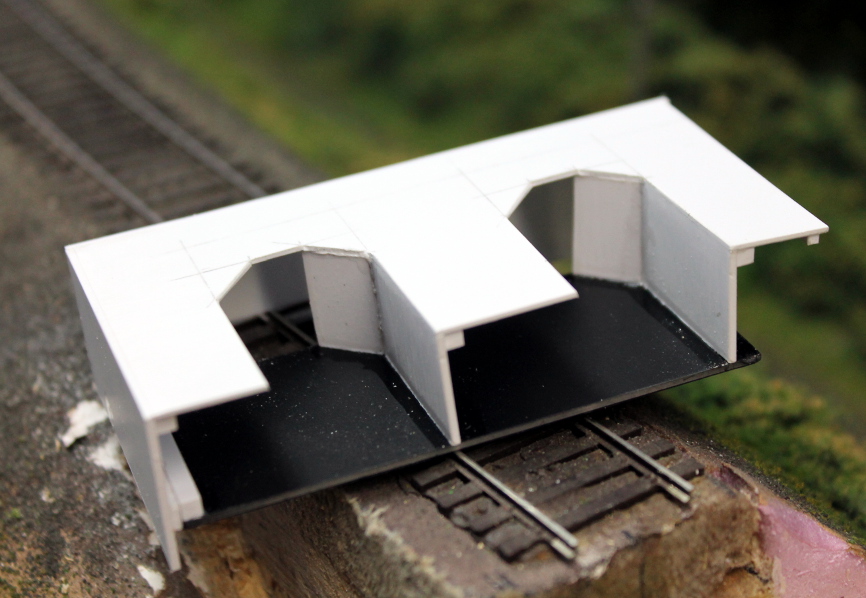
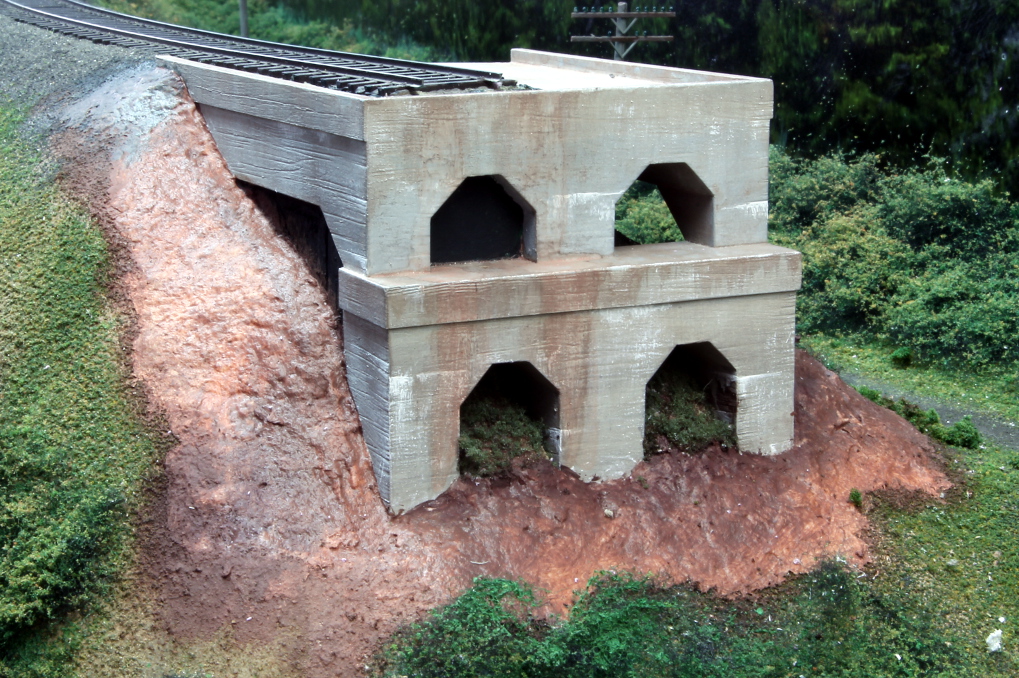
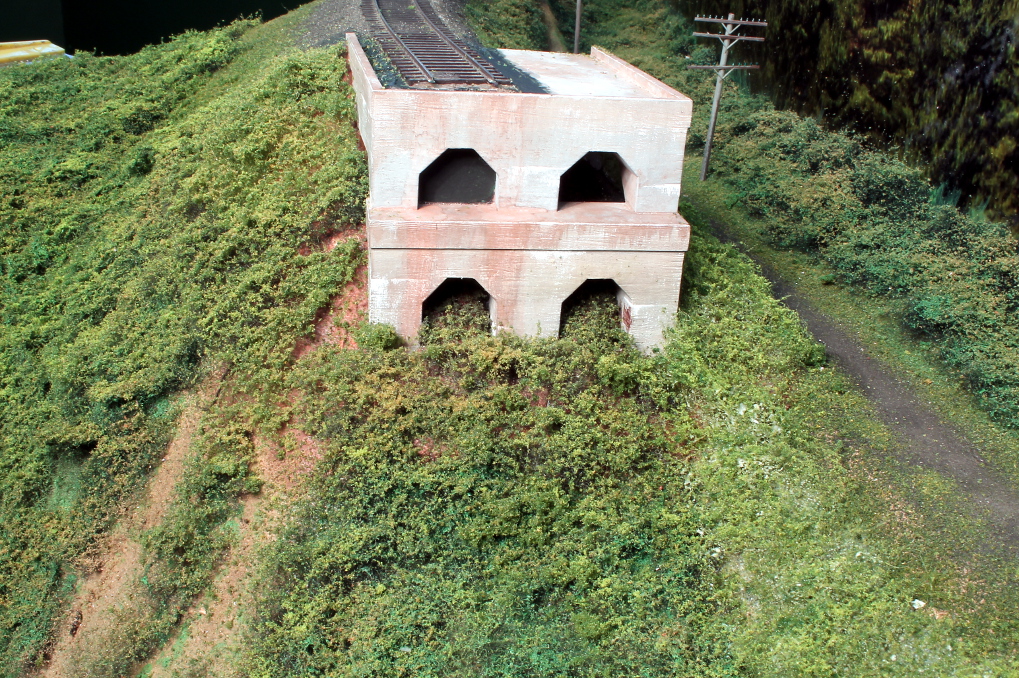
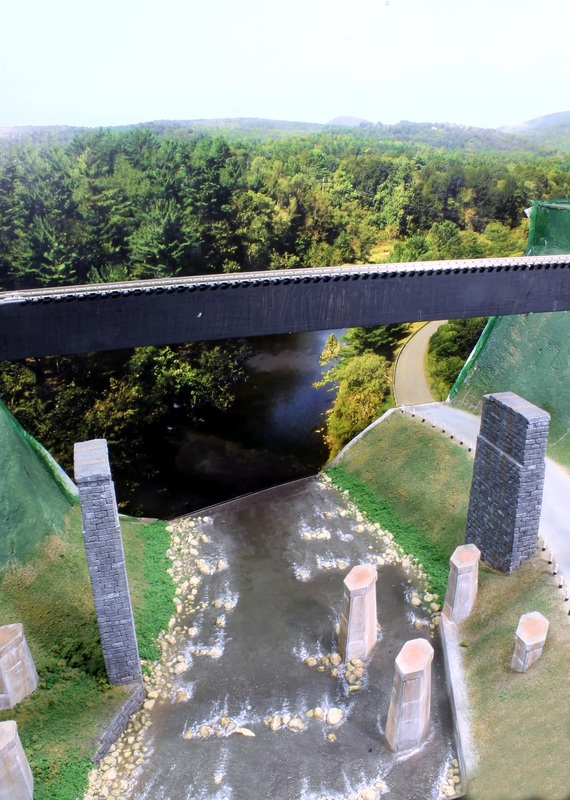
Claremont High Bridge Abutments
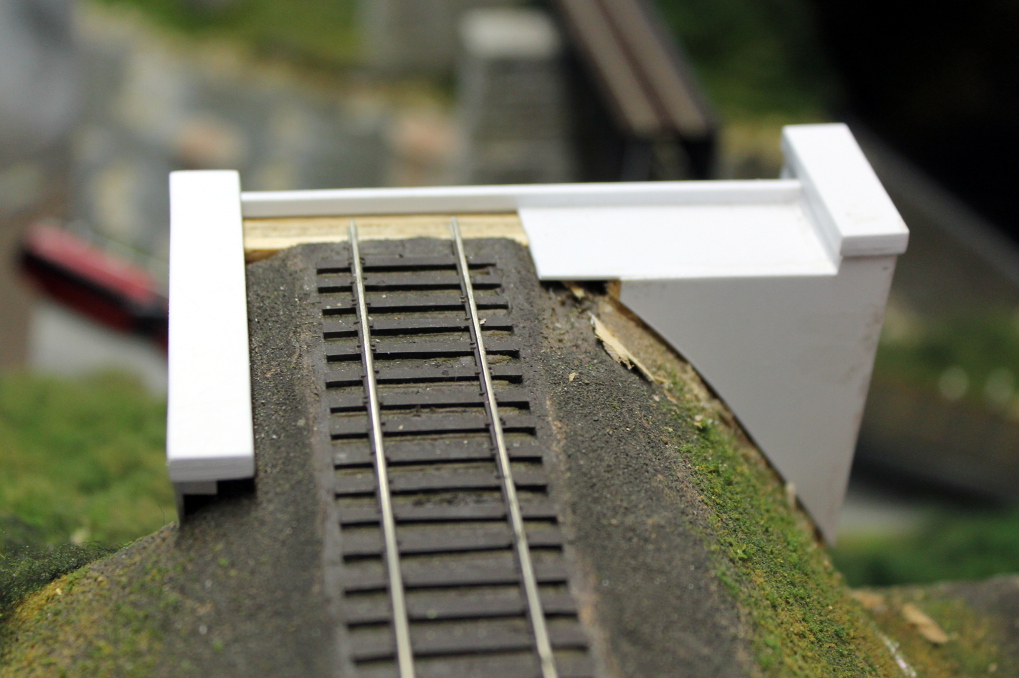
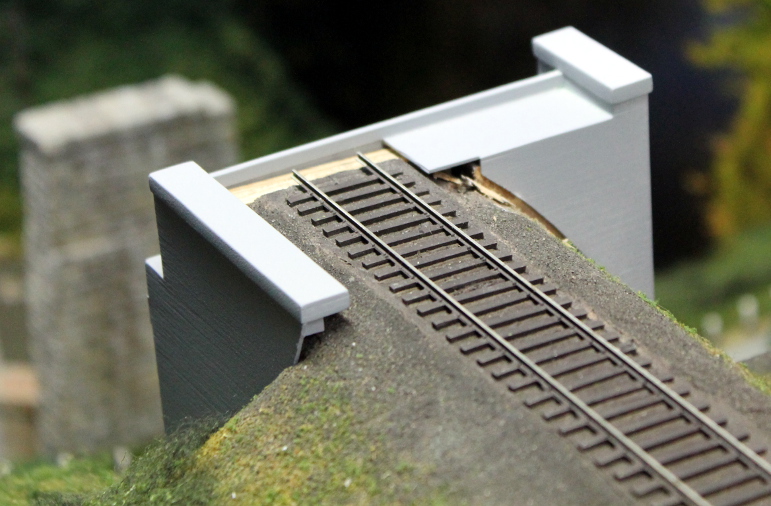
I removed the temporary 1x2 that served as the high bridge so I could start on the bridge abutments. Looks like no trains running through the area until I am done.
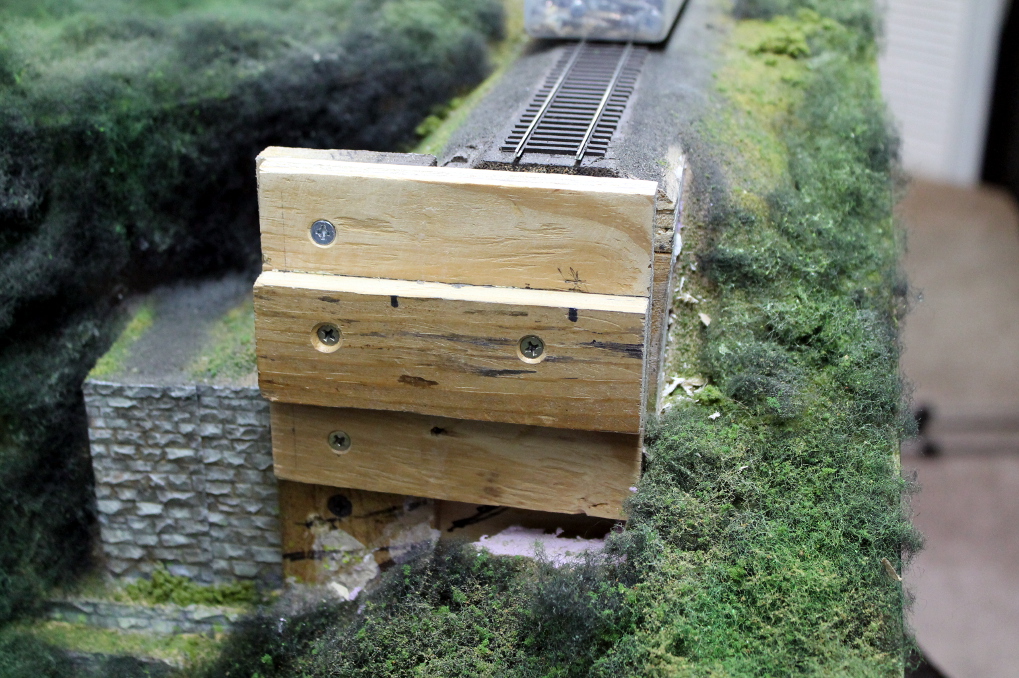
The abutments are set up to be 70 scale feet from the center of the nearest tower footings (a 70 foot girder will span the distance). A 3 scale foot ledge out from the abutments will support the bridge. So I broke out a 9" level and my scale rule and figured out where to locate the wood blocks that hold up the girder ends. Everything will be wrapped in .040" styrene so I allowed for that thickness in my measurements. Then the wood blocks were cut and screwed in place.
Adding the styrene wrappers involved measuring and cutting pieces to fit. Things were glued together in subassemblies when possible and I tried to add some extra bracing wherever I could. I kept moving back and forth from the workbench to the layout to make sure things fit properly.
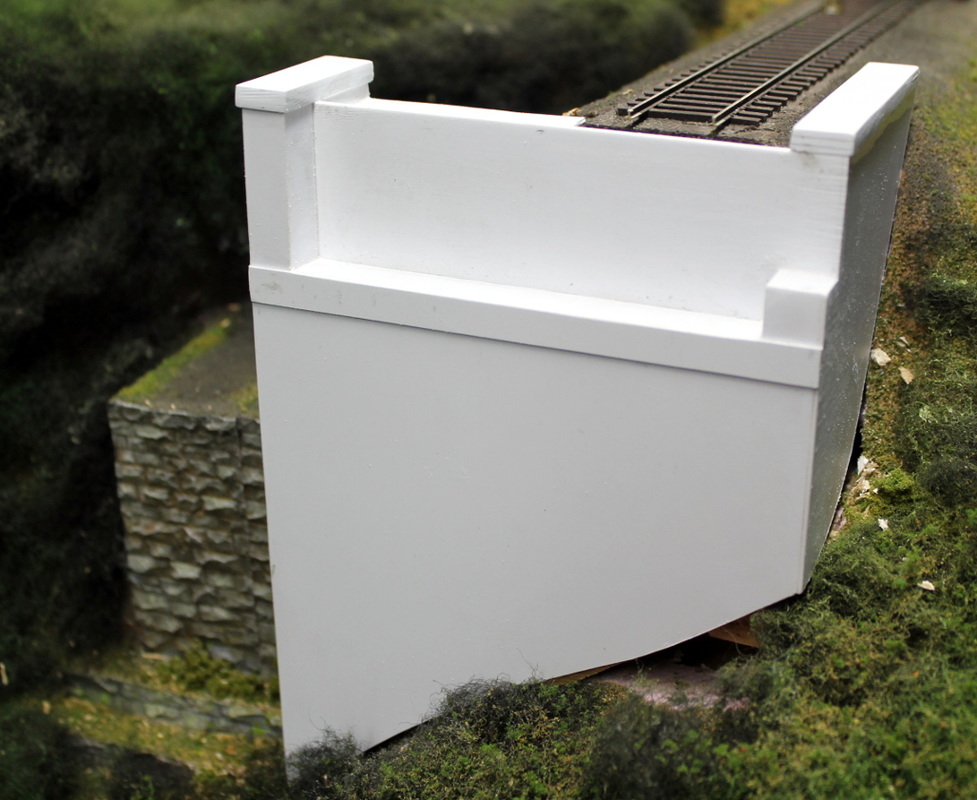
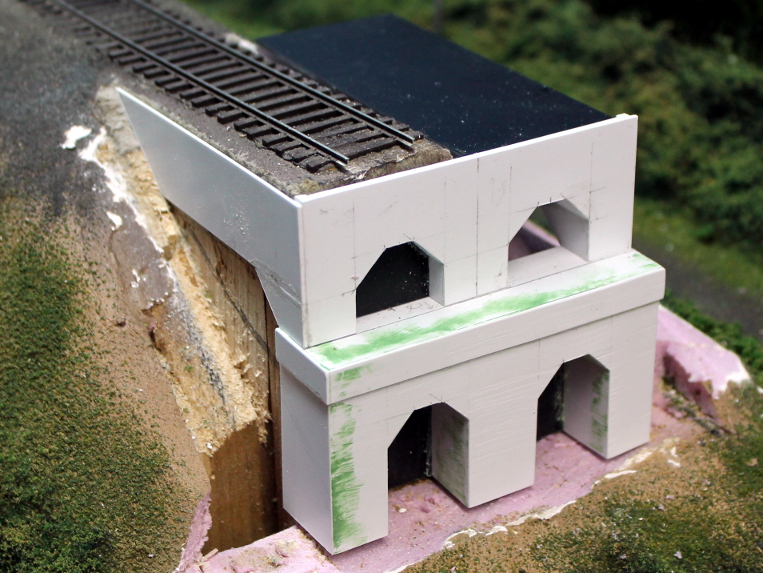
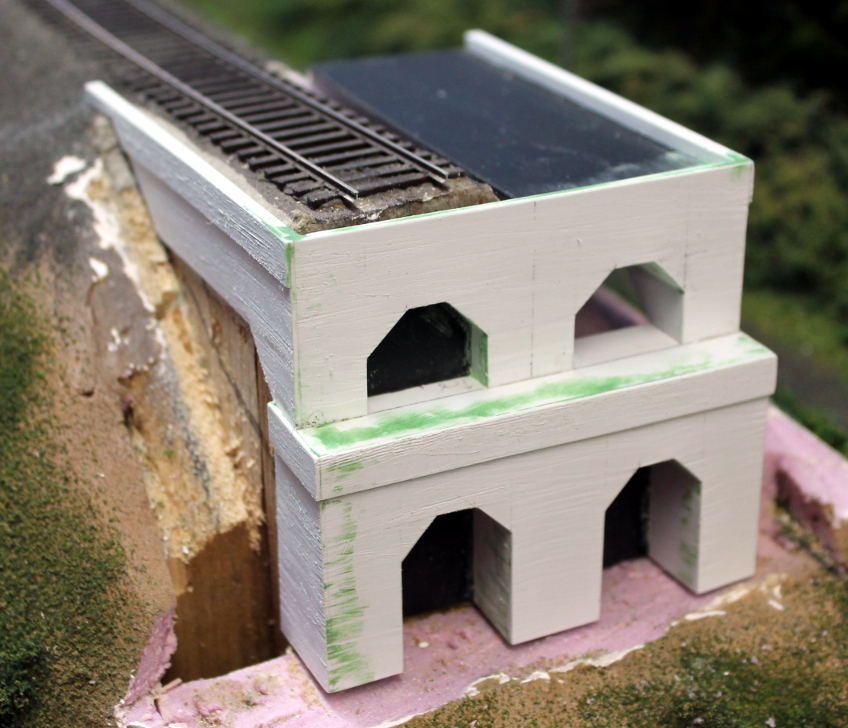
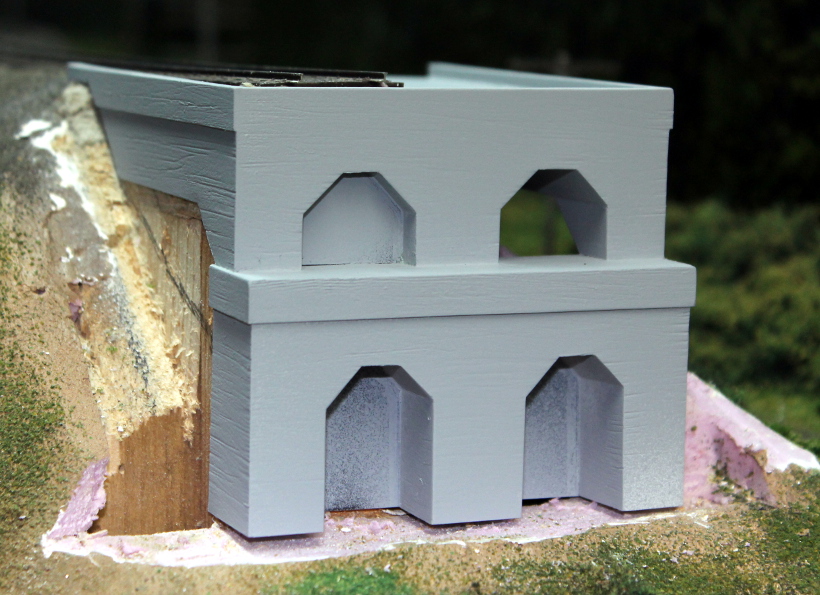
When everything fit I added some filler putty to the joints, let it harden and then sanded things smooth. I then took a razor saw and some files and dragged them horizontally across all the faces to simulate the impressions left in the cement by the wood forms.
At this point it was time to paint everything with some light gray primer and let it dry. Then various acrylic paints were brushed on the give an old cement look.
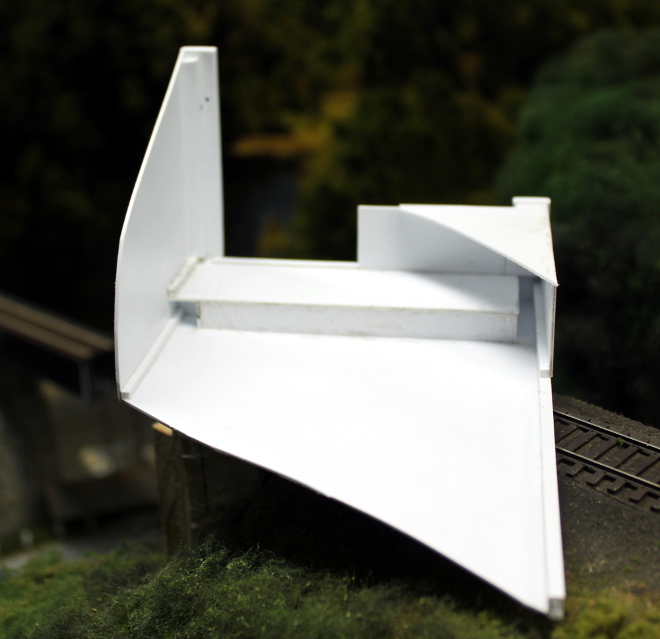
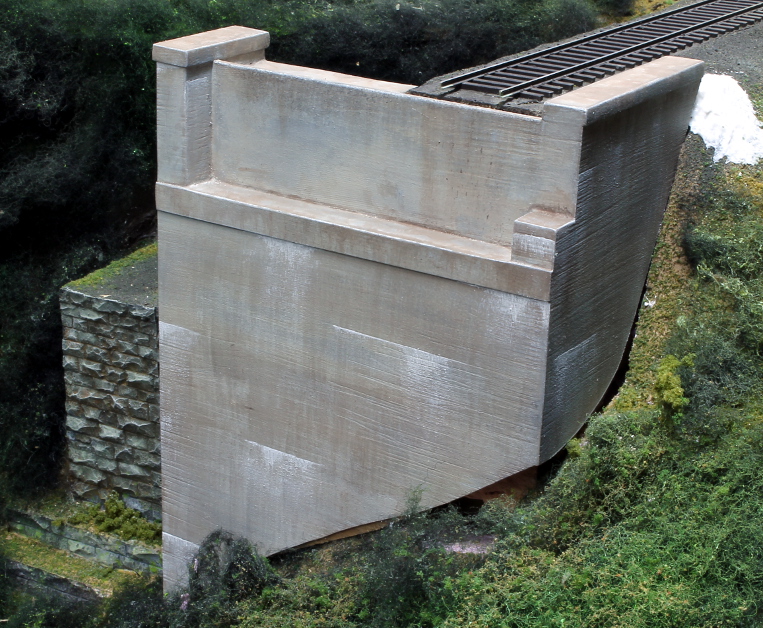
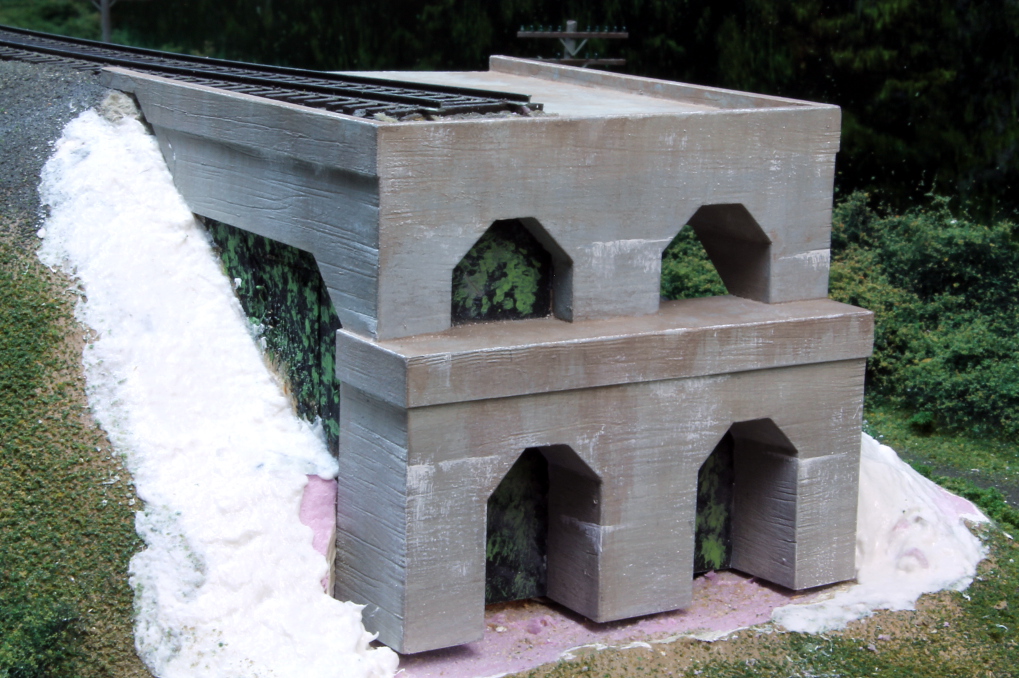
The abutments were then glued in place with some Liquid Nails and left to dry. To blend them into the existing scenery some foam blocks were glued in place and then covered with some Sculptamold.
The last step was to paint the dry Sculptamold with various browns and then the usual scenery treatments - poly fiber and a mix of ground foams.
The abutments are set up to be 70 scale feet from the center of the nearest tower footings (a 70 foot girder will span the distance). A 3 scale foot ledge out from the abutments will support the bridge. So I broke out a 9" level and my scale rule and figured out where to locate the wood blocks that hold up the girder ends. Everything will be wrapped in .040" styrene so I allowed for that thickness in my measurements. Then the wood blocks were cut and screwed in place.
Adding the styrene wrappers involved measuring and cutting pieces to fit. Things were glued together in subassemblies when possible and I tried to add some extra bracing wherever I could. I kept moving back and forth from the workbench to the layout to make sure things fit properly.
When everything fit I added some filler putty to the joints, let it harden and then sanded things smooth. I then took a razor saw and some files and dragged them horizontally across all the faces to simulate the impressions left in the cement by the wood forms.
At this point it was time to paint everything with some light gray primer and let it dry. Then various acrylic paints were brushed on the give an old cement look.
The abutments were then glued in place with some Liquid Nails and left to dry. To blend them into the existing scenery some foam blocks were glued in place and then covered with some Sculptamold.
The last step was to paint the dry Sculptamold with various browns and then the usual scenery treatments - poly fiber and a mix of ground foams.